02. Initial Installation
Introduction
Burn the NEQTO Engine to Spresense using your local PC.
Please refer to the Spresense system configuration and combine the Spresense hardware components beforehand.
The following describes the procedure when using the Spresense hardware configuration above.
Before burning the NEQTO Engine to Spresense, please check the following notes:
IMPORTANT
Once the NEQTO Engine has been burned to Spresense, it will no longer be possible to rewrite it with application software you develop using the Spresense SDK. Please note that it is not possible to return to the initial state when Spresense was purchased.
When burning the NEQTO Engine to Spresense, be careful not to turn off the power until the burn is complete. It will be the cause of the failure.
The burning tool executes a dedicated application (.exe) on your local PC. Please note that if the operation of the application is restricted due to the influence of the security function or security software of your PC, it may not operate normally.
This initial installation procedure can be applied as a local firmware upgrade procedure for Spresense that already has the NEQTO Engine installed.
It is also possible to change from Spresense Wi-Fi firmware to Spresense LTE-M firmware, and from Spresense LTE-M firmware to Spresense Wi-Fi firmware.
In that case, the parameters already set to Spresense are inherited and only the firmware is updated.
Downloads
NEQTO Engine burning tools
Burning tool for Spresense Wi-Fi (If using the Spresense Wi-Fi configuration):
- ImageBurnTool_neqtoSpresenseWiFi_Engine(v02.04.00) [2025/03/25] (Latest)
- ImageBurnTool_neqtoSpresenseWiFi_Engine(v02.03.00) [2025/01/29]
- ImageBurnTool_neqtoSpresenseWiFi_Engine(v02.02.01) [2024/03/28]
- ImageBurnTool_neqtoSpresenseWiFi_Engine(v02.02.00) [2024/01/30]
- ImageBurnTool_neqtoSpresenseWiFi_Engine(v02.01.00) [2023/09/28]
- ImageBurnTool_neqtoSpresenseWiFi_Engine(v02.00.01) [2022/06/28]
- ImageBurnTool_neqtoSpresenseWiFi_Engine(v02.00.00) [2022/06/02]
- ImageBurnTool_neqtoSpresenseWiFi_Engine(v01.03.02) [2021/08/24]
- ImageBurnTool_neqtoSpresenseWiFi_Engine(v01.03.01) [2021/07/06]
- ImageBurnTool_neqtoSpresenseWiFi_Engine(v01.03.00) [2021/05/18]
- ImageBurnTool_neqtoSpresenseWiFi_Engine(v01.02.00) [2021/01/18]
Burning tool for Spresense LTE-M (If using the Spresense LTE-M configuration):
- ImageBurnTool_neqtoSpresenseLteM_Engine(v02.04.00) [2025/03/25] (Latest)
- ImageBurnTool_neqtoSpresenseLteM_Engine(v02.03.00) [2025/01/29]
- ImageBurnTool_neqtoSpresenseLteM_Engine(v02.02.01) [2024/03/28]
- ImageBurnTool_neqtoSpresenseLteM_Engine(v02.02.00) [2024/01/30]
- ImageBurnTool_neqtoSpresenseLteM_Engine(v02.01.00) [2023/09/28]
- ImageBurnTool_neqtoSpresenseLteM_Engine(v02.00.01) [2022/06/28]
- ImageBurnTool_neqtoSpresenseLteM_Engine(v02.00.00) [2022/06/02]
- ImageBurnTool_neqtoSpresenseLteM_Engine(v01.03.02) [2021/08/24]
- ImageBurnTool_neqtoSpresenseLteM_Engine(v01.03.01) [2021/07/06]
- ImageBurnTool_neqtoSpresenseLteM_Engine(v01.03.00) [2021/05/18]
From Version 02.00.00, the LTE module firmware version (RK_02_01_02_10_108_54) is required. The LTE module firmware is automatically updated as needed by the burning tool for Spresense LTE-M or by FOTA execution. The LTE module firmware update requires at least 20 minutes when using the burning tool, and at least 30 minutes when using FOTA. (It is recommended to update using the burning tool)
Initial installation procedure [Windows 10]
Burn the NEQTO Engine to Spresense. Please follow the steps below.
Prepare the Windows 10 PC with TeraTerm (Terminal software) installed in advance.
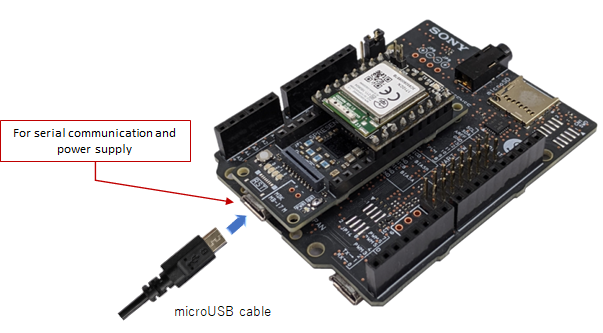
You must install the USB serial driver before connecting the Spresense board to your PC.
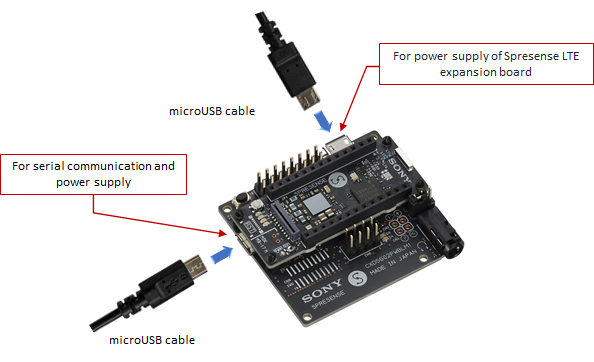
Please download and install the driver from the link below.Connect the Spresense main board and PC using a USB cable for communication.
If using the Spresense Wi-Fi configuration:
If using the Spresense LTE-M configuration:
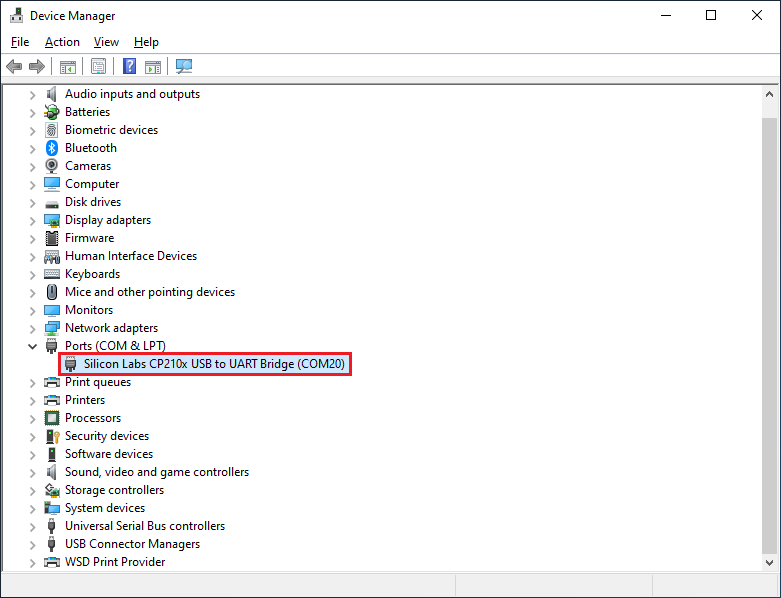
Open the device manager on your PC and check the COM port number to which Spresense is connected.
Please download the latest NEQTO Engine burning tool.
Unzip the burning tool (zip file) and move it under the ImageBurnTool folder.
Start burning the NEQTO Engine into Spresense.
Please execute the"ImageBurnTool_neqtoEngineToSpresense_windows.bat".
* Please execute after confirming IMPORTANT.

A command prompt will be launched. After that, follow the tool's instructions to continue.
Please read the important notes and enter
"agree"if you agree.
*** IMPORTANT ***
Once the NEQTO Engine has been burned to Spresense, it will no longer be possible to rewrite it with application software you develop using the Spresense SDK.
Please note that it is not possible to return to the initial state when Spresense was purchased.
If you agree and want to continue, please enter "agree" >> agree↵
Enter the COM port number to which Spresense is connected and press the Enter key to proceed.
============================================================
Step0: Settings
============================================================
Please enter the COM port number [ 1 ] : 20↵
When the
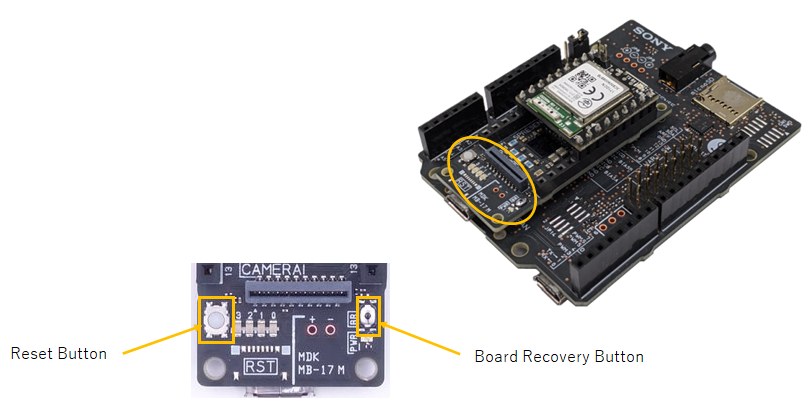
"Please press RESET button while holding down the Board Recovery button"message is displayed, hold down the board recovery button on the Spresense main board and short-press the reset button. When the display of...starts, release the board recovery button and wait. If the display of...does not start, release the board recovery button once, and then perform the button operation again. If that doesn't work, disconnect the USB and try again from step 3.
============================================================
Step1: Recovery
============================================================
Please press RESET button while holding down the Board Recovery button
The second
"Please press RESET button while holding down the Board Recovery button"message will be displayed. Similarly, perform the button operation to proceed.
============================================================
Step2: Configuration
============================================================
Please press RESET button while holding down the Board Recovery button
Please wait until the flash write is complete.
============================================================
Step3: Flash Write
============================================================
>>> Install files ...
install -b 115200
Install image¥gnssfw.espk
|0%-----------------------------50%------------------------------100%|
############################################
If a firmware update of the LTE module is required, the update will be initiated automatically. (Spresense LTE-M only)
The LTE module firmware update takes more than 20 minutes.
Do not turn off the power until completion.============================================================
Step4: LTE Modem Firmware Update
============================================================
Spresense LTE Firmware Update Tool for NEQTO Engine
ver.1.0 - RK_02_01_01_10_41_15-RK_02_01_02_10_108_54
Checking LTE modem firmware version.............
RK_02_01_02_10_108_54 - FW update is required
LTE modem update image is being downloaded.
It may take several minutes to complete the process.
|0%-----------------------------50%------------------------------100%|
###################################################
LTE modem firmware is being updated.
It may take several minutes to complete the process.
Please wait for a while and do not turn off the power.
|0%-----------------------------50%------------------------------100%|
###################################################
Success
Please wait until the final status
"Success"is displayed.
If the tool freezes in the middle of the process or"Failure"is displayed, please try again from step 7.
============================================================
Finish
============================================================
Success
When the tool has reached the end, burning is complete. Enter the enter key to exit the command prompt.
============================================================
Image Burn Tool 1.1 >> NEQTO Engine to Spresense
============================================================
*** IMPORTANT ***
Once the NEQTO Engine has been burned to Spresense, it will no longer be possible to rewrite it with application software you develop using the Spresense SDK.
Please note that it is not possible to return to the initial state when Spresense was purchased.
If you agree and want to continue, please enter "agree" >> agree↵
============================================================
Step0: Settings
============================================================
Please enter the COM port number [ 1 ] : 20↵
COM20
============================================================
Step1: Recovery
============================================================
Please press RESET button while holding down the Board Recovery button
..............................................................................................................................................................................................................................................................................................................................................................................................................................................................................................................................................................................................................................................................................................................................................................................................................................................................................Recovery Successful!
============================================================
Step2: Configuration
============================================================
Please press RESET button while holding down the Board Recovery button
....................................................Changed to encryption board!
============================================================
Step3: Flash Write
============================================================
>>> Install files ...
install -b 115200
Install image¥gnssfw.espk
|0%-----------------------------50%------------------------------100%|
###################################################
XXXXXX bytes loaded.
Package validation is OK.
Saving package to "gnssfw"
updater$ install -b 115200
Install image¥loader.espk
|0%-----------------------------50%------------------------------100%|
###################################################
XXXXXX bytes loaded.
Package validation is OK.
Saving package to "loader"
updater$ install -b 115200
Install image¥nuttx.espk
|0%-----------------------------50%------------------------------100%|
###################################################
XXXXXX bytes loaded.
Package validation is OK.
Saving package to "nuttx"
updater$ sync
updater$ Restarting the board ...
reboot
============================================================
Finish
============================================================
Success