Tutorial Step 3. Application development using scripts
Overview
Tutorial Step 3. describes the process for updating the script while developing the application.
Before starting this tutorial, make sure to have progressed through Tutorial Step 2.3 Launch the NEQTO service.
» Tutorial Step 2.3 Device Settings & Launching Service (NEQTO Bridge)➔
» Tutorial Step 2.3 Device Settings & Launching Service (STM32 Discovery)➔
» Tutorial Step 2.3 Device Settings & Launching Service (SPRESENSE)➔
1. Updating the Script
Related resources: About Script Management
Navigate to the Script created in Tutorial Step 1.4 Register Script
- In the Script editor, add the following after line 15:
print(Array(loopcnt+2).join('#')); //Inserted code - Click Save to update the Script
Updated Script
//==============================================================
//  Sample scenario
//==============================================================
//  Output "Hello World" to the log
//==============================================================
log.setLevel(0,2); //-1:NONE 0:ERROR 1:WARNING 2:DEBUG 3:TRACE, 0:DISABLE 1:LOG 2:CONSOLE 3:BOTH
log.printLevel(2); //0:DISABLE 1:LOG 2:CONSOLE 3:BOTH

var timerInterval = 1000; //ms
var maxNumOfTimes = 60;

var loopcnt = 0;
var to = setInterval(function() {
    var date = new Date();
    print(date.toString() + '+' +  date.getMilliseconds() + 'ms : Hello World!!! ' + loopcnt);
    print(Array(loopcnt+2).join('#')); //Inserted code
    if(++loopcnt >= maxNumOfTimes) {
        print('finished');
        clearInterval(to);
    }
}, timerInterval);
2. Reloading Script
Related resources: About Node Commands
While the device is connected to the NEQTO service, navigate to the Nodes tab using the Group navigation menu.
- Select the Node registered in Tutorial Step 1.6 Register Node
- Click the " Reload Script" command

3. Executing new Script
Related resources: About Script Reload (NEQTO Bridge/STM32 Discovery/SPRESENSE)
When the device receives the reload command from the NEQTO Console, the device will terminate the script once and download and execute the updated script.
|
Thu Apr 08 2021 02:32:02 GMT+00:00+766ms : Hello World!!! 57 Thu Apr 08 2021 02:32:03 GMT+00:00+766ms : Hello World!!! 58 Thu Apr 08 2021 02:32:04 GMT+00:00+766ms : Hello World!!! 59 finished [system][info]Checking Script... [system][info]Script Updated Thu Apr 08 2021 02:34:04 GMT+00:00+766ms : Hello World!!! 0 # Thu Apr 08 2021 02:34:04 GMT+00:00+766ms : Hello World!!! 1 ## Thu Apr 08 2021 02:34:04 GMT+00:00+766ms : Hello World!!! 2 ### |
Conclusion
This concludes the tutorial, NEQTO Hello World!
Provided through neqto.js are a variety of functions which are essential for developing IoT products, including direct control of the module's hardware interfaces such as UART, SPI, I2C, and GPIO, as well as cloud-to-cloud communication, storage, and power-saving management features. Take advantage of NEQTO to complete your IoT solution.
Various introductory samples are provided in "Advanced Tutorials". They are available as reference for development.
Advanced Tutorials
The code used in the Advanced Tutorials is for proof-of-concept and general guidance, and is not intended for direct use in a production environment.
1. Send dummy data to NEQTO Console
Related resources:
- About Components
- Viewing data from NEQTO Console
- About nqMQTT data formats (
NEQTO Bridge/STM32 Discovery/SPRESENSE)
1. Register new Script
From the Scripts page, add a new Script.
- Click "Add Script"
- Input the required fields
- Click Save
Insert the sample code provided below to the editor and click Save.
//==============================================================
//  Sample scenario
//==============================================================
//  Send dummy data to NEQTO Console
//==============================================================
log.setLevel(0,2); //-1:NONE 0:ERROR 1:WARNING 2:DEBUG 3:TRACE, 0:DISABLE 1:LOG 2:CONSOLE 3:BOTH
log.printLevel(2); //0:DISABLE 1:LOG 2:CONSOLE 3:BOTH

var timerInterval = 1000; //ms
var maxNumOfTimes = 60;

var to = setInterval(function() { publishFlag = 1; }, timerInterval);

//==============================================================
//  Main Loop
//==============================================================
var actFlag = 1;
var publishFlag = 0;
var loopcnt = 0;
while(actFlag) {
    if(publishFlag) {
        if(nqMqtt.canPublish()) {
            var valT = 20.2; /* dummy Temperature */
            valT += Math.pow(2, loopcnt*0.04) - 1;
            var strT = String(valT);
            var tempObj = nqMqtt.get('LwM2MObject', Date.now(), 3303, 0, 5700, 'Float', strT);
            nqMqtt.publish(null,tempObj,function(err) {
                if(err.code == 0) {
                    print('publish successful');
                } else {
                    print('publish failure');
                }
                if(++loopcnt >= maxNumOfTimes) {
                    print('finished');
                    clearInterval(to);
                    actFlag = 0;
                }
            });
        }
        publishFlag = 0;
    }
}
2. Register new Template
From the Templates page, add a new Template.
- Click "Add Template"
- Input the required fields
- For Script, select the newly registered Script
- Click Save
3. Register Component
Select the newly created Template and scroll to Components.
- Click "Add Component"
- Enter the Name
Temperature - For Object, select
Temperature - For Resource, select
Sensor Value - For Instance, enter
0 - Click Save to register the Component
4. Update Node
From the Nodes page, select the previously created Node.
Edit the Node configuration by clicking the gear icon.
- Replace the Template with the newly created Template
- Click Save
- Reload the page to view the updated Node
5. View Graph
From the Node page, scroll to Components.
- Click the
Chartbutton for theTemperatureComponent - Select "View Detailed Chart"
From the Chart view, toggle "LIVE" mode.
6. Execute Script
Click the " Reload Script" button to execute the command.
The device will then update and execute the script.

2. Controlling an LED
SPRESENSE
Related resources:
- SPRESENSE Pinout
- Related neqto.js objects: Timers, GPIO, nqMqtt
Wiring diagrams
 |
Spresense Wi-Fi | 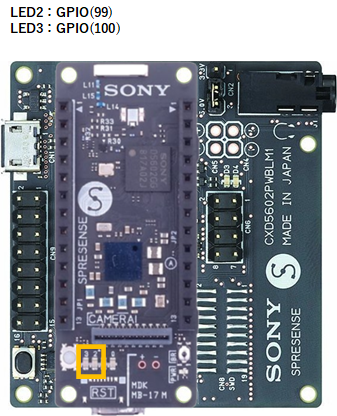 |
Spresense LTE-M |
Example 1
Turning LEDs ON/OFF in 1 second cycles.
//==============================================================
//  Sample scenario
//==============================================================
//  Turn the LED on and off with a timer.
//==============================================================
log.setLevel(0,2); //-1:NONE 0:ERROR 1:WARNING 2:DEBUG 3:TRACE, 0:DISABLE 1:LOG 2:CONSOLE 3:BOTH
log.printLevel(2); //0:DISABLE 1:LOG 2:CONSOLE 3:BOTH

var gpioLED2 = new GPIO(99,5);  //OUT:PUSH-PULL
var gpioLED3 = new GPIO(100,5); //OUT:PUSH-PULL
gpioLED2.setValue(0);
gpioLED3.setValue(0);

var timerInterval = 1000; //ms
var maxNumOfTimes = 30;

var loopcnt = 0;
var to = setInterval(function() {
    var date = new Date();
    if(++loopcnt >= maxNumOfTimes) {
        print(date + '+' +  date.getMilliseconds() + 'ms : finished');
        clearInterval(to);
        gpioLED2.setValue(0);
        gpioLED3.setValue(0);
    } else {
        print(date + '+' +  date.getMilliseconds() + 'ms : ' + (maxNumOfTimes - loopcnt));
        gpioLED2.setValue(loopcnt & 1);
        gpioLED3.setValue((loopcnt + 1) & 1);
    }
}, timerInterval);
Example 2
Sending custom messages to turn the LEDs ON/OFF.
//==============================================================
//  Sample scenario
//==============================================================
//  Turn the LED on and off with a custom message.
//==============================================================
log.setLevel(0,2); //-1:NONE 0:ERROR 1:WARNING 2:DEBUG 3:TRACE, 0:DISABLE 1:LOG 2:CONSOLE 3:BOTH
log.printLevel(2); //0:DISABLE 1:LOG 2:CONSOLE 3:BOTH

var gpioLED2 = new GPIO(99,5);  //OUT:PUSH-PULL
var gpioLED3 = new GPIO(100,5); //OUT:PUSH-PULL
gpioLED2.setValue(0);
gpioLED3.setValue(0);

//neqto MQTT event handler
nqMqtt.on('push', function(message) {
    print(Date() + ': nqmqtt push ' + message);
    if(message == 'exit') {
        actflag = 0;
    } else if(message == "led2 on") {
        gpioLED2.setValue(1);
    } else if(message == "led2 off") {
        gpioLED2.setValue(0);
    } else if(message == "led3 on") {
        gpioLED3.setValue(1);
    } else if(message == "led3 off") {
        gpioLED3.setValue(0);
    }
});
nqMqtt.on('error', function(error) {
    print(Date() + ': nqmqtt error ' + error.code);
});
nqMqtt.on('connect', function(connack) {
    print(Date() + ': nqmqtt connect');
});
nqMqtt.on('close', function() {
    print(Date() + ': nqmqtt close');
});

//==============================================================
//  Main Loop
//==============================================================
var actflag = 1;
print(Date() + ': Ready');
while(actflag) {
}

//Termination processing
gpioLED2.setValue(0);
gpioLED3.setValue(0);
throw '#nqEXIT';
The following commands may be executed by Custom Message:
| Custom Message | Details |
|---|---|
led2 on | Turn on led2 |
led2 off | Turn off led2 |
led3 on | Turn on led3 |
led3 off | Turn off led3 |
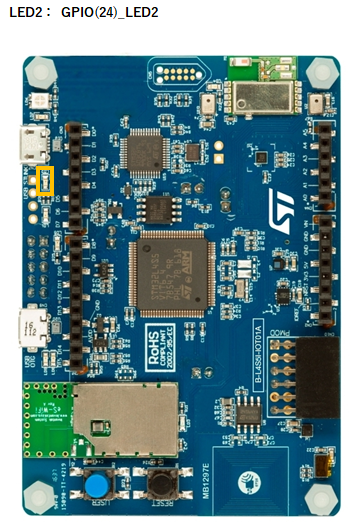
STM32 Discovery
Related resources:
- STM32 Discovery Kit (B-L4S5I-IOT01A) Pinout
- Related neqto.js objects: Timers, GPIO, nqMqtt
Wiring diagrams
STM32 Discovery Kit (B-L4S5I-IOT01A)
Example 1
Turning an LED ON/OFF in 1 second cycles.
//==============================================================
//  Sample scenario
//==============================================================
//  Turn the LED on and off with a timer.
//==============================================================
log.setLevel(0,2); //-1:NONE 0:ERROR 1:WARNING 2:DEBUG 3:TRACE, 0:DISABLE 1:LOG 2:CONSOLE 3:BOTH
log.printLevel(2); //0:DISABLE 1:LOG 2:CONSOLE 3:BOTH

var gpioLED2 = new GPIO(24,5);  //OUT:PUSH-PULL
gpioLED2.setValue(0);

var timerInterval = 1000; //ms
var maxNumOfTimes = 30;

var loopcnt = 0;
var to = setInterval(function() {
    var date = new Date();
    if(++loopcnt >= maxNumOfTimes) {
        print(date + '+' +  date.getMilliseconds() + 'ms : finished');
        clearInterval(to);
        gpioLED2.setValue(0);
    } else {
        print(date + '+' +  date.getMilliseconds() + 'ms : ' + (maxNumOfTimes - loopcnt));
        gpioLED2.setValue(loopcnt & 1);
    }
}, timerInterval);
Example 2
Sending custom messages to turn the LED ON/OFF.
//==============================================================
//  Sample scenario
//==============================================================
//  Turn the LED on and off with a custom message.
//==============================================================
log.setLevel(0,2); //-1:NONE 0:ERROR 1:WARNING 2:DEBUG 3:TRACE, 0:DISABLE 1:LOG 2:CONSOLE 3:BOTH
log.printLevel(2); //0:DISABLE 1:LOG 2:CONSOLE 3:BOTH

var gpioLED2 = new GPIO(24,5);  //OUT:PUSH-PULL
gpioLED2.setValue(0);

//neqto MQTT event handler
nqMqtt.on('push', function(message) {
    print(Date() + ': nqmqtt push ' + message);
    if(message == 'exit') {
        actflag = 0;
    } else if(message == "led2 on") {
        gpioLED2.setValue(1);
    } else if(message == "led2 off") {
        gpioLED2.setValue(0);
    }
});
nqMqtt.on('error', function(error) {
    print(Date() + ': nqmqtt error ' + error.code);
});
nqMqtt.on('connect', function(connack) {
    print(Date() + ': nqmqtt connect');
});
nqMqtt.on('close', function() {
    print(Date() + ': nqmqtt close');
});

//==============================================================
//  Main Loop
//==============================================================
var actflag = 1;
print(Date() + ': Ready');
while(actflag) {
}

//Termination processing
gpioLED2.setValue(0);
gpioLED3.setValue(0);
throw '#nqEXIT';
The following commands may be executed by Custom Message:
| Custom Message | Details |
|---|---|
led2 on | Turn on led2 |
led2 off | Turn off led2 |
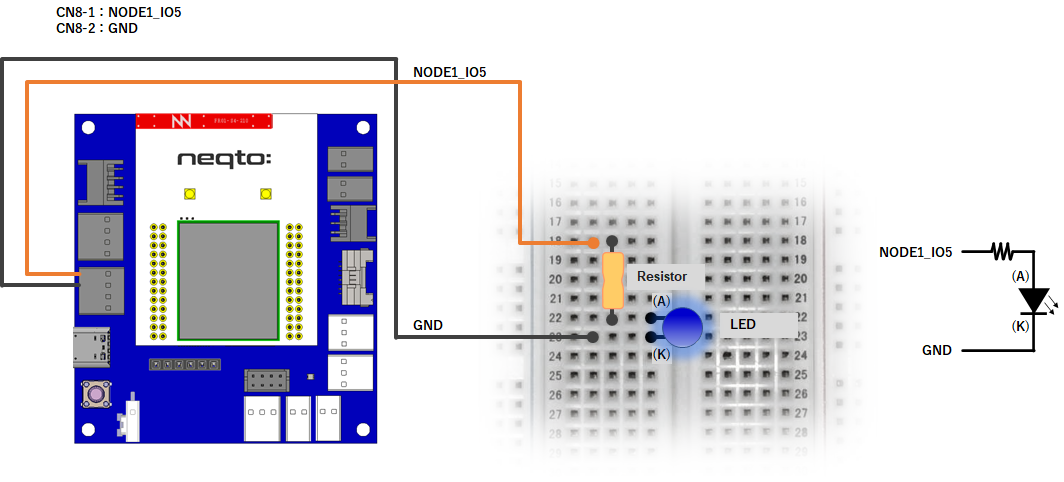
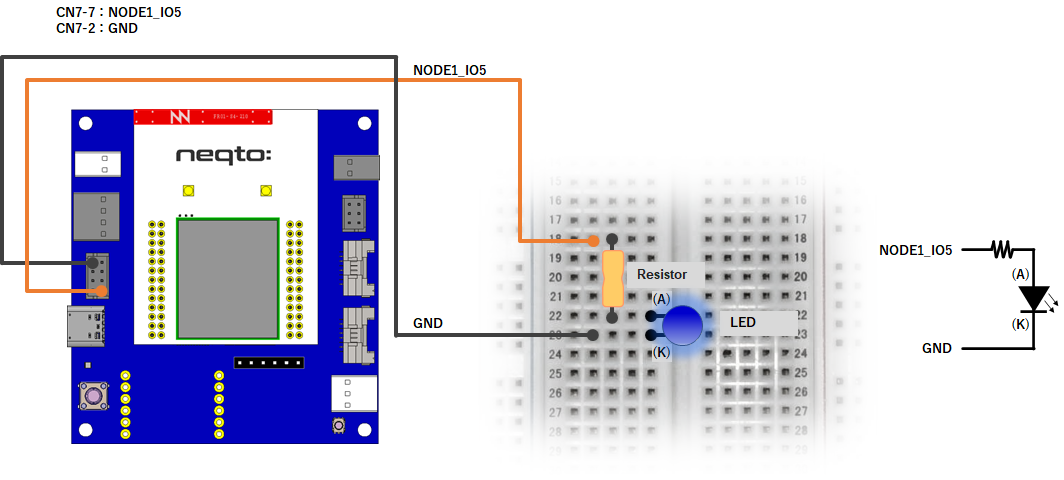
NEQTO Bridge
Related resources
- NEQTO Bridge Module Pinout
- About the extension board connection points:
Connector Board,IO Board,Digital IO Board - Related neqto.js objects: Timers, GPIO, nqEx, nqMqtt
Wiring diagrams
This tutorial requires a separate external circuit in addition to the NEQTO device.
NEQTO Bridge + IO Board
NEQTO Bridge + Digital IO Board
NEQTO Bridge + Connector Board
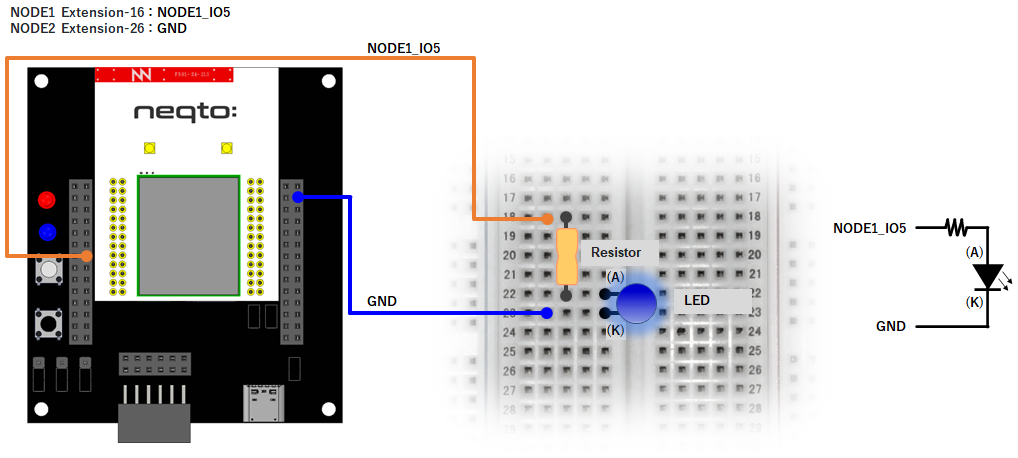
Example 1
Turning an LED ON/OFF in 1 second cycles.
//==============================================================
//  Sample scenario
//==============================================================
//  Turn the LED on and off with a timer.
//==============================================================
log.setLevel(0,2); //-1:NONE 0:ERROR 1:WARNING 2:DEBUG 3:TRACE, 0:DISABLE 1:LOG 2:CONSOLE 3:BOTH
log.printLevel(2); //0:DISABLE 1:LOG 2:CONSOLE 3:BOTH

if(nqEx.getBoardType()) { //using IO board or Digital IO board
    nqEx.enGPIO(true);
}

var gpioLED = new GPIO(15,5); //NODE1_IO5(OUT:PUSH-PULL)
gpioLED.setValue(0);

var timerInterval = 1000; //ms
var maxNumOfTimes = 30;

var loopcnt = 0;
var to = setInterval(function() {
    var date = new Date();
    if(++loopcnt >= maxNumOfTimes) {
        print(date + '+' +  date.getMilliseconds() + 'ms : finished');
        clearInterval(to);
        gpioLED.setValue(0);
        nqEx.enGPIO(false);
    } else {
        print(date + '+' +  date.getMilliseconds() + 'ms : ' + (maxNumOfTimes - loopcnt));
        gpioLED.setValue(loopcnt & 1);
    }
}, timerInterval);
Example 2
Using PWM to turn the LED ON/OFF at intervals of 100ms.
//==============================================================
//  Sample scenario
//==============================================================
//  Turn the LED on and off with PWM.
//==============================================================
log.setLevel(0,2); //-1:NONE 0:ERROR 1:WARNING 2:DEBUG 3:TRACE, 0:DISABLE 1:LOG 2:CONSOLE 3:BOTH
log.printLevel(2); //0:DISABLE 1:LOG 2:CONSOLE 3:BOTH

if(nqEx.getBoardType()) { //using IO board or Digital IO board
    nqEx.enGPIO(true);
}

var gpioLED = new GPIO(15,9); //NODE1_IO5(OUT:PWM)
gpioLED.setPwm(2000,1000);    //period=200ms, pulse=100ms

var timerInterval = 1000; //ms
var maxNumOfTimes = 10;

var loopcnt = 0;
var to = setInterval(function() {
    var date = new Date();
    if(++loopcnt >= maxNumOfTimes) {
        print(date + '+' +  date.getMilliseconds() + 'ms : finished');
        clearInterval(to);
        gpioLED.releasePwm();
        nqEx.enGPIO(false);
    } else {
        print(date + '+' +  date.getMilliseconds() + 'ms : ' + (maxNumOfTimes - loopcnt));
    }
}, timerInterval);
Example 3
Sending custom messages to turn the LED ON/OFF.
//==============================================================
//  Sample scenario
//==============================================================
//  Turn the LED on and off with a custom message.
//==============================================================
log.setLevel(0,2); //-1:NONE 0:ERROR 1:WARNING 2:DEBUG 3:TRACE, 0:DISABLE 1:LOG 2:CONSOLE 3:BOTH
log.printLevel(2); //0:DISABLE 1:LOG 2:CONSOLE 3:BOTH

if(nqEx.getBoardType()) { //using IO board or Digital IO board
    nqEx.enGPIO(true);
}

var gpioLED = new GPIO(15,5); //NODE1_IO5(OUT:PUSH-PULL)
gpioLED.setValue(0);

//neqto MQTT event handler
nqMqtt.on('push', function(message) {
    print(Date() + ': nqmqtt push ' + message);
    if(message == 'exit') {
        actflag = 0;
    } else if(message == "led on") {
        gpioLED.setValue(1);
    } else if(message == "led off") {
        gpioLED.setValue(0);
    }
});
nqMqtt.on('error', function(error) {
    print(Date() + ': nqmqtt error ' + error.code);
});
nqMqtt.on('connect', function(connack) {
    print(Date() + ': nqmqtt connect');
});
nqMqtt.on('close', function() {
    print(Date() + ': nqmqtt close');
});

//==============================================================
//  Main Loop
//==============================================================
var actflag = 1;
print(Date() + ': Ready');
while(actflag) {
}

//Termination processing
gpioLED.setValue(0);
nqEx.enGPIO(false);
throw '#nqEXIT';
The following commands may be executed by Custom Message:
| Custom Message | Details |
|---|---|
led on | Turn on the LED |
led off | Turn off the LED |
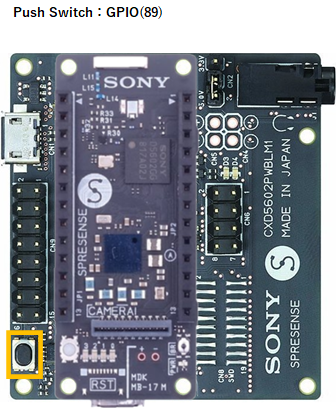
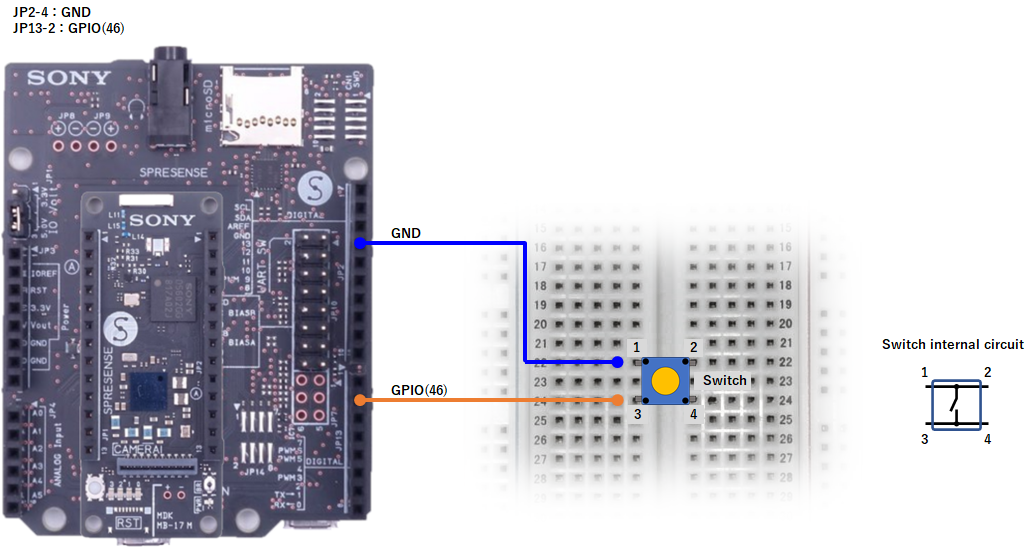
3. Controlling a Switch
SPRESENSE
Related resources
- SPRESENSE Pinout
- Related neqto.js objects: Timers, GPIO, nqMqtt
- About Components
Wiring diagrams
This tutorial requires a separate external circuit in addition to the NEQTO device.
SPRESENSE LTE-M
SPRESENSE Wi-Fi
Example 1
Monitoring the switch's state.
//==============================================================
//  Sample scenario
//==============================================================
//  Monitor switch status
//==============================================================
log.setLevel(0,2); //-1:NONE 0:ERROR 1:WARNING 2:DEBUG 3:TRACE, 0:DISABLE 1:LOG 2:CONSOLE 3:BOTH
log.printLevel(2); //0:DISABLE 1:LOG 2:CONSOLE 3:BOTH

var gpioSW;
if(nqSpresense.getModuleType() == 'WiFi') { //using SPRESENSE Wi-Fi
    gpioSW = new GPIO(46,0); //IN:PULL-UP
} else { //using SPRESENSE LTE-M
    gpioSW = new GPIO(89,2); //Push Switch - IN
}

//neqto MQTT event handler
nqMqtt.on('push', function(message) {
    print(Date() + ': nqmqtt push ' + message);
    if(message == 'exit') {
        actflag = 0;
    }
});
nqMqtt.on('error', function(error) {
    print(Date() + ': nqmqtt error ' + error.code);
});
nqMqtt.on('connect', function(connack) {
    print(Date() + ': nqmqtt connect');
});
nqMqtt.on('close', function() {
    print(Date() + ': nqmqtt close');
});

var monitorInterval = 250; //ms

var to = setInterval(function() {
    print('SW state : ' + gpioSW.getValue());
}, monitorInterval);

//==============================================================
//  Main Loop
//==============================================================
var actflag = 1;
print(Date() + ': Ready');
while(actflag) {
}

//Termination processing
clearInterval(to);
throw '#nqEXIT';
Example 2
Using a GPIO interrupt to monitor the switch's state.
//==============================================================
//  Sample scenario
//==============================================================
//  Monitor switch status using GPIO interrupts.
//==============================================================
log.setLevel(0,2); //-1:NONE 0:ERROR 1:WARNING 2:DEBUG 3:TRACE, 0:DISABLE 1:LOG 2:CONSOLE 3:BOTH
log.printLevel(2); //0:DISABLE 1:LOG 2:CONSOLE 3:BOTH

var gpioSW;
if(nqSpresense.getModuleType() == 'WiFi') { //using SPRESENSE Wi-Fi
    gpioSW = new GPIO(46,0); //IN:PULL-UP
} else { //using SPRESENSE LTE-M
    gpioSW = new GPIO(89,2); //Push Switch - IN
}

gpioSW.setIrq(3, function(status) {
    print('SW state : ' + status);
});

//neqto MQTT event handler
nqMqtt.on('push', function(message) {
    print(Date() + ': nqmqtt push ' + message);
    if(message == 'exit') {
        actflag = 0;
    }
});
nqMqtt.on('error', function(error) {
    print(Date() + ': nqmqtt error ' + error.code);
});
nqMqtt.on('connect', function(connack) {
    print(Date() + ': nqmqtt connect');
});
nqMqtt.on('close', function() {
    print(Date() + ': nqmqtt close');
});

//==============================================================
//  Main Loop
//==============================================================
var actflag = 1;
print(Date() + ': Ready');
while(actflag) {
}

//Termination processing
gpioSW.disableIrq();
throw '#nqEXIT';
Example 3
Sending the switch's state to the NEQTO Console.
//==============================================================
//  Sample scenario
//==============================================================
//  Send switch state changes to NEQTO Console
//==============================================================
log.setLevel(0,2); //-1:NONE 0:ERROR 1:WARNING 2:DEBUG 3:TRACE, 0:DISABLE 1:LOG 2:CONSOLE 3:BOTH
log.printLevel(2); //0:DISABLE 1:LOG 2:CONSOLE 3:BOTH

var gpioSW;
if(nqSpresense.getModuleType() == 'WiFi') { //using SPRESENSE Wi-Fi
    gpioSW = new GPIO(46,0); //IN:PULL-UP
} else { //using SPRESENSE LTE-M
    gpioSW = new GPIO(89,2); //Push Switch - IN
}

gpioSW.setIrq(3, function(status) {
    swEvt = [Date.now(), status];
    print('SW state : ' + status);
});

//neqto MQTT event handler
nqMqtt.on('push', function(message) {
    print(Date() + ': nqmqtt push ' + message);
    if(message == 'exit') {
        actflag = 0;
    }
});
nqMqtt.on('error', function(error) {
    print(Date() + ': nqmqtt error ' + error.code);
});
nqMqtt.on('connect', function(connack) {
    print(Date() + ': nqmqtt connect');
});
nqMqtt.on('close', function() {
    print(Date() + ': nqmqtt close');
});

//Component
var OBJECT_ID = 3342;   //On/Off switch
var RESOURCE_ID = 5500; //Digital Input State
var INSTANCE_ID = 0;

//==============================================================
//  Main Loop
//==============================================================
var actflag = 1;
var swEvt = [-1, -1];
var swEvtPrev = [-1, -1];
var swEvtTmp = new Array(swEvt.length);
print(Date() + ': Ready');
while(actflag) {
    if(swEvtPrev[0] != swEvt[0] || swEvtPrev[1] != swEvt[1]) {
        if(nqMqtt.canPublish()) {
            swEvtTmp[0] = swEvt[0];
            swEvtTmp[1] = swEvt[1];
            var mqttdata = nqMqtt.get('LwM2MObject', swEvtTmp[0], OBJECT_ID, INSTANCE_ID, RESOURCE_ID, 'Integer', swEvtTmp[1].toString());
            nqMqtt.publish(null, mqttdata, function(err) {
                if(err.code == 0) {
                    print('publish successful');
                } else {
                    print('publish failure');
                }
                swEvtPrev[0] = swEvtTmp[0];
                swEvtPrev[1] = swEvtTmp[1];
            });
        }
    }
}

//Termination processing
gpioSW.disableIrq();
throw '#nqEXIT';
The following Component settings are used as the destination for the data:
| Name | Object | Resource | Instance |
|---|---|---|---|
Switch State | On/Off switch | Digital Input State | 0 |
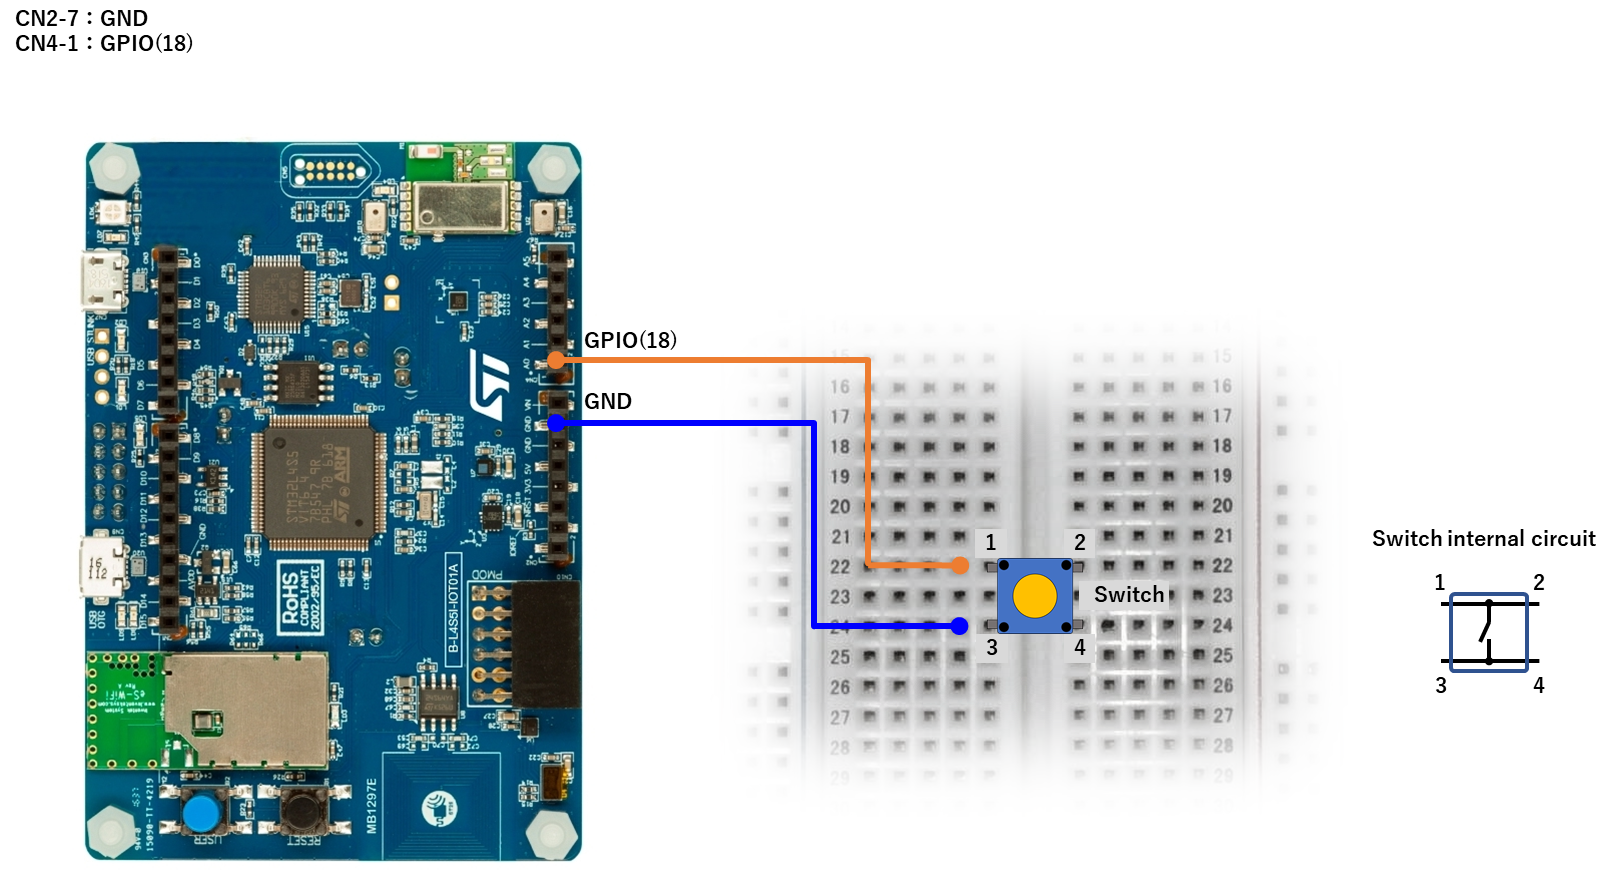
STM32 Discovery
Related resources
- STM32 Discovery Kit (B-L4S5I-IOT01A) Pinout
- Related neqto.js objects: Timers, GPIO, nqMqtt
- About Components
Wiring diagrams
This tutorial requires a separate external circuit in addition to the NEQTO device.
STM32 Discovery Kit (B-L4S5I-IOT01A)
Example 1
Monitoring the switch's state.
//==============================================================
//  Sample scenario
//==============================================================
//  Monitor switch status
//==============================================================
log.setLevel(0,2); //-1:NONE 0:ERROR 1:WARNING 2:DEBUG 3:TRACE, 0:DISABLE 1:LOG 2:CONSOLE 3:BOTH
log.printLevel(2); //0:DISABLE 1:LOG 2:CONSOLE 3:BOTH

var gpioSW = new GPIO(18,0); //IN:PULL-UP

//neqto MQTT event handler
nqMqtt.on('push', function(message) {
    print(Date() + ': nqmqtt push ' + message);
    if(message == 'exit') {
        actflag = 0;
    }
});
nqMqtt.on('error', function(error) {
    print(Date() + ': nqmqtt error ' + error.code);
});
nqMqtt.on('connect', function(connack) {
    print(Date() + ': nqmqtt connect');
});
nqMqtt.on('close', function() {
    print(Date() + ': nqmqtt close');
});

var monitorInterval = 250; //ms

var to = setInterval(function() {
    print('SW state : ' + gpioSW.getValue());
}, monitorInterval);

//==============================================================
//  Main Loop
//==============================================================
var actflag = 1;
print(Date() + ': Ready');
while(actflag) {
}

//Termination processing
clearInterval(to);
throw '#nqEXIT';
Example 2
Using a GPIO interrupt to monitor the switch's state.
//==============================================================
//  Sample scenario
//==============================================================
//  Monitor switch status using GPIO interrupts.
//==============================================================
log.setLevel(0,2); //-1:NONE 0:ERROR 1:WARNING 2:DEBUG 3:TRACE, 0:DISABLE 1:LOG 2:CONSOLE 3:BOTH
log.printLevel(2); //0:DISABLE 1:LOG 2:CONSOLE 3:BOTH

var gpioSW = new GPIO(18,0); //IN:PULL-UP

gpioSW.setIrq(3, function(status) {
    print('SW state : ' + status);
});

//neqto MQTT event handler
nqMqtt.on('push', function(message) {
    print(Date() + ': nqmqtt push ' + message);
    if(message == 'exit') {
        actflag = 0;
    }
});
nqMqtt.on('error', function(error) {
    print(Date() + ': nqmqtt error ' + error.code);
});
nqMqtt.on('connect', function(connack) {
    print(Date() + ': nqmqtt connect');
});
nqMqtt.on('close', function() {
    print(Date() + ': nqmqtt close');
});

//==============================================================
//  Main Loop
//==============================================================
var actflag = 1;
print(Date() + ': Ready');
while(actflag) {
}

//Termination processing
gpioSW.disableIrq();
throw '#nqEXIT';
Example 3
Sending the switch's state to the NEQTO Console.
//==============================================================
//  Sample scenario
//==============================================================
//  Send switch state changes to NEQTO Console
//==============================================================
log.setLevel(0,2); //-1:NONE 0:ERROR 1:WARNING 2:DEBUG 3:TRACE, 0:DISABLE 1:LOG 2:CONSOLE 3:BOTH
log.printLevel(2); //0:DISABLE 1:LOG 2:CONSOLE 3:BOTH

var gpioSW = new GPIO(18,0); //IN:PULL-UP

gpioSW.setIrq(3, function(status) {
    swEvt = [Date.now(), status];
    print('SW state : ' + status);
});

//neqto MQTT event handler
nqMqtt.on('push', function(message) {
    print(Date() + ': nqmqtt push ' + message);
    if(message == 'exit') {
        actflag = 0;
    }
});
nqMqtt.on('error', function(error) {
    print(Date() + ': nqmqtt error ' + error.code);
});
nqMqtt.on('connect', function(connack) {
    print(Date() + ': nqmqtt connect');
});
nqMqtt.on('close', function() {
    print(Date() + ': nqmqtt close');
});

//Component
var OBJECT_ID = 3342;   //On/Off switch
var RESOURCE_ID = 5500; //Digital Input State
var INSTANCE_ID = 0;

//==============================================================
//  Main Loop
//==============================================================
var actflag = 1;
var swEvt = [-1, -1];
var swEvtPrev = [-1, -1];
var swEvtTmp = new Array(swEvt.length);
print(Date() + ': Ready');
while(actflag) {
    if(swEvtPrev[0] != swEvt[0] || swEvtPrev[1] != swEvt[1]) {
        if(nqMqtt.canPublish()) {
            swEvtTmp[0] = swEvt[0];
            swEvtTmp[1] = swEvt[1];
            var mqttdata = nqMqtt.get('LwM2MObject', swEvtTmp[0], OBJECT_ID, INSTANCE_ID, RESOURCE_ID, 'Integer', swEvtTmp[1].toString());
            nqMqtt.publish(null, mqttdata, function(err) {
                if(err.code == 0) {
                    print('publish successful');
                } else {
                    print('publish failure');
                }
                swEvtPrev[0] = swEvtTmp[0];
                swEvtPrev[1] = swEvtTmp[1];
            });
        }
    }
}

//Termination processing
gpioSW.disableIrq();
throw '#nqEXIT';
The following Component settings are used as the destination for the data:
| Name | Object | Resource | Instance |
|---|---|---|---|
Switch State | On/Off switch | Digital Input State | 0 |
NEQTO Bridge
Related resources
- NEQTO Bridge Module Pinout
- About the extension board connection points:
Connector Board,IO Board,Digital IO Board - Related neqto.js objects: Timers, GPIO, nqEx, nqMqtt
- About Components
Wiring diagrams
This tutorial requires a separate external circuit in addition to the NEQTO device.
NEQTO Bridge + IO Board
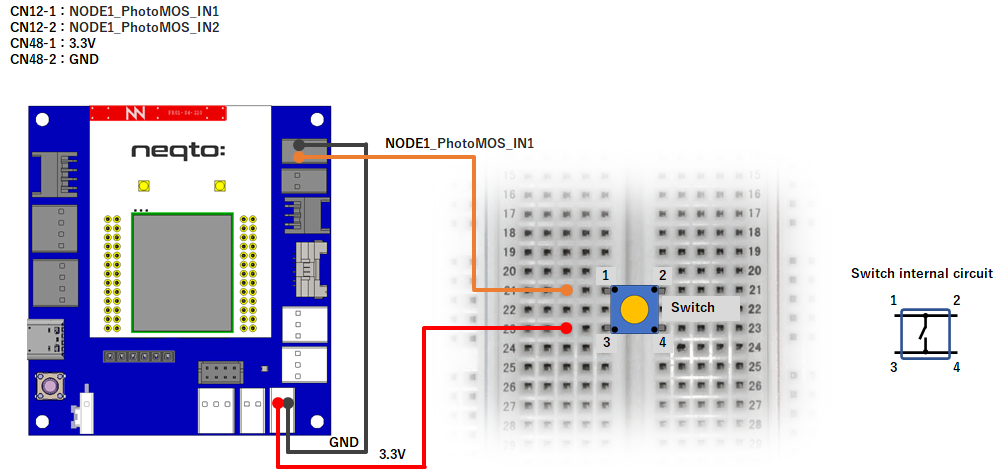
NEQTO Bridge + Digital IO Board
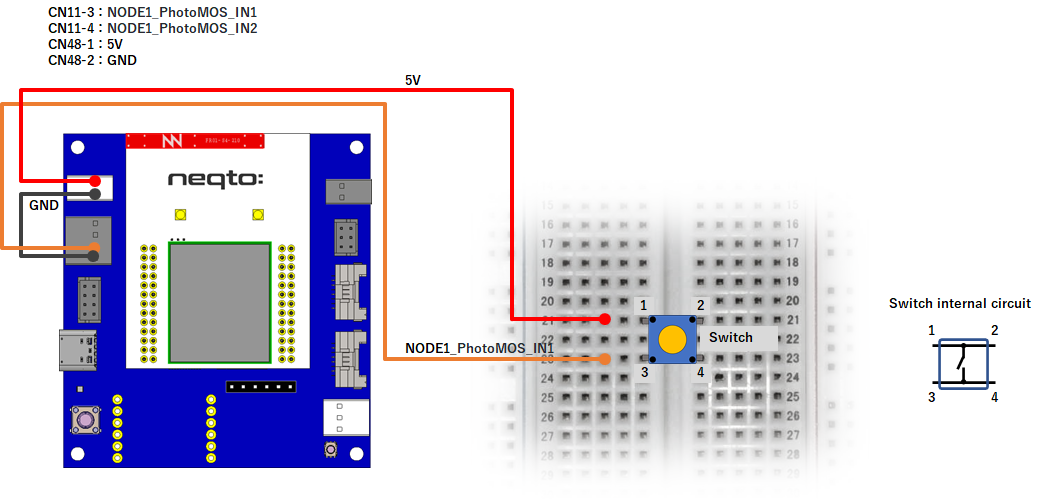
NEQTO Bridge + Connector Board
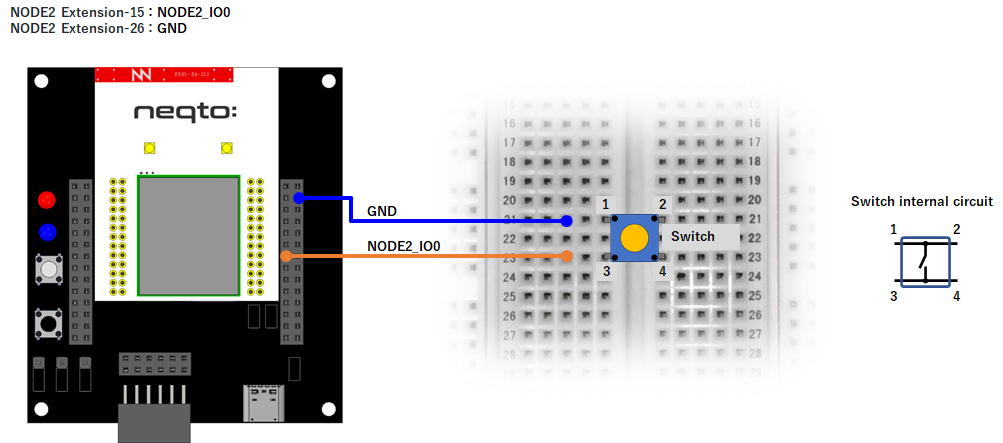
Example 1
Monitoring the switch's state.
//==============================================================
//  Sample scenario
//==============================================================
//  Monitor switch status
//==============================================================
log.setLevel(0,2); //-1:NONE 0:ERROR 1:WARNING 2:DEBUG 3:TRACE, 0:DISABLE 1:LOG 2:CONSOLE 3:BOTH
log.printLevel(2); //0:DISABLE 1:LOG 2:CONSOLE 3:BOTH

var gpioSW;
if(nqEx.getBoardType()) { //using IO board or Digital IO board
    gpioSW = new GPIO(13,2); //Photo Coupler - NODE1_IO3(IN)
} else { //using Connector board
    gpioSW = new GPIO(20,0); //NODE2_IO0(IN:PULL-UP)
}

//neqto MQTT event handler
nqMqtt.on('push', function(message) {
    print(Date() + ': nqmqtt push ' + message);
    if(message == 'exit') {
        actflag = 0;
    }
});
nqMqtt.on('error', function(error) {
    print(Date() + ': nqmqtt error ' + error.code);
});
nqMqtt.on('connect', function(connack) {
    print(Date() + ': nqmqtt connect');
});
nqMqtt.on('close', function() {
    print(Date() + ': nqmqtt close');
});

var monitorInterval = 250; //ms

var to = setInterval(function() {
    print('SW state : ' + gpioSW.getValue());
}, monitorInterval);

//==============================================================
//  Main Loop
//==============================================================
var actflag = 1;
print(Date() + ': Ready');
while(actflag) {
}

//Termination processing
clearInterval(to);
nqEx.enGPIO(false);
throw '#nqEXIT';
Example 2
Using a GPIO interrupt to monitor the switch's state
//==============================================================
//  Sample scenario
//==============================================================
//  Monitor switch status using GPIO interrupts.
//==============================================================
log.setLevel(0,2); //-1:NONE 0:ERROR 1:WARNING 2:DEBUG 3:TRACE, 0:DISABLE 1:LOG 2:CONSOLE 3:BOTH
log.printLevel(2); //0:DISABLE 1:LOG 2:CONSOLE 3:BOTH

var gpioSW;
if(nqEx.getBoardType()) { //using IO board or Digital IO board
    gpioSW = new GPIO(13,2); //Photo Coupler - NODE1_IO3(IN)
} else { //using Connector board
    gpioSW = new GPIO(20,0); //NODE2_IO0(IN:PULL-UP)
}

gpioSW.setIrq(3, function(status) {
    print('SW state : ' + status);
});

//neqto MQTT event handler
nqMqtt.on('push', function(message) {
    print(Date() + ': nqmqtt push ' + message);
    if(message == 'exit') {
        actflag = 0;
    }
});
nqMqtt.on('error', function(error) {
    print(Date() + ': nqmqtt error ' + error.code);
});
nqMqtt.on('connect', function(connack) {
    print(Date() + ': nqmqtt connect');
});
nqMqtt.on('close', function() {
    print(Date() + ': nqmqtt close');
});

//==============================================================
//  Main Loop
//==============================================================
var actflag = 1;
print(Date() + ': Ready');
while(actflag) {
}

//Termination processing
gpioSW.disableIrq();
throw '#nqEXIT';
Example 3
Sending the switch's state to the NEQTO Console.
//==============================================================
//  Sample scenario
//==============================================================
//  Send switch state changes to NEQTO Console
//==============================================================
log.setLevel(0,2); //-1:NONE 0:ERROR 1:WARNING 2:DEBUG 3:TRACE, 0:DISABLE 1:LOG 2:CONSOLE 3:BOTH
log.printLevel(2); //0:DISABLE 1:LOG 2:CONSOLE 3:BOTH

var gpioSW;
if(nqEx.getBoardType()) { //using IO board or Digital IO board
    gpioSW = new GPIO(13,2); //Photo Coupler - NODE1_IO3(IN)
} else { //using Connector board
    gpioSW = new GPIO(20,0); //NODE2_IO0(IN:PULL-UP)
}

gpioSW.setIrq(3, function(status) {
    swEvt = [Date.now(), status];
    print('SW state : ' + status);
});

//neqto MQTT event handler
nqMqtt.on('push', function(message) {
    print(Date() + ': nqmqtt push ' + message);
    if(message == 'exit') {
        actflag = 0;
    }
});
nqMqtt.on('error', function(error) {
    print(Date() + ': nqmqtt error ' + error.code);
});
nqMqtt.on('connect', function(connack) {
    print(Date() + ': nqmqtt connect');
});
nqMqtt.on('close', function() {
    print(Date() + ': nqmqtt close');
});

//Component
var OBJECT_ID = 3342;   //On/Off switch
var RESOURCE_ID = 5500; //Digital Input State
var INSTANCE_ID = 0;

//==============================================================
//  Main Loop
//==============================================================
var actflag = 1;
var swEvt = [-1, -1];
var swEvtPrev = [-1, -1];
var swEvtTmp = new Array(swEvt.length);
print(Date() + ': Ready');
while(actflag) {
    if(swEvtPrev[0] != swEvt[0] || swEvtPrev[1] != swEvt[1]) {
        if(nqMqtt.canPublish()) {
            swEvtTmp[0] = swEvt[0];
            swEvtTmp[1] = swEvt[1];
            var mqttdata = nqMqtt.get('LwM2MObject', swEvtTmp[0], OBJECT_ID, INSTANCE_ID, RESOURCE_ID, 'Integer', swEvtTmp[1].toString());
            nqMqtt.publish(null, mqttdata, function(err) {
                if(err.code == 0) {
                    print('publish successful');
                } else {
                    print('publish failure');
                }
                swEvtPrev[0] = swEvtTmp[0];
                swEvtPrev[1] = swEvtTmp[1];
            });
        }
    }
}

//Termination processing
gpioSW.disableIrq();
throw '#nqEXIT';
The following Component settings are used as the destination for the data:
| Name | Object | Resource | Instance |
|---|---|---|---|
Switch State | On/Off switch | Digital Input State | 0 |
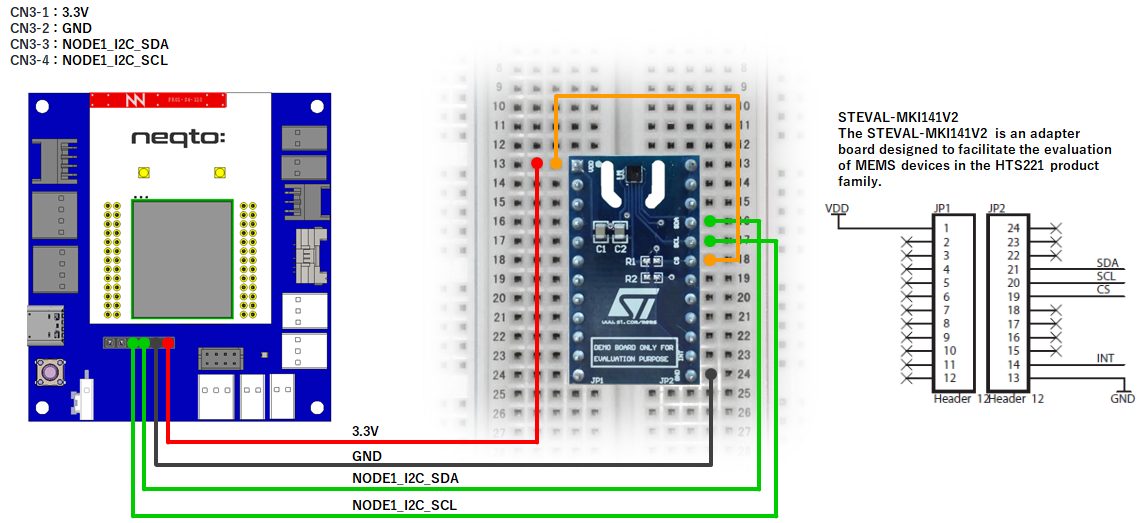
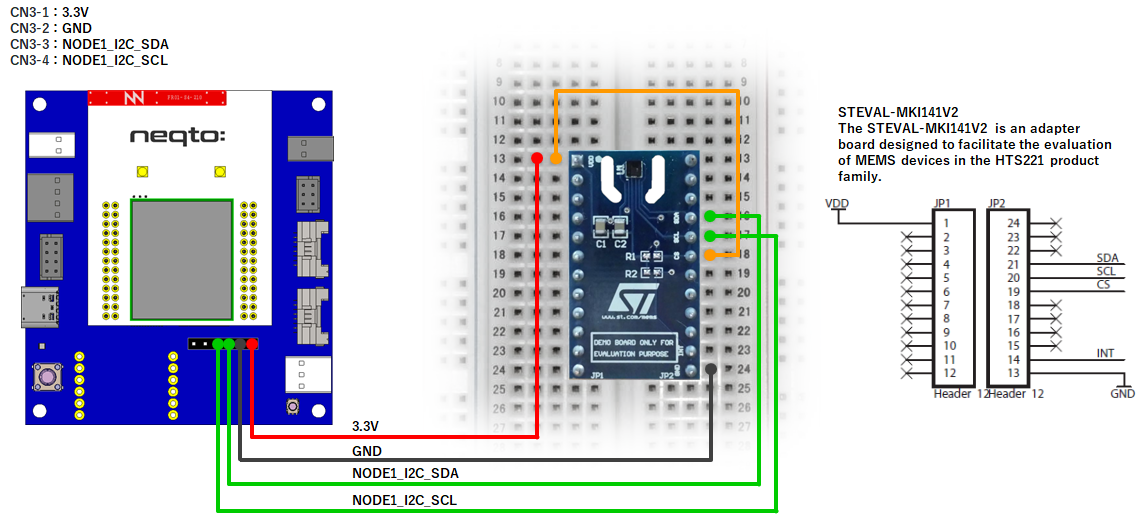
4. Controlling an HTS221 Temperature and Humidity Sensor
SPRESENSE
Related resources
- SPRESENSE Pinout
- Related neqto.js objects: Timers, I2C, nqMqtt
- About Components
- About neqto.js Libraries HTS221 v2 Temperature and Humidity Sensor
- STMicroelectronics N.V. STEVAL-MKI141V2
Wiring diagrams
This tutorial requires a separate external circuit in addition to the NEQTO device.
SPRESENSE LTE-M
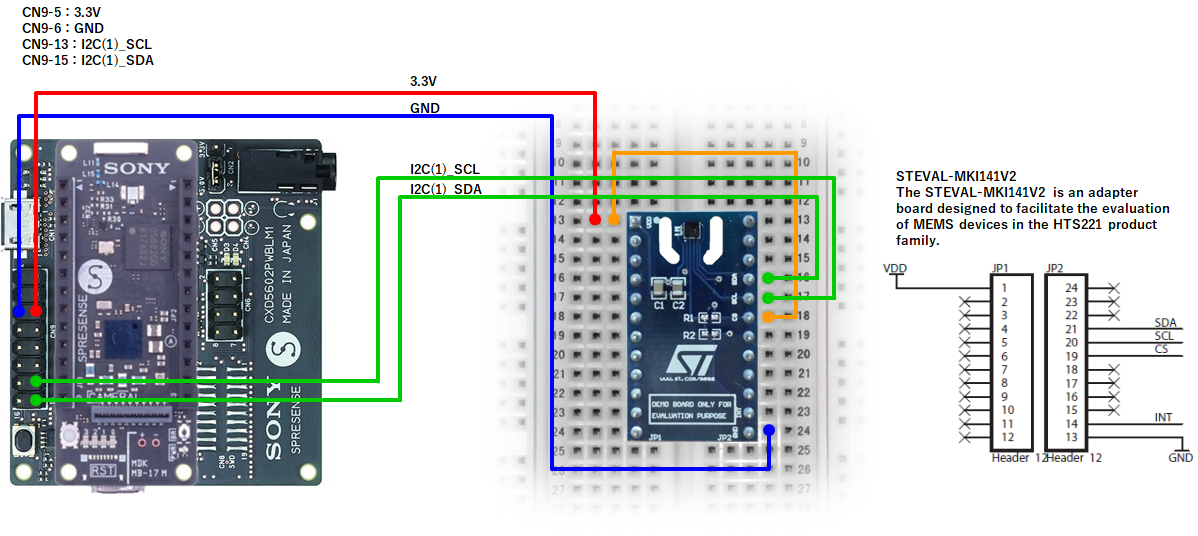
SPRESENSE Wi-Fi

Example 1
Using the NEQTO Library to measure temperature and humidity data.
//==============================================================
//  Sample scenario
//==============================================================
//  Measure temperature and humidity data using NEQTO library.
//==============================================================
log.setLevel(0,2); //-1:NONE 0:ERROR 1:WARNING 2:DEBUG 3:TRACE, 0:DISABLE 1:LOG 2:CONSOLE 3:BOTH
log.printLevel(2); //0:DISABLE 1:LOG 2:CONSOLE 3:BOTH

if(!('HTS221' in this)) {
    throw new Error('Please add the HTS221_V2 Library to the Script');
}

var i2c;
if(nqSpresense.getModuleType() == 'WiFi') { //using SPRESENSE Wi-Fi
    i2c = new I2C(0);
} else { //using SPRESENSE LTE-M
    i2c = new I2C(1);
}

i2c.open(400000);
var hts221 = new HTS221(i2c);
var ready = hts221.init();
if(!ready) {
    print('Unable to connect to HTS221');
    i2c.close();
}

//neqto MQTT event handler
nqMqtt.on('push', function(message) {
    print(Date() + ': nqmqtt push ' + message);
    if(message == 'exit') {
        actflag = 0;
    }
});
nqMqtt.on('error', function(error) {
    print(Date() + ': nqmqtt error ' + error.code);
});
nqMqtt.on('connect', function(connack) {
    print(Date() + ': nqmqtt connect');
});
nqMqtt.on('close', function() {
    print(Date() + ': nqmqtt close');
});

var timerInterval = 1000; //ms

var to = setInterval(function() { measureFlag = 1; }, timerInterval);

//==============================================================
//  Main Loop
//==============================================================
var actflag = 1;
var measureFlag = 0;
while(actflag){
    if(ready && measureFlag) {
        var date = new Date();
        hts221.measOn();
        results = hts221.checkStatusAndGetResult();
        hts221.measOff();
        if(!results) {
            print('failed measurement');
        } else {
            print(date + ', Temp: ' + results.temp.toFixed(1) + ', Humi: ' + results.humi.toFixed(1));
        }
        measureFlag = 0;
    }
}

//Termination processing
clearInterval(to);
i2c.close();
throw '#nqEXIT';
Example 2
Sending measured temperature and humidity data to the NEQTO Console.
//==============================================================
//  Sample scenario
//==============================================================
//  Measure temperature and humidity data using NEQTO library.
//==============================================================
log.setLevel(0,2); //-1:NONE 0:ERROR 1:WARNING 2:DEBUG 3:TRACE, 0:DISABLE 1:LOG 2:CONSOLE 3:BOTH
log.printLevel(2); //0:DISABLE 1:LOG 2:CONSOLE 3:BOTH

if(!('HTS221' in this)) {
    throw new Error('Please add the HTS221_V2 Library to the Script');
}

var i2c;
if(nqSpresense.getModuleType() == 'WiFi') { //using SPRESENSE Wi-Fi
    i2c = new I2C(0);
} else { //using SPRESENSE LTE-M
    i2c = new I2C(1);
}

i2c.open(400000);
var hts221 = new HTS221(i2c);
var ready = hts221.init();
if(!ready) {
    print('Unable to connect to HTS221');
    i2c.close();
}

//neqto MQTT event handler
nqMqtt.on('push', function(message) {
    print(Date() + ': nqmqtt push ' + message);
    if(message == 'exit') {
        actflag = 0;
    }
});
nqMqtt.on('error', function(error) {
    print(Date() + ': nqmqtt error ' + error.code);
});
nqMqtt.on('connect', function(connack) {
    print(Date() + ': nqmqtt connect');
});
nqMqtt.on('close', function() {
    print(Date() + ': nqmqtt close');
});

var timerInterval = 3000; //ms
var numOfTimes = 10;

var to = setInterval(function() { measureFlag = 1; }, timerInterval);

//==============================================================
//  Main Loop
//==============================================================
var actflag = 1;
var measureFlag = 0;
while(actflag){
    if(ready && numOfTimes && measureFlag) {
        var date = new Date();
        hts221.measOn();
        results = hts221.checkStatusAndGetResult();
        hts221.measOff();
        if(!results) {
            print('failed measurement');
        } else {
            print(date + ', Temp: ' + results.temp.toFixed(1) + ', Humi: ' + results.humi.toFixed(1));
            if(nqMqtt.canPublish()) {
                var tempobj = nqMqtt.get('LwM2MObject', date.getTime(), 3303, 0, 5700, 'Float', results.temp.toString());
                var humiobj = nqMqtt.get('LwM2MObject', date.getTime(), 3304, 0, 5700, 'Float', results.humi.toString());
                var mqttdata = [tempobj, humiobj];
                nqMqtt.publish(null, mqttdata, function(err) {
                    if(err.code == 0) {
                        print('publish successful');
                    } else {
                        print('publish failure');
                    }
                    numOfTimes--;
                    if(!numOfTimes) {
                        print('finished');
                    }
                });
            } else {
                print('publish was skipped');
            }
        }
        measureFlag = 0;
    }
}

//Termination processing
clearInterval(to);
i2c.close();
throw '#nqEXIT';
The following Components' settings are used as the destination for the data:
| Name | Object | Resource | Instance |
|---|---|---|---|
Temperature Measurements | Temperature | Sensor Value | 0 |
Humidity Measurements | Humidity | Sensor Value | 0 |
Example 3
Accessing the sensor directly by controlling the I2C interface.
//==============================================================
//  Sample scenario
//==============================================================
//  Directly control the I2C interface to access the sensor.
//==============================================================
log.setLevel(0,2); //-1:NONE 0:ERROR 1:WARNING 2:DEBUG 3:TRACE, 0:DISABLE 1:LOG 2:CONSOLE 3:BOTH
log.printLevel(2); //0:DISABLE 1:LOG 2:CONSOLE 3:BOTH

var i2c;
if(nqSpresense.getModuleType() == 'WiFi') { //using SPRESENSE Wi-Fi
    i2c = new I2C(0);
} else { //using SPRESENSE LTE-M
    i2c = new I2C(1);
}

i2c.open(400000);

var SLAVE_ADDR = 0x5F;   //HTS221 slave address
var REG_WHO_AM_I = 0x0F; //HTS221 device ID register address

var wrBuf = new ArrayBuffer(1);
var wrAry = new Uint8Array(wrBuf);
wrAry[0] = REG_WHO_AM_I;

print('Send : 0x' + ('0' + wrAry[0].toString(16).toUpperCase()).slice(-2));

if(i2c.write(SLAVE_ADDR, wrBuf)) {
    var rdBuf = i2c.read(SLAVE_ADDR, 1);
    if(rdBuf.byteLength > 0) {
        var rdAry = new Uint8Array(rdBuf);
        print('Device ID : 0x' + ('0' + rdAry[0].toString(16).toUpperCase()).slice(-2));
    }
}

i2c.close();
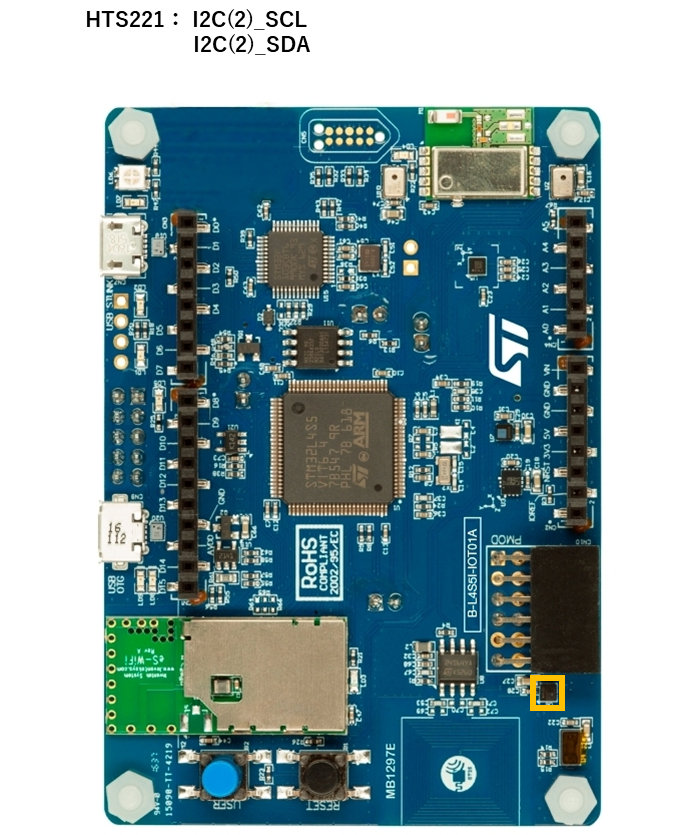
STM32 Discovery
Related resources
- STM32 Discovery Kit (B-L4S5I-IOT01A) Pinout
- Related neqto.js objects: Timers, I2C, nqMqtt
- About Components
- About neqto.js Libraries HTS221 v2 Temperature and Humidity Sensor
- STMicroelectronics N.V. HTS221
Wiring diagrams
STM32 Discovery Kit (B-L4S5I-IOT01A)
Example 1
Using the NEQTO Library to measure temperature and humidity data.
//==============================================================
//  Sample scenario
//==============================================================
//  Measure temperature and humidity data using NEQTO library.
//==============================================================
log.setLevel(0,2); //-1:NONE 0:ERROR 1:WARNING 2:DEBUG 3:TRACE, 0:DISABLE 1:LOG 2:CONSOLE 3:BOTH
log.printLevel(2); //0:DISABLE 1:LOG 2:CONSOLE 3:BOTH

if(!('HTS221' in this)) {
    throw new Error('Please add the HTS221_V2 Library to the Script');
}

var i2c = new I2C(2);

i2c.open(400000);
var hts221 = new HTS221(i2c);
var ready = hts221.init();
if(!ready) {
    print('Unable to connect to HTS221');
    i2c.close();
}

//neqto MQTT event handler
nqMqtt.on('push', function(message) {
    print(Date() + ': nqmqtt push ' + message);
    if(message == 'exit') {
        actflag = 0;
    }
});
nqMqtt.on('error', function(error) {
    print(Date() + ': nqmqtt error ' + error.code);
});
nqMqtt.on('connect', function(connack) {
    print(Date() + ': nqmqtt connect');
});
nqMqtt.on('close', function() {
    print(Date() + ': nqmqtt close');
});

var timerInterval = 1000; //ms

var to = setInterval(function() { measureFlag = 1; }, timerInterval);

//==============================================================
//  Main Loop
//==============================================================
var actflag = 1;
var measureFlag = 0;
while(actflag){
    if(ready && measureFlag) {
        var date = new Date();
        hts221.measOn();
        results = hts221.checkStatusAndGetResult();
        hts221.measOff();
        if(!results) {
            print('failed measurement');
        } else {
            print(date + ', Temp: ' + results.temp.toFixed(1) + ', Humi: ' + results.humi.toFixed(1));
        }
        measureFlag = 0;
    }
}

//Termination processing
clearInterval(to);
i2c.close();
throw '#nqEXIT';
Example 2
Sending measured temperature and humidity data to the NEQTO Console.
//==============================================================
//  Sample scenario
//==============================================================
//  Measure temperature and humidity data using NEQTO library.
//==============================================================
log.setLevel(0,2); //-1:NONE 0:ERROR 1:WARNING 2:DEBUG 3:TRACE, 0:DISABLE 1:LOG 2:CONSOLE 3:BOTH
log.printLevel(2); //0:DISABLE 1:LOG 2:CONSOLE 3:BOTH

if(!('HTS221' in this)) {
    throw new Error('Please add the HTS221_V2 Library to the Script');
}

var i2c = new I2C(2);

i2c.open(400000);
var hts221 = new HTS221(i2c);
var ready = hts221.init();
if(!ready) {
    print('Unable to connect to HTS221');
    i2c.close();
}

//neqto MQTT event handler
nqMqtt.on('push', function(message) {
    print(Date() + ': nqmqtt push ' + message);
    if(message == 'exit') {
        actflag = 0;
    }
});
nqMqtt.on('error', function(error) {
    print(Date() + ': nqmqtt error ' + error.code);
});
nqMqtt.on('connect', function(connack) {
    print(Date() + ': nqmqtt connect');
});
nqMqtt.on('close', function() {
    print(Date() + ': nqmqtt close');
});

var timerInterval = 3000; //ms
var numOfTimes = 10;

var to = setInterval(function() { measureFlag = 1; }, timerInterval);

//==============================================================
//  Main Loop
//==============================================================
var actflag = 1;
var measureFlag = 0;
while(actflag){
    if(ready && numOfTimes && measureFlag) {
        var date = new Date();
        hts221.measOn();
        results = hts221.checkStatusAndGetResult();
        hts221.measOff();
        if(!results) {
            print('failed measurement');
        } else {
            print(date + ', Temp: ' + results.temp.toFixed(1) + ', Humi: ' + results.humi.toFixed(1));
            if(nqMqtt.canPublish()) {
                var tempobj = nqMqtt.get('LwM2MObject', date.getTime(), 3303, 0, 5700, 'Float', results.temp.toString());
                var humiobj = nqMqtt.get('LwM2MObject', date.getTime(), 3304, 0, 5700, 'Float', results.humi.toString());
                var mqttdata = [tempobj, humiobj];
                nqMqtt.publish(null, mqttdata, function(err) {
                    if(err.code == 0) {
                        print('publish successful');
                    } else {
                        print('publish failure');
                    }
                    numOfTimes--;
                    if(!numOfTimes) {
                        print('finished');
                    }
                });
            } else {
                print('publish was skipped');
            }
        }
        measureFlag = 0;
    }
}

//Termination processing
clearInterval(to);
i2c.close();
throw '#nqEXIT';
The following Components' settings are used as the destination for the data:
| Name | Object | Resource | Instance |
|---|---|---|---|
Temperature Measurements | Temperature | Sensor Value | 0 |
Humidity Measurements | Humidity | Sensor Value | 0 |
Example 3
Accessing the sensor directly by controlling the I2C interface.
//==============================================================
//  Sample scenario
//==============================================================
//  Directly control the I2C interface to access the sensor.
//==============================================================
log.setLevel(0,2); //-1:NONE 0:ERROR 1:WARNING 2:DEBUG 3:TRACE, 0:DISABLE 1:LOG 2:CONSOLE 3:BOTH
log.printLevel(2); //0:DISABLE 1:LOG 2:CONSOLE 3:BOTH

var i2c = new I2C(2);

i2c.open(400000);

var SLAVE_ADDR = 0x5F;   //HTS221 slave address
var REG_WHO_AM_I = 0x0F; //HTS221 device ID register address

var wrBuf = new ArrayBuffer(1);
var wrAry = new Uint8Array(wrBuf);
wrAry[0] = REG_WHO_AM_I;

print('Send : 0x' + ('0' + wrAry[0].toString(16).toUpperCase()).slice(-2));

if(i2c.write(SLAVE_ADDR, wrBuf)) {
    var rdBuf = i2c.read(SLAVE_ADDR, 1);
    if(rdBuf.byteLength > 0) {
        var rdAry = new Uint8Array(rdBuf);
        print('Device ID : 0x' + ('0' + rdAry[0].toString(16).toUpperCase()).slice(-2));
    }
}

i2c.close();
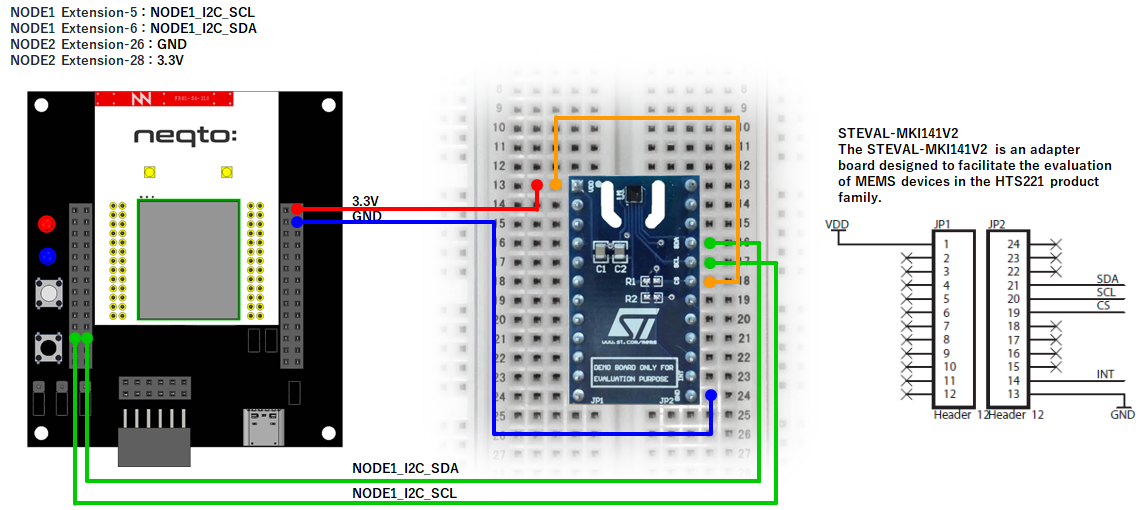
NEQTO Bridge
Related resources
- NEQTO Bridge Module Pinout
- About the extension board connection points:
Connector Board,IO Board,Digital IO Board - Related neqto.js objects: Timers, I2C, nqEx, nqMqtt
- About Components
- About neqto.js Libraries HTS221 v2 Temperature and Humidity Sensor
- STMicroelectronics N.V. STEVAL-MKI141V2
Wiring diagrams
This tutorial requires a separate external circuit in addition to the NEQTO device.
NEQTO Bridge + IO Board
NEQTO Bridge + Digital IO Board
NEQTO Bridge + Connector Board
Example 1
Using the NEQTO Library to measure temperature and humidity data.
//==============================================================
//  Sample scenario
//==============================================================
//  Measure temperature and humidity data using NEQTO library.
//==============================================================
log.setLevel(0,2); //-1:NONE 0:ERROR 1:WARNING 2:DEBUG 3:TRACE, 0:DISABLE 1:LOG 2:CONSOLE 3:BOTH
log.printLevel(2); //0:DISABLE 1:LOG 2:CONSOLE 3:BOTH

if(!('HTS221' in this)) {
    throw new Error('Please add the HTS221_V2 Library to the Script');
}

if(nqEx.getBoardType()) { //using IO board or Digital IO board
    nqEx.enI2CS(true); //Required to use the I2C Short port
    nqEx.enI2CL(true); //Required to use the I2C Long port
}

var i2c = new I2C(1);

i2c.open(400000);
var hts221 = new HTS221(i2c);
var ready = hts221.init();
if(!ready) {
    print('Unable to connect to HTS221');
    i2c.close();
}

//neqto MQTT event handler
nqMqtt.on('push', function(message) {
    print(Date() + ': nqmqtt push ' + message);
    if(message == 'exit') {
        actflag = 0;
    }
});
nqMqtt.on('error', function(error) {
    print(Date() + ': nqmqtt error ' + error.code);
});
nqMqtt.on('connect', function(connack) {
    print(Date() + ': nqmqtt connect');
});
nqMqtt.on('close', function() {
    print(Date() + ': nqmqtt close');
});

var timerInterval = 1000; //ms

var to = setInterval(function() { measureFlag = 1; }, timerInterval);

//==============================================================
//  Main Loop
//==============================================================
var actflag = 1;
var measureFlag = 0;
while(actflag){
    if(ready && measureFlag) {
        var date = new Date();
        hts221.measOn();
        results = hts221.checkStatusAndGetResult();
        hts221.measOff();
        if(!results) {
            print('failed measurement');
        } else {
            print(date + ', Temp: ' + results.temp.toFixed(1) + ', Humi: ' + results.humi.toFixed(1));
        }
        measureFlag = 0;
    }
}

//Termination processing
clearInterval(to);
i2c.close();
nqEx.enI2CS(false);
nqEx.enI2CL(false);
throw '#nqEXIT';
Example 2
Sending measured temperature and humidity data to the NEQTO Console.
//==============================================================
//  Sample scenario
//==============================================================
//  Measure temperature and humidity data using NEQTO library.
//==============================================================
log.setLevel(0,2); //-1:NONE 0:ERROR 1:WARNING 2:DEBUG 3:TRACE, 0:DISABLE 1:LOG 2:CONSOLE 3:BOTH
log.printLevel(2); //0:DISABLE 1:LOG 2:CONSOLE 3:BOTH

if(!('HTS221' in this)) {
    throw new Error('Please add the HTS221_V2 Library to the Script');
}

if(nqEx.getBoardType()) { //using IO board or Digital IO board
    nqEx.enI2CS(true); //Required to use the I2C Short port
    nqEx.enI2CL(true); //Required to use the I2C Long port
}

var i2c = new I2C(1)

i2c.open(400000);
var hts221 = new HTS221(i2c);
var ready = hts221.init();
if(!ready) {
    print('Unable to connect to HTS221');
    i2c.close();
}

//neqto MQTT event handler
nqMqtt.on('push', function(message) {
    print(Date() + ': nqmqtt push ' + message);
    if(message == 'exit') {
        actflag = 0;
    }
});
nqMqtt.on('error', function(error) {
    print(Date() + ': nqmqtt error ' + error.code);
});
nqMqtt.on('connect', function(connack) {
    print(Date() + ': nqmqtt connect');
});
nqMqtt.on('close', function() {
    print(Date() + ': nqmqtt close');
});

var timerInterval = 3000; //ms
var numOfTimes = 10;

var to = setInterval(function() { measureFlag = 1; }, timerInterval);

//==============================================================
//  Main Loop
//==============================================================
var actflag = 1;
var measureFlag = 0;
while(actflag){
    if(ready && numOfTimes && measureFlag) {
        var date = new Date();
        hts221.measOn();
        results = hts221.checkStatusAndGetResult();
        hts221.measOff();
        if(!results) {
            print('failed measurement');
        } else {
            print(date + ', Temp: ' + results.temp.toFixed(1) + ', Humi: ' + results.humi.toFixed(1));
            if(nqMqtt.canPublish()) {
                var tempobj = nqMqtt.get('LwM2MObject', date.getTime(), 3303, 0, 5700, 'Float', results.temp.toString());
                var humiobj = nqMqtt.get('LwM2MObject', date.getTime(), 3304, 0, 5700, 'Float', results.humi.toString());
                var mqttdata = [tempobj, humiobj];
                nqMqtt.publish(null, mqttdata, function(err) {
                    if(err.code == 0) {
                        print('publish successful');
                    } else {
                        print('publish failure');
                    }
                    numOfTimes--;
                    if(!numOfTimes) {
                        print('finished');
                    }
                });
            } else {
                print('publish was skipped');
            }
        }
        measureFlag = 0;
    }
}

//Termination processing
clearInterval(to);
i2c.close();
nqEx.enI2CS(false);
nqEx.enI2CL(false);
throw '#nqEXIT';
The following Components' settings are used as the destination for the data:
| Name | Object | Resource | Instance |
|---|---|---|---|
Temperature Measurements | Temperature | Sensor Value | 0 |
Humidity Measurements | Humidity | Sensor Value | 0 |
Example 3
Accessing the sensor directly by controlling the I2C interface.
//==============================================================
//  Sample scenario
//==============================================================
//  Directly control the I2C interface to access the sensor.
//==============================================================
log.setLevel(0,2); //-1:NONE 0:ERROR 1:WARNING 2:DEBUG 3:TRACE, 0:DISABLE 1:LOG 2:CONSOLE 3:BOTH
log.printLevel(2); //0:DISABLE 1:LOG 2:CONSOLE 3:BOTH

if(nqEx.getBoardType()) { //using IO board or Digital IO board
    nqEx.enI2CS(true); //Required to use the I2C Short port
    nqEx.enI2CL(true); //Required to use the I2C Long port
}

var i2c = new I2C(1);

i2c.open(400000);

var SLAVE_ADDR = 0x5F;   //HTS221 slave address
var REG_WHO_AM_I = 0x0F; //HTS221 device ID register address

var wrBuf = new ArrayBuffer(1);
var wrAry = new Uint8Array(wrBuf);
wrAry[0] = REG_WHO_AM_I;

print('Send : 0x' + ('0' + wrAry[0].toString(16).toUpperCase()).slice(-2));

if(i2c.write(SLAVE_ADDR, wrBuf)) {
    var rdBuf = i2c.read(SLAVE_ADDR, 1);
    if(rdBuf.byteLength > 0) {
        var rdAry = new Uint8Array(rdBuf);
        print('Device ID : 0x' + ('0' + rdAry[0].toString(16).toUpperCase()).slice(-2));
    }
}

i2c.close();
nqEx.enI2CS(false);
nqEx.enI2CL(false);