Device Management
Controlling & Managing Devices
NEQTO Console enables customers to remotely control and manage IoT devices and deployments. Through NEQTO Console's streamlined UI accessible from any computer, tablet, or smartphone browser, users can access these features and perform various operations such as viewing real-time data or sending commands to deployed devices.
Managing Devices & Licenses
From the NEQTO Console, it is possible to control and manage the devices linked with a license and available within the NEQTO service.
Licenses
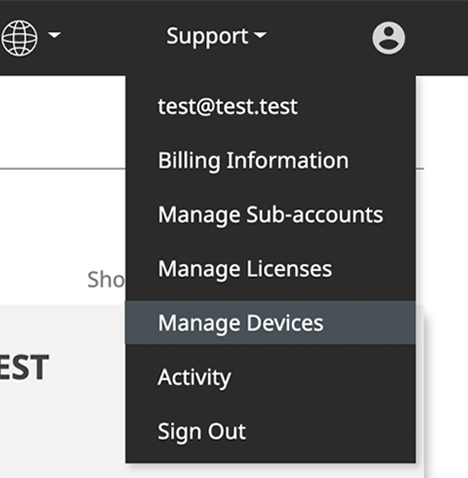
All devices connected to NEQTO Console require an appropriate license. To manage licenses, click on the user icon and select "Manage Licenses" from the drop-down menu.

Licenses contain the following user-input information.
| Field | Description |
|---|---|
| Hardware Reference (Required) | Select the supported hardware reference to link with the new license. |
Add a License
- Click the "Add License" button in the upper-right hand corner of the Licenses page.
- Select the appropriate hardware reference.
- Select the check box with the understanding that registering a license will start billing for that license.
- Click "Save" to register the license.
Unused licenses will continue to incur costs. Please be sure to remove unused licenses.
Delete a License
- Next to the license, click the "X" icon to open the deletion confirmation dialogue.
- Input the License ID of the license to confirm, then click the delete button.
If a license is linked to a device, the license for that device must be switched, or the device must be deleted before the license can be deleted.
Devices
To manage devices, click on the user icon and select "Manage Devices" from the drop-down menu.
Devices contain the following user-input information.
| Field | Description |
|---|---|
| Note | Because devices use alphanumeric IDs, preparing a note makes it easier to identify and search for a device within the organization. |
| Hardware Reference (Required) | Select the hardware reference of NEQTO device you are using. |
| License (Required*¹) | Search using License ID and select the license you wish to link to the device. |
| Serial ID (Required*²) | The serial ID associated with your NEQTO Bridge. |
| Product Key (Required*²) | The product key for your NEQTO Bridge. |
*¹ This field is only required when using an existing license with the device.
*² This field is only required for NEQTO Bridge Hardware Reference.
Add a Device
To perform batch registration of devices, refer here.
- Click the "Add Device" button in the upper-right hand corner of the Devices page.
- Input a note to help identify the device within the organization.
- Select the appropriate hardware reference.
- Input an existing license ID in the License field, or select the "Create a new license for this device?" checkbox.
- If you are creating a new license, select the check box with the understanding that you will be billed for the license.
- If "NEQTO Bridge" is selected as the hardware reference, input the device's serial ID and product key. The serial ID and product key can be verified via a QR code attached to the device. The QR code can be scanned in the "Add Device" view.
- Click "Save" to register the device.
Scanning a QR Code (NEQTO Bridge)
A QR code can be scanned using the QR code scanner in the "Add Device" view.
Align the device's QR code with the red frame of the QR code scanner. Upon a successful scan, the serial ID and product key fields will be input automatically.
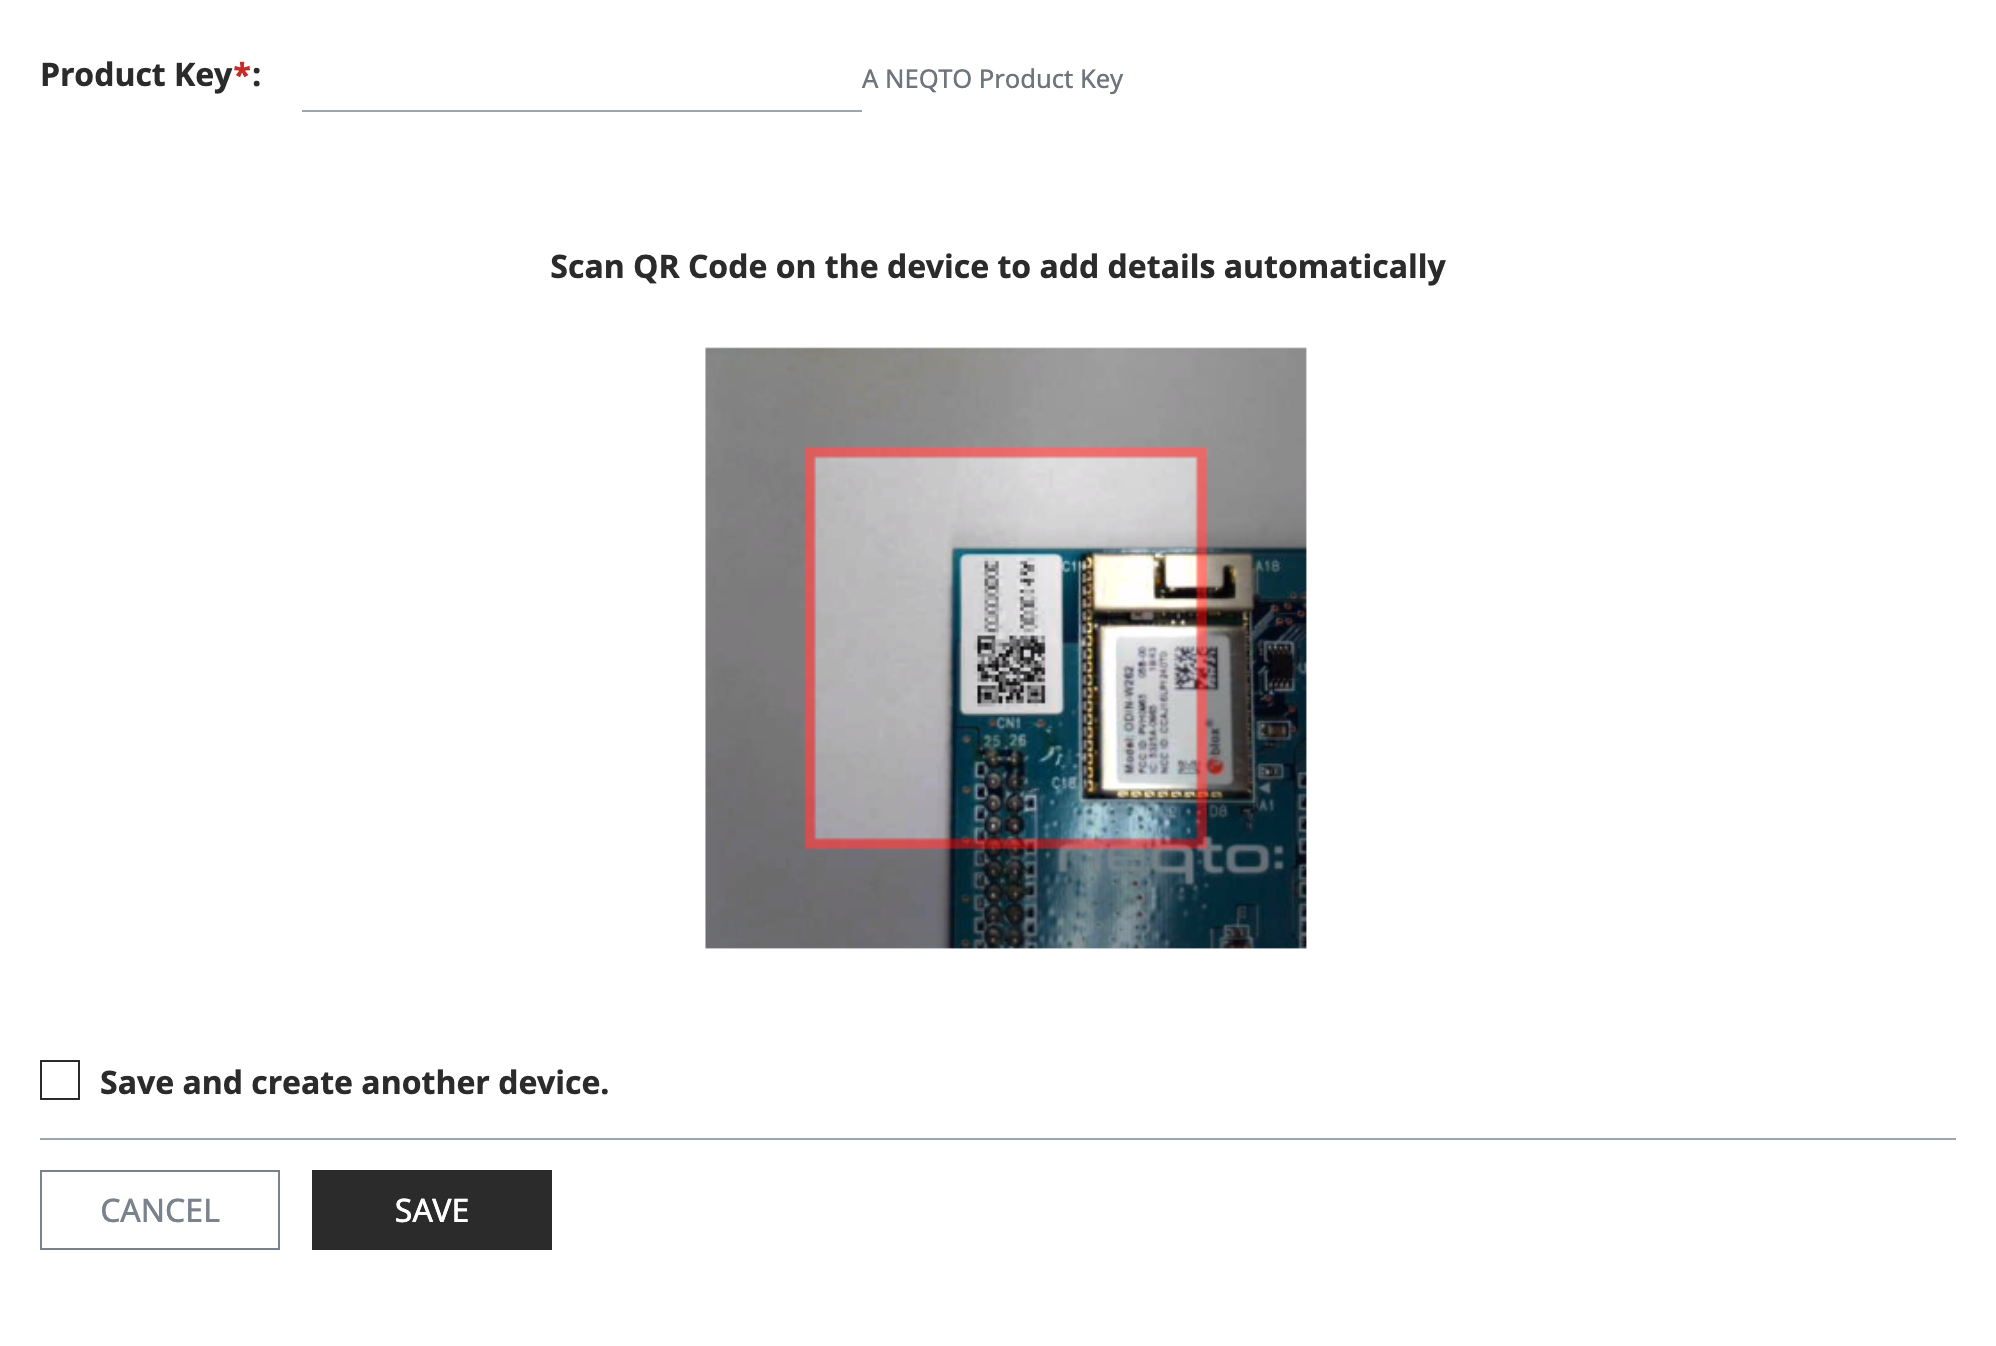
- On iOS 11, QR scanner is only supported on Safari.
- If scanning the QR code is difficult through webcam, consider using a mobile phone camera or an additional clip-type macro lens.
View a Device's Details
- Within the Devices page, locate the device to confirm from the list.
- Click the "Details" button.

- Remember to keep details like serial IDs and challenge codes a secret!
Challenge Code
A "challenge code" is a one-time code used to dynamically issue a serial ID from the NEQTO Console to a Spresense or STM32 Discovery device in the initial setup process (challenge registration). (Spresense Wi-Fi/Spresense LTE-M/STM32 Discovery Wi-Fi)
The challenge code will be displayed in the device details until challenge registration is performed, after which it will remain hidden.

A challenge code can be regenerated using the "Regenerate" button. By doing so, the previous challenge code will be invalidated and will require performing the challenge registration again using the new challenge code.
Edit or Delete a Device
- Navigate to the device list and reference the above picture.
- Click the pencil icon in the row of the device you wish to edit.
To Edit
- Change the Meta Data or License Details. It is possible to change the license which is linked to the device.
- To switch the device's license to a newly generated license, select the "Switch to a new license." checkbox.
- To switch the device's license to a different existing license, input the license ID into the "Switch to an unused license" field.
- If the license linked to the device will be changed, it is possible to select the "Delete the old license when switching." checkbox, to delete the device's current license before switching licenses.
- Click "Save" to confirm the changes or "X" to cancel this operation.
To Delete
- In the lower-left corner of the "Edit Device" view, click the "Delete Device" button.
- Input in the serial ID of the device to confirm, then click the "Delete" button.
Region Selection
Before creating the following resources ensure the preferred region is selected at the top of the screen. We recommend using the region closest to your physical devices.
Groups
As implied by the name, "Groups" define an organizational unit and grouping of resources in NEQTO Console. Devices are registered to Groups as Nodes, along with firmware and other resources.
The following settings are available in Group registration:
| Field | Description |
|---|---|
| Name (Required) | Enter the name for the Group. |
| Note | Any description that may help your organization identify this Group. |
| Infinitypool | Check to opt-in to this optional service. |
| Insights | Check to opt-in to this optional service. |
Add a Group
- At the Groups page, click the "Add Group" button in the upper-right hand corner.
- Enter the necessary settings.
- Click the "Save" button to register the Group.
Edit or Delete a Group
- Navigate to the Groups page.
- Click the gear icon in the area of the Group you wish to edit.
To Edit
- Edit the settings as necessary
- Click "Save" to commit the changes or "X" to cancel this operation.
To Delete
- In the lower-left corner of the dialogue click the "Delete Group" button.
- Enter in the name of the Group to confirm, then click the delete button.
- When editing a Group, you may notice the "Optional Services" category. Optional services allow you to opt-in to NEQTO Apps. They are opt-out by default.

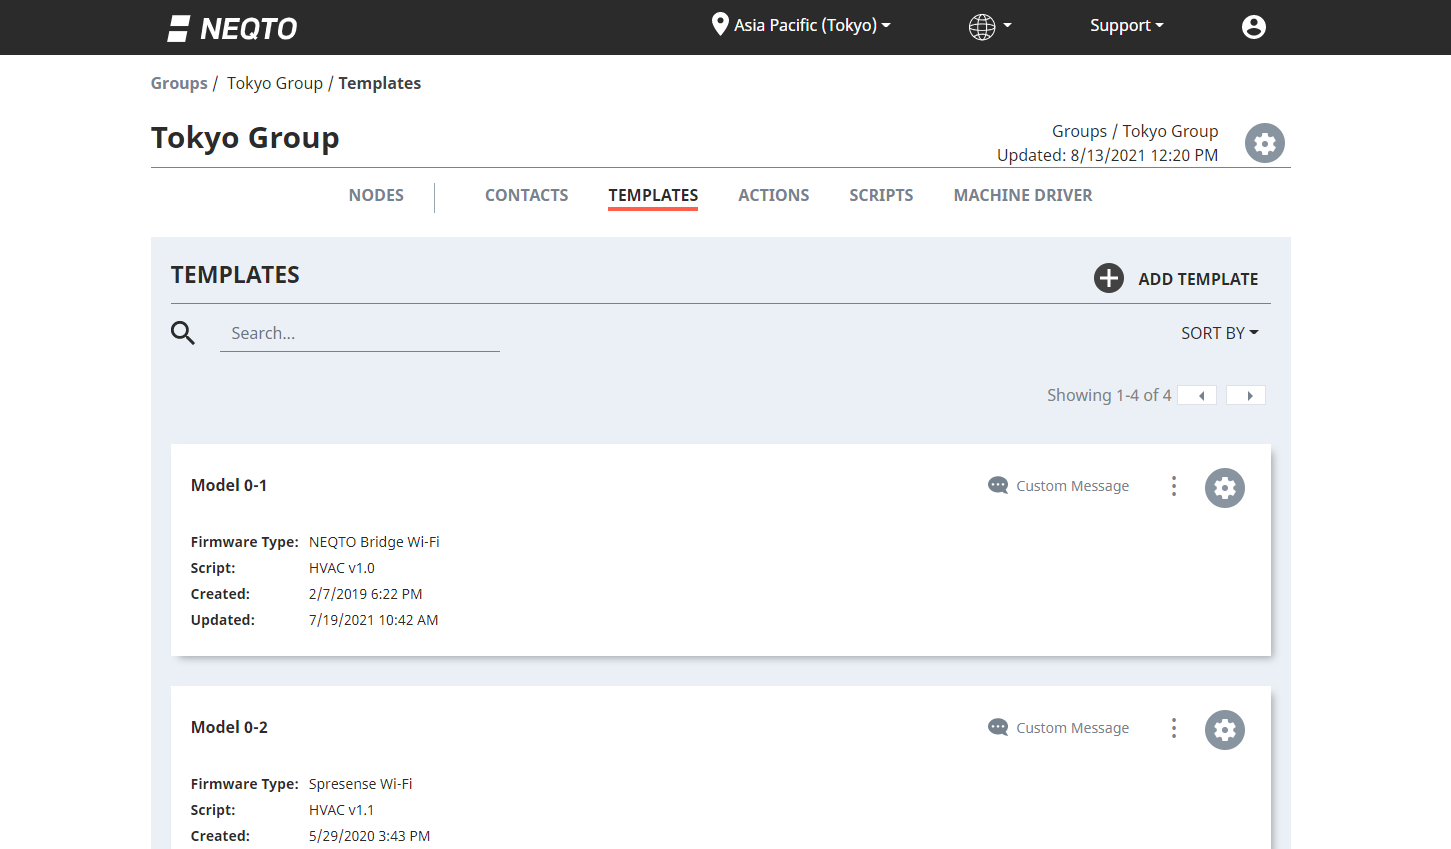
Templates
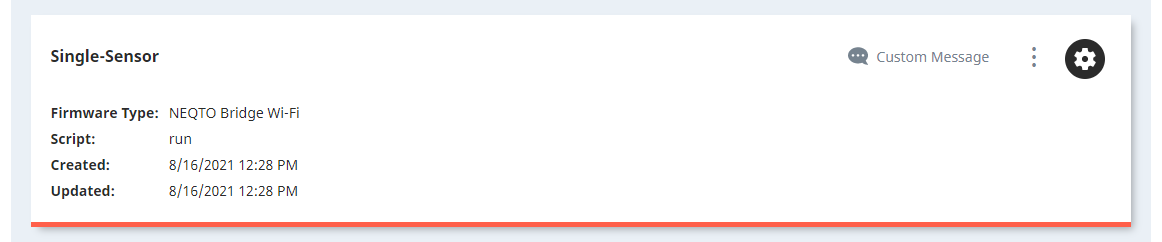
Templates are virtual "models" of devices. They define physical hardware configurations and allow Nodes of the same type of device to be easily created, updated, and operated on.
A Template defines the following aspects of a device:
| Field | Detail |
|---|---|
| Name (Required) | Enter a name for the Template. |
| Firmware Type (Required) | Select firmware type. |
| Firmware Version (Required) | Select firmware version. It is recommended to select the latest version. |
| Machine Driver Package | Set the Machine Driver Package. You can specify the firmware of instruments connected to the device. |
| Script | Set the script and business logic to run on the device. |
| Environment Variables | Enter the Environment Variables for the Template. See here for usage in scripts. |
- Components are instruments such as sensors or other MCUs that are connected to a NEQTO Device. They are set on a per Template basis.
- Available device firmware vary based on the selected firmware type. Please confirm the correct firmware type before saving to prevent misuse of devices.
- The order of precedence for Environment Variables from highest to lowest is as follows: Nodes, Templates, Scripts.
Add a Template
- Navigate to the "Templates" resource page.
- In the upper right-hand corner, click the "Add Template" button.
- Enter the necessary settings.
- Click "Save" at the bottom of the dialogue.
Edit or Delete a Template
- Navigate to the "Templates" resource page.
- Find the Template you wish to edit or delete and click the gear icon.
To Edit
- Edit the settings as necessary.
- Click "Save" at the bottom of the dialogue.
To Delete
- Click the "Delete Template" button in the left-hand bottom corner of the dialogue.
- Enter the Templates name to confirm, then click the "Delete" button.
Trigger Commands on a Template
Via the "Control Center Menu" accessible from the list of Templates, you can quickly send commands to all Nodes that belong to a Template.
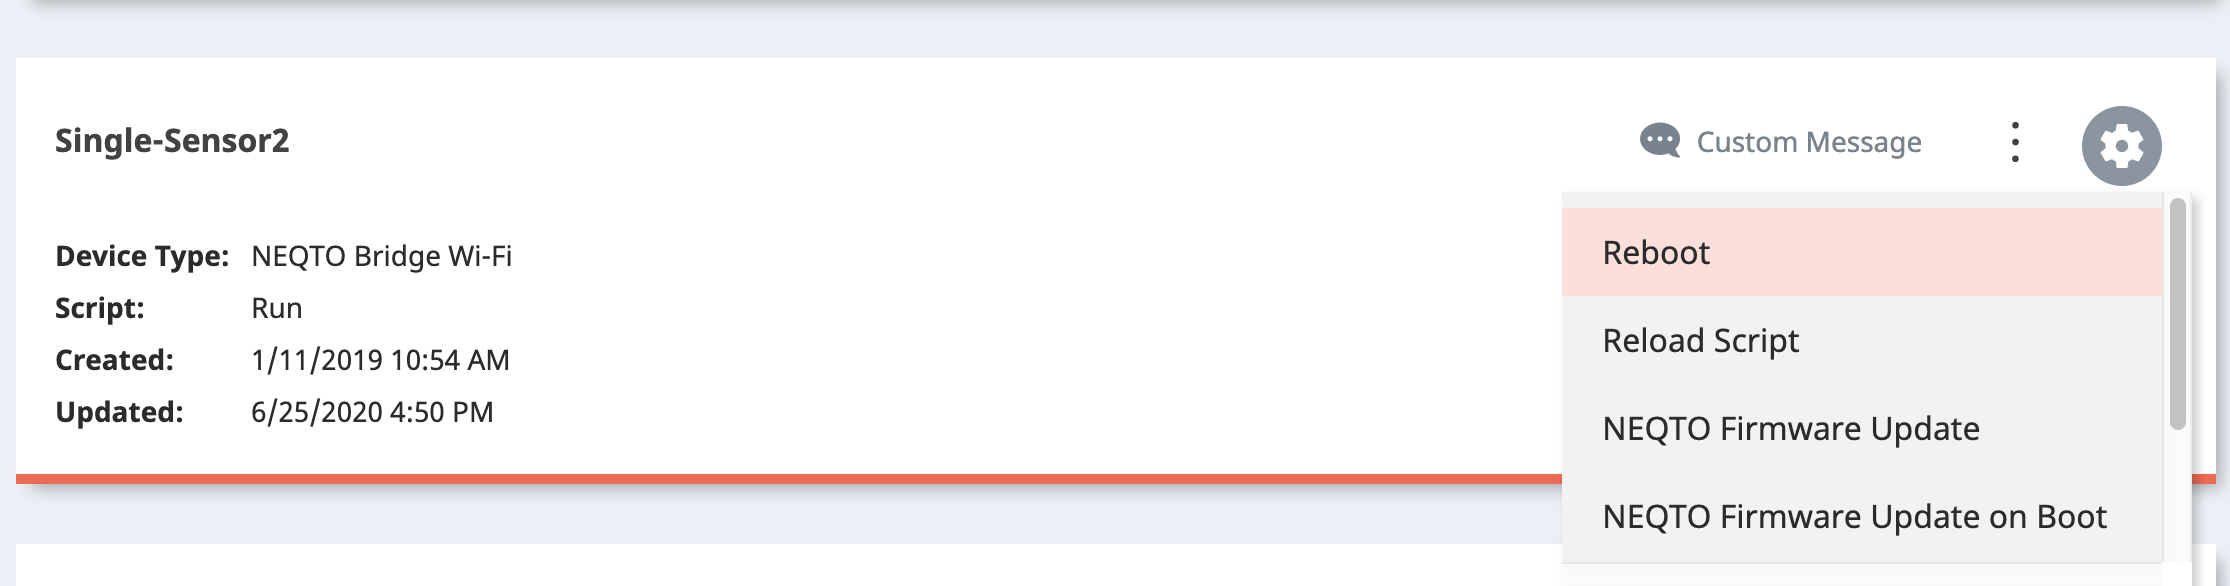
The following commands are supported:
| Command | Detail |
|---|---|
| Custom Message | Send a custom MQTT message to the device. |
| Reboot | Reboot the device. Rebooting the device will also reload the script. |
| Reload Script | Download the newest version of the neqto.js script from the cloud and begin executing it. |
| NEQTO Firmware Update | Executes FOTA on the actual NEQTO device. The device firmware set in the Template will be used. Only official NEQTO Firmware can be used. |
| NEQTO Firmware Update on Boot¹ | On the device's next boot, the firmware will be downloaded and FOTA will be triggered on the actual NEQTO device. The device firmware set in the Template will be used. |
| Machine Driver Update | Executes FOTA on connected sub-devices. Uses the Machine Driver set in the Template. Customers can register their own firmware to set as a Machine Driver. See Machine Driver for more information. |
| Machine Driver Update on Boot¹𝄒² | On the device's next boot, the firmware will be downloaded and FOTA will be triggered on the connected sub-devices. The Machine Driver set in the Template will be used. |
| Cancel Update on Boot for all Nodes | Cancels pending Update on Boot command executions for all Nodes assigned to the Template. |
nqFOTA object's .reportResult() method must be executed in the script for Machine Driver.
Components
Templates also contain components, which define the instruments connected to a device.
Components are defined using the LwM2M Standards.
When registering a component, the following options are available:
The following options apply to the Device Information tab:
| Field | Detail |
|---|---|
| Name (Required) | Enter a name for the component. |
| Note | Enter a description. |
| Object (Required) | Set an object ID. (Type of sensor) |
| Resource (Required) | Set a resource ID. (Type of data) |
| Instance (Required) | Set an instance ID number. (0-2147483647) When a sensor (Object and Resource) are the same, change and set the instance ID. |
| Privacy Mode | Use this if sending personal information. |
The below options apply to the Graph Settings tab (Infinitypool customers only):
| Field | Detail |
|---|---|
| Y-Axis Label | Specify the Y-axis label to be displayed on the graph. |
| Minimum | Specify lower limit to be displayed on the graph. |
| Maximum | Specify upper limit to be displayed on the graph. |
To add a component
- Select the desired Template from the Templates list.
- On that Template's dashboard, in the upper-right hand corner of the "Components" section, click "Add Component".
- Enter the necessary settings.
- Click the "Save" button at the bottom of the dialogue.
To Edit or Delete component
- From the list of components, click the pencil icon in the row of the component you wish to edit.
To Edit
- Edit the settings as necessary.
- Click "Save" at the bottom of the dialogue.
To Delete
- Click the "Delete component" button in the left-hand bottom corner of the dialogue.
- Enter the components name to confirm, then click the "Delete" button.
Event Notifications
Templates also contain Notifications that can be set when certain events related to a device occur.
To use notifications, you will need an Action.
Based on the event and the level, the action will be triggered.
When registering a notification the following settings are available:
Event Type
| Type | Detail |
|---|---|
| User | User messages (From user script) |
| Engine | NEQTO Engine event messages |
| Battery | Battery status event messages |
| Flow | NEQTO Flow notification messages |
| FOTA | FOTA event messages |
Event Level
| Level | Detail |
|---|---|
| Info | Debug Information etc. |
| Warn | Minor error (Can continue operation) |
| Error | Major error (Cannot continue operation) |
| Fatal | Fatal error |
To add a Notification
- Select the desired Template from the Templates list.
- On that Template's dashboard, in the upper-right hand corner of the "Notification" section, click "Add Notification".
- Enter the necessary settings.
- Click the "Save" button at the bottom of the dialogue.
To Edit or Delete a Notification
- From the list of Notifications, click the pencil icon in the row of the component you wish to edit.
To Edit
- Edit the settings as necessary.
- Click "Save" at the bottom of the dialogue.
To Delete
- Click the "Delete Notification" button in the left-hand bottom corner of the dialogue.
- Enter the Notification's name to confirm, then click the "Delete" button.
- Actions triggered by an event also have access to the following dynamic information as variables.
Variable Value {event_type} Event Type name {event_level } Event Level {event_message} Event Message
Nodes
Nodes represent your NEQTO Engine devices in the NEQTO Console.
Nodes inherit many of their settings through Templates and other features.
Before registering a Node you will need 1 Template and at least 1 Device.
| Field | Detail |
|---|---|
| Name (Required) | Enter a name for the Node. |
| Note | Enter a description. |
| Template (Required) | Set a Template. |
| Serial ID (Required) | Enter the serial ID of the NEQTO Bridge. |
| Environment Variables | Enter the Environment Variables for the Node. See here for usage in Scripts. |
- The order of precedence for Environment Variables from highest to lowest is as follows: Nodes, Templates, Scripts.
Add a Node
To perform batch registration of Nodes, refer here.
- Navigate to the "Nodes" resource page.
- In the upper right-hand corner, click the "Add Node" button.
- Enter the necessary settings.
- Click "Save" at the bottom of the dialogue.
Edit or Delete a Node
- Navigate to the "Nodes" resource page.
- Find the Node you wish to edit or delete and click the gear icon.
When deleting a Node or switching devices, the Express Mode status must be "Undefined", "Unsupported" or "Disabled". In any other state, Express Mode must be disabled using the Express Mode settings.
To Edit
- Edit the settings as necessary.
- Click "Save" at the bottom of the dialogue.
To Delete
- Click the "Delete Node" button in the left-hand bottom corner of the dialogue.
- Enter the Nodes name to confirm, then click the "Delete" button.
Trigger Commands on a Node
Via the "Control Center Menu" accessible from the list of Nodes, you can quickly trigger commands on a single Node.
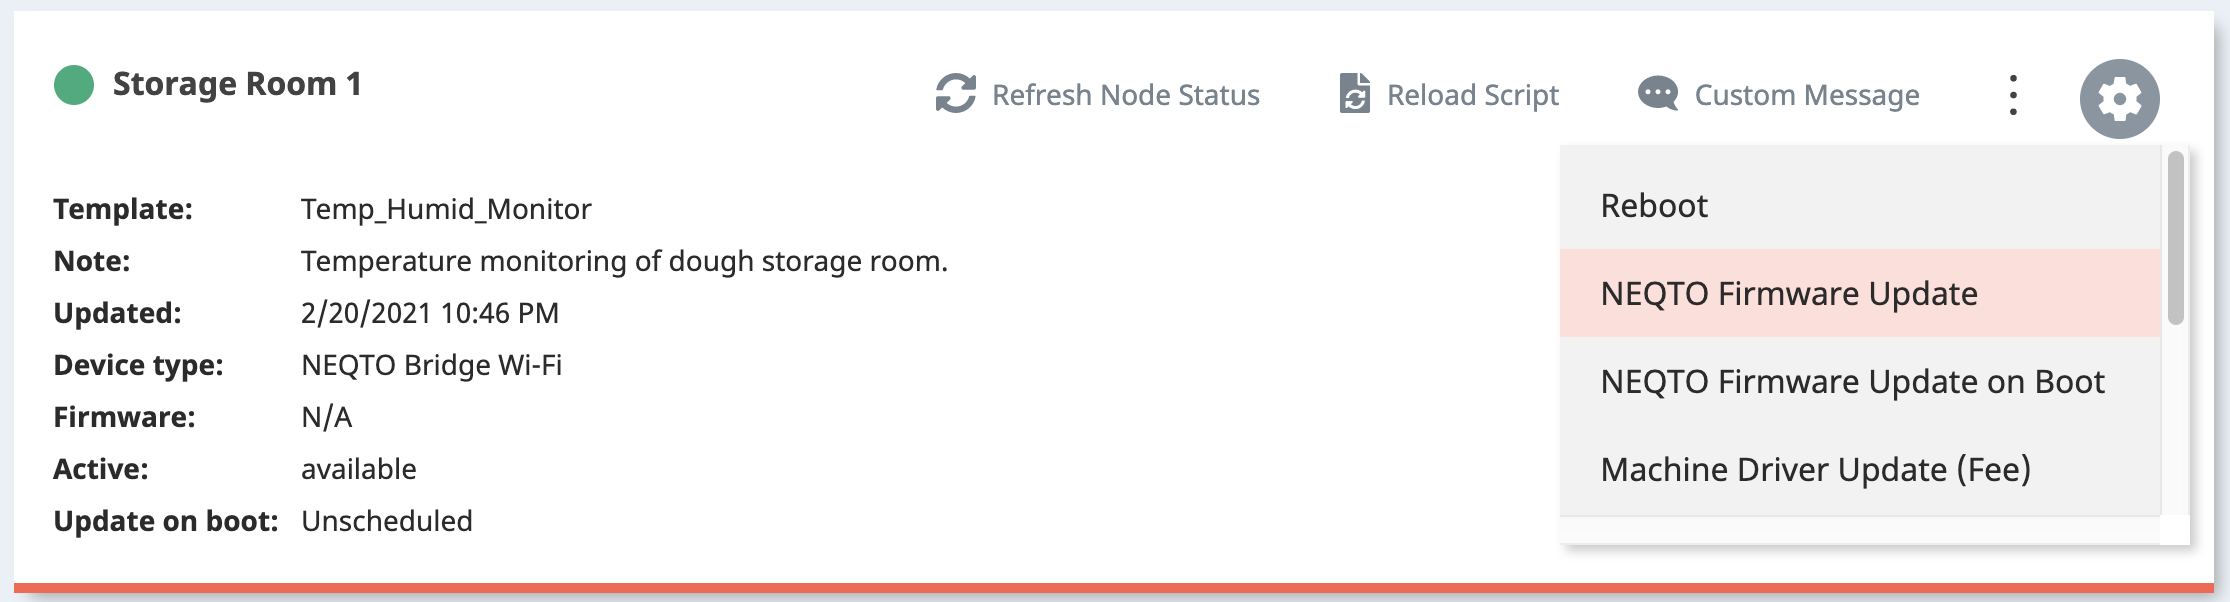
The following commands are supported:
| Command | Detail |
|---|---|
| Refresh Node Status | Request device to update its current configuration information to the Node. |
| Reload Script | Download the newest version of the neqto.js script from NEQTO and begin executing it. |
| Custom Message | Send a custom MQTT message to the device. |
| Reboot | Reboot the device. Rebooting the device will also reload the script. |
| NEQTO Firmware Update | Executes FOTA on the actual NEQTO device. The device firmware set in the Template will be used. |
| NEQTO Firmware Update on Boot¹ | On the script's next boot (script download), execute FOTA on the NEQTO device. The device firmware set in the Template will be used. |
| Machine Driver Update | Executes FOTA on the connected sub-devices. Uses the Machine Driver set in the Template. |
| Machine Driver Update on Boot¹𝄒² | On the script's next boot (script download), execute FOTA on the connected sub-devices. The Machine Driver set in the Template will be used. |
| Get Debug Log | Upload the logs stored on the device to NEQTO. The uploaded logs will be displayed in the debug logs area of each Node's page. Uploaded logs are stored for 30 days. |
| Renew Client Certificate | Replace the device's client-side SSL certificate. |
| Factory Reset | Resets the device to its factory conditions. This will erase all changes made to the device, so remote operation will become impossible. The initial setup procedure must be repeated before it can be used again. |
nqFOTA object's .reportResult() method must be executed in the script for Machine Driver.
Check the MQTT Status of a Node
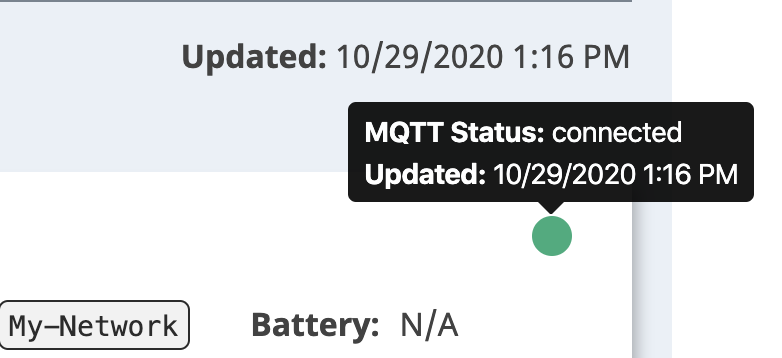
The MQTT Status icon can be found in the Node Status of a Node and on each Node in the Node list of a Group. The MQTT status of the Node can be determined by the color of the MQTT Status icon, or by hovering over the icon for more details.
| Icon | Status | Detail |
|---|---|---|
| disconnected | The device was disconnected normally from NEQTO Console. Nodes with devices which have not yet connected to the NEQTO Console also display this status. | |
| connected | The device is connected normally via MQTT to NEQTO Console. | |
| ungraceful | The device disconnected inadvertently from NEQTO Console. For example, the power supply of the device may have depleted or a network malfunction occurred. |
Using Express Mode
Express Mode is displayed on the Node page and in the Node list. The status of Express Mode is displayed and can be configured. For details on Express Mode, refer here: (NEQTO Bridge/STM32 Discovery/SPRESENSE).
Checking the status
The Express Mode on a device is either "Enabled" or "Disabled", however there are eight different Express Mode statuses that can be displayed on the NEQTO Console. Hover the mouse cursor over the information tooltip to display details for the Express Mode status.
| status | details |
|---|---|
| Undefined | The Express Mode settings have never been configured and the device has never connected to the NEQTO Console. |
| Unsupported | The NEQTO device does not support Express Mode. To use Express mode, upgrade the FW version and then enable Express mode. |
| Disabled | The Express Mode of the device is disabled. |
| Enabled | The Express Mode of the device is enabled. |
| Disabling | Express Mode deactivation has been accepted. To apply the settings on the device, trigger the "Renew Client Certificate" or "Reboot" command via the Node's "Control Center Menu" with the device connected to the NEQTO Console. |
| Enabling | Express Mode activation has been accepted. In order to activate Express Mode, trigger the "Renew Client Certificate" or "Reboot" command via the Node's "Control Center Menu" with the device connected to the NEQTO Console. |
| Disable Failed | Failed to disable Express Mode. Trigger the "Renew Client Certificate" or "Reboot" command via the Node's "Control Center Menu" with the device connected to the NEQTO Console. Express Mode is currently enabled on the device. |
| Enable Failed | Failed to enable Express Mode. Trigger the "Renew Client Certificate" or "Reboot" command via the Node's "Control Center Menu" with the device connected to the NEQTO Console. Express Mode is currently disabled on the device. |
Configuring Express Mode
When configuring Express Mode, please note the following (refer here):
- When switching devices
- When deleting a Node
- Click on the "Settings" button next to Express Mode for the Node.
- Depending on the current Express Mode status, an "Enable" or "Disable" button will be displayed on the configuration window.
- Read the notes on changing the current settings and click the "Enable" or "Disable" button.
- When the configuration is accepted, the Express Mode status will become "Enabling" or "Disabling".
- Trigger the "Renew Client Certificate" or "Reboot" command via the Node's "Control Center Menu" with the device connected to the NEQTO Console.
- If the Express Mode status is "Enabled" or "Disabled", the configuration has been set successfully.
List View for Nodes
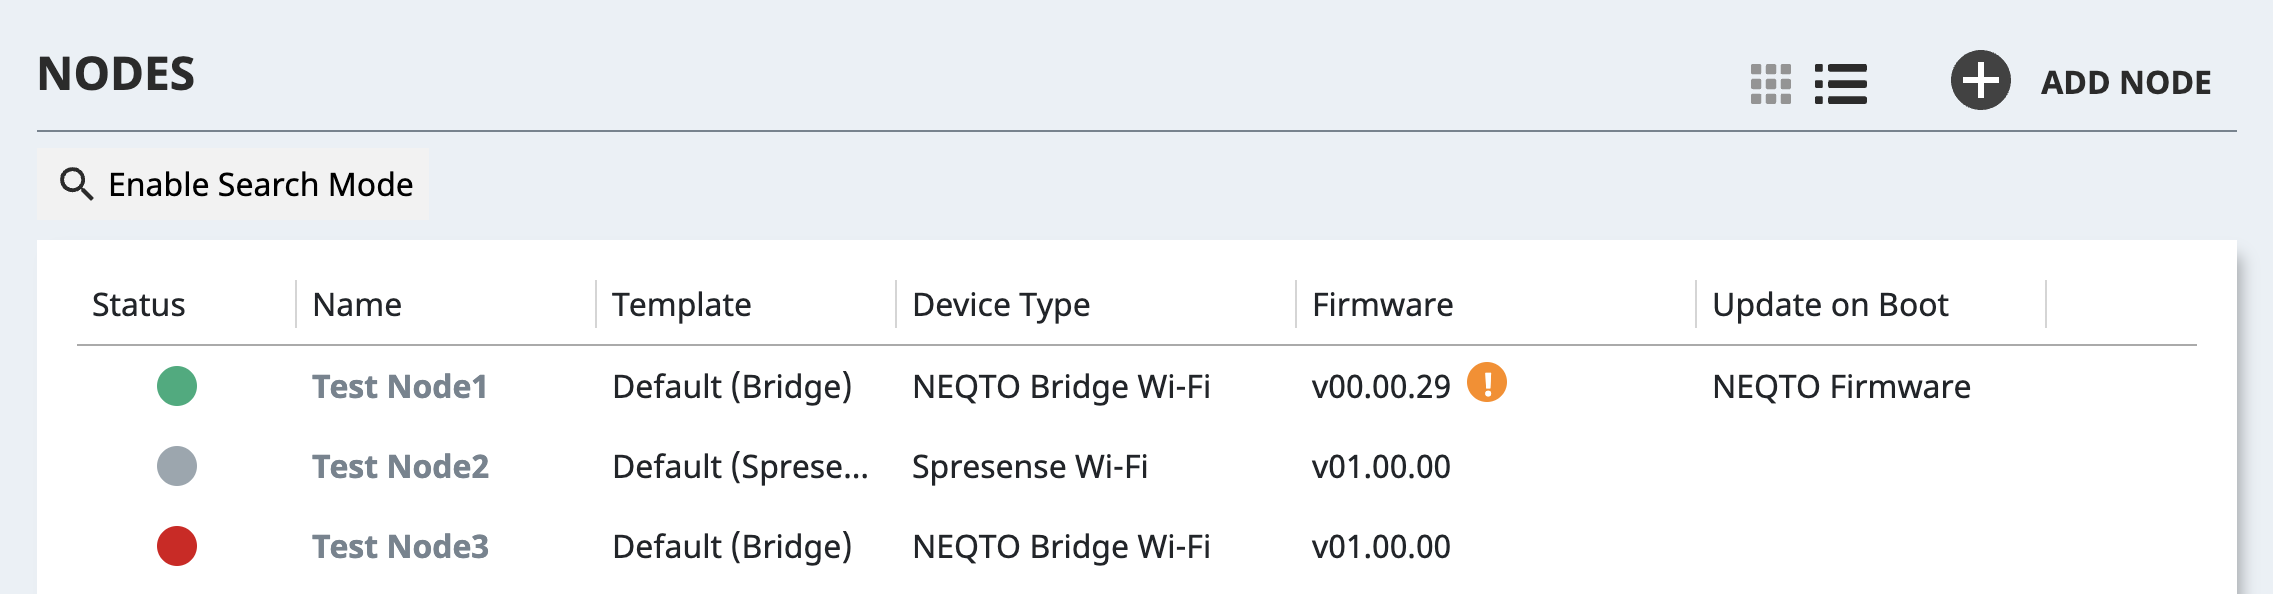
Icons for switching between Card View and List View can be found in the upper right of the Node list page of a Group. When List View is selected, a table containing a summary of all of the Nodes within the Group will be displayed.
By default, the Node list page is set to Card View.
The List View has many features for sorting and filtering Nodes to give an informative overview of the status of every Node. When there are large quantities of Nodes within a Group, any Nodes which are not displayed initially may be loaded with the "Load More" button which will appear at the bottom of the page.