02. 初期インストール
はじめに
ローカルPCを使用してSpresenseにNEQTO Engineを初期書き込みします。
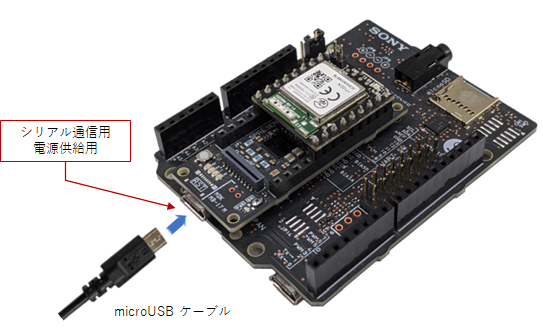
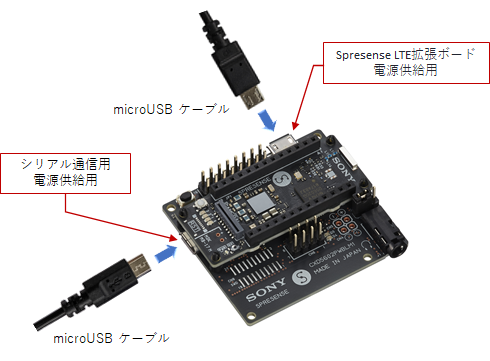
Spresenseシステム構成を参照し、事前にSpresenseハードウェア構成品を組み合わせた状態にしてください。
以後、上記、Spresenseハードウェア構成を使用した手順で説明します。
SpresenseにNEQTO Engineを書き込みを行う前に、下記、注意事項を確認してください。
注意事項
一度、SpresenseにNEQTO Engineの書き込み行うと、以降、Spresense SDKを使って任意に作成したアプリケーションソフトウェアに書き換えることができなくなります。Spresense購入時の初期状態に戻すこともできませんので注意してください。
SpresenseにNEQTO Engineを書き込みしている際、書き込み完了まで、電源を切らないように注意してください。故障の要因になります。
書き込みツールは、ローカルPC上で専用アプリケーション(.exe)を実行します。使用するPCのセキュリティ機能やセキュリティソフトウェアの影響により、アプリケーションの動作が制限された場合、正常に動作しない場合がありますので注意してください。
この初期インストール手順は、既にNEQTO EngineがインストールされているSpresenseに対して、ファームウェアのローカルバージョンアップ手順として適用できます。
又、Spresense Wi-Fi用ファームウェアからSpresense LTE-M用ファームウェアへ、Spresense LTE-M用ファームウェアからSpresense Wi-Fi用ファームウェアへの入れ替えも可能です。
その際、既にSpresenseへ設定済みのパラメータは引き継がれ、ファームウェアのみ更新されます。
ダウンロード
NEQTO Engine書き込みツール
Spresense Wi-Fi用書き込みツール (Spresense Wi-Fi構成を使用する場合)
- ImageBurnTool_neqtoSpresenseWiFi_Engine(v02.04.00) [2025/03/25] (Latest)
- ImageBurnTool_neqtoSpresenseWiFi_Engine(v02.03.00) [2025/01/29]
- ImageBurnTool_neqtoSpresenseWiFi_Engine(v02.02.01) [2024/03/28]
- ImageBurnTool_neqtoSpresenseWiFi_Engine(v02.02.00) [2024/01/30]
- ImageBurnTool_neqtoSpresenseWiFi_Engine(v02.01.00) [2023/09/28]
- ImageBurnTool_neqtoSpresenseWiFi_Engine(v02.00.01) [2022/06/28]
- ImageBurnTool_neqtoSpresenseWiFi_Engine(v02.00.00) [2022/06/02]
- ImageBurnTool_neqtoSpresenseWiFi_Engine(v01.03.02) [2021/08/24]
- ImageBurnTool_neqtoSpresenseWiFi_Engine(v01.03.01) [2021/07/06]
- ImageBurnTool_neqtoSpresenseWiFi_Engine(v01.03.00) [2021/05/18]
- ImageBurnTool_neqtoSpresenseWiFi_Engine(v01.02.00) [2021/01/18]
Spresense LTE-M用書き込みツール (Spresense LTE-M構成を使用する場合)
- ImageBurnTool_neqtoSpresenseLteM_Engine(v02.04.00) [2025/03/25] (Latest)
- ImageBurnTool_neqtoSpresenseLteM_Engine(v02.03.00) [2025/01/29]
- ImageBurnTool_neqtoSpresenseLteM_Engine(v02.02.01) [2024/03/28]
- ImageBurnTool_neqtoSpresenseLteM_Engine(v02.02.00) [2024/01/30]
- ImageBurnTool_neqtoSpresenseLteM_Engine(v02.01.00) [2023/09/28]
- ImageBurnTool_neqtoSpresenseLteM_Engine(v02.00.01) [2022/06/28]
- ImageBurnTool_neqtoSpresenseLteM_Engine(v02.00.00) [2022/06/02]
- ImageBurnTool_neqtoSpresenseLteM_Engine(v01.03.02) [2021/08/24]
- ImageBurnTool_neqtoSpresenseLteM_Engine(v01.03.01) [2021/07/06]
- ImageBurnTool_neqtoSpresenseLteM_Engine(v01.03.00) [2021/05/18]
Version 02.00.00以降、LTEモジュールのファームウェアバージョン(RK_02_01_02_10_108_54)が必須となります。LTEモジュールのファームウェアは、Spresense LTE-M用書き込みツール又はFOTA実行により、必要に応じて自動アップデートされます。尚、LTEモジュールのファームウェアアップデートには、書き込みツールを使用した場合は20分以上、FOTAを使用した場合は30分以上時間が必要となります。(書き込みツールの使用を推奨します)
初期インストール手順 [Windows 10]
SpresenseにNEQTO Engineを書き込みます。以下の手順に沿って操作してください。
事前にTeraTerm(ターミナルソフト)がインストールされたWindows 10 PCを用意してください。
SpresenseボードをPCに接続する前に、USBシリアルドライバをインストールする必要があります。
下記リンクよりドライバをダウンロードし、インストールしてください。SpresenseメインボードとPCを通信用USBケーブルを使って接続します。
Spresense Wi-Fi構成を使用する場合

Spresense LTE-M構成を使用する場合

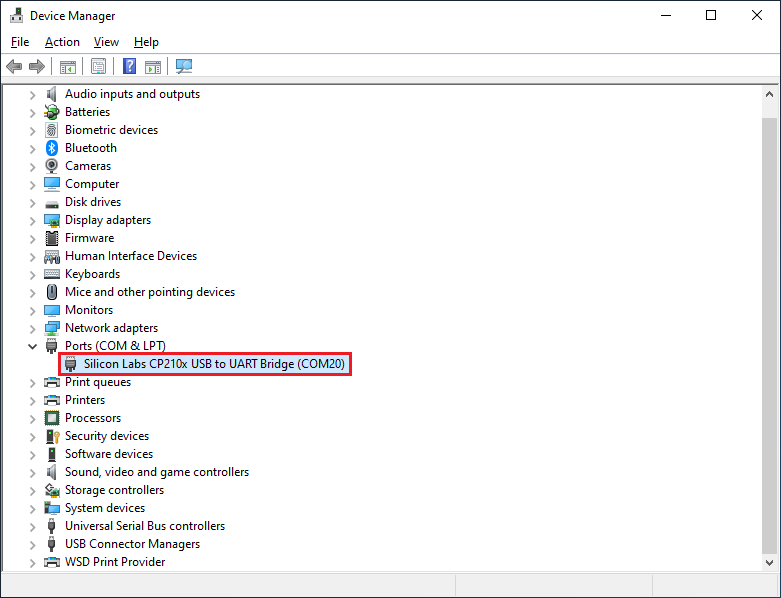
デバイスマネージャーを開き、Spresenseが接続されているCOMポート番号を確認します。

最新のNEQTO Engine書き込みツールをダウンロードしてください。
書き込みツール(zipファイル)を解凍し、ImageBurnToolフォルダ下に移動します。
SpresenseにNEQTO Engineの書き込みを開始します。
ImageBurnTool_neqtoEngineToSpresense_windows.batを実行してください。
※ 注意事項を確認してから実行してください。

コマンドプロンプトが立ち上がります。以降、ツールの指示に従って、進めてください。
注意事項を確認の上、同意する場合は
agreeを入力してください。
*** IMPORTANT ***
Once the NEQTO Engine has been burned to Spresense, it will no longer be possible to rewrite it with application software you develop using the Spresense SDK.
Please note that it is not possible to return to the initial state when Spresense was purchased.
If you agree and want to continue, please enter "agree" >> agree↵
Spresenseが接続されているCOMポート番号を入力し、エンターキーで次に進んでください。
============================================================
Step0: Settings
============================================================
Please enter the COM port number [ 1 ] : 20↵
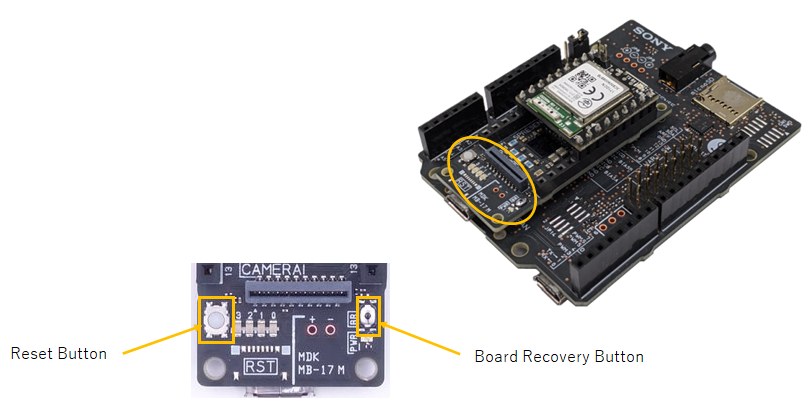
"Please press RESET button while holding down the Board Recovery button"メッセージが表示されたならば、Spresenseメインボードのボードリカバリボタンを押したままの状態で、リセットボタンを短押ししてください。...の表示が開始したならば、ボードリカバリボタンをリリースして、そのままお待ちください。...の表示が開始されなかった場合は、一度、ボードリカバリボタンをリリースして、再度、ボタン操作を行ってください。それでもうまくいかない場合は、一度、USBを外して、手順3からやり直してください。
============================================================
Step1: Recovery
============================================================
Please press RESET button while holding down the Board Recovery button

2回目の
"Please press RESET button while holding down the Board Recovery button"メッセージが表示されます。同様にボタン操作を行って、進めてください。============================================================
Step2: Configuration
============================================================
Please press RESET button while holding down the Board Recovery button
フラッシュ書き込みが完了するまでお待ちください。
============================================================
Step3: Flash Write
============================================================
>>> Install files ...
install -b 115200
Install image¥gnssfw.espk
|0%-----------------------------50%------------------------------100%|
############################################
LTEモジュールのファームウェアアップデートが必要な場合、自動的にアップデートが開始されます。(Spresense LTE-Mのみ)
LTEモジュールのファームウェアアップデートには20分以上時間を要します。
完了まで電源を切らずにお待ちください。============================================================
Step4: LTE Modem Firmware Update
============================================================
Spresense LTE Firmware Update Tool for NEQTO Engine
ver.1.0 - RK_02_01_01_10_41_15-RK_02_01_02_10_108_54
Checking LTE modem firmware version.............
RK_02_01_02_10_108_54 - FW update is required
LTE modem update image is being downloaded.
It may take several minutes to complete the process.
|0%-----------------------------50%------------------------------100%|
###################################################
LTE modem firmware is being updated.
It may take several minutes to complete the process.
Please wait for a while and do not turn off the power.
|0%-----------------------------50%------------------------------100%|
###################################################
Success
最終ステータスの
Successが表示されるまで、お待ちください。
ツールが途中でフリーズしたり、Failure表示となった場合は、再度、手順7からやり直してください。============================================================
Finish
============================================================
Success
ツールが最後まで進んだならば、書き込み完了となります。エンターキーを入力して、コマンドプロンプトを終了してください。
============================================================
Image Burn Tool 1.1 >> NEQTO Engine to Spresense
============================================================
*** IMPORTANT ***
Once the NEQTO Engine has been burned to Spresense, it will no longer be possible to rewrite it with application software you develop using the Spresense SDK.
Please note that it is not possible to return to the initial state when Spresense was purchased.
If you agree and want to continue, please enter "agree" >> agree↵
============================================================
Step0: Settings
============================================================
Please enter the COM port number [ 1 ] : 20↵
COM20
============================================================
Step1: Recovery
============================================================
Please press RESET button while holding down the Board Recovery button
..............................................................................................................................................................................................................................................................................................................................................................................................................................................................................................................................................................................................................................................................................................................................................................................................................................................................................Recovery Successful!
============================================================
Step2: Configuration
============================================================
Please press RESET button while holding down the Board Recovery button
....................................................Changed to encryption board!
============================================================
Step3: Flash Write
============================================================
>>> Install files ...
install -b 115200
Install image¥gnssfw.espk
|0%-----------------------------50%------------------------------100%|
###################################################
XXXXXX bytes loaded.
Package validation is OK.
Saving package to "gnssfw"
updater$ install -b 115200
Install image¥loader.espk
|0%-----------------------------50%------------------------------100%|
###################################################
XXXXXX bytes loaded.
Package validation is OK.
Saving package to "loader"
updater$ install -b 115200
Install image¥nuttx.espk
|0%-----------------------------50%------------------------------100%|
###################################################
XXXXXX bytes loaded.
Package validation is OK.
Saving package to "nuttx"
updater$ sync
updater$ Restarting the board ...
reboot
============================================================
Finish
============================================================
Success
