Tutorial Step 3. スクリプトを使ったアプリケーション開発
概要
Tutorial Step 3. では、スクリプトを更新しながら、アプリケーション開発を進める方法を説明します。
このチュートリアルを開始する前に、Tutorial Step 2.3 NEQTOサービスを開始します まで進めた状態にしてください。
» Tutorial Step 2.3 (NEQTO Bridgeをご使用の場合)➔
» Tutorial Step 2.3 (STM32 Discoveryをご使用の場合)➔
» Tutorial Step 2.3 (SPRESENSEをご使用の場合)➔
1. スクリプトの更新
関連リソース » スクリプト管理について
Tutorial Step 1.4 スクリプト登録で作成したスクリプトを開きます。
- スクリプトエディタで、15行目の後に以下を追加します
print(Array(loopcnt+2).join('#')); //Inserted code - 保存をクリックします
更新されたスクリプト
//==============================================================
//  Sample scenario
//==============================================================
//  Output "Hello World" to the log
//==============================================================
log.setLevel(0,2); //-1:NONE 0:ERROR 1:WARNING 2:DEBUG 3:TRACE, 0:DISABLE 1:LOG 2:CONSOLE 3:BOTH
log.printLevel(2); //0:DISABLE 1:LOG 2:CONSOLE 3:BOTH

var timerInterval = 1000; //ms
var maxNumOfTimes = 60;

var loopcnt = 0;
var to = setInterval(function() {
    var date = new Date();
    print(date.toString() + '+' +  date.getMilliseconds() + 'ms : Hello World!!! ' + loopcnt);
    print(Array(loopcnt+2).join('#')); //Inserted code
    if(++loopcnt >= maxNumOfTimes) {
        print('finished');
        clearInterval(to);
    }
}, timerInterval);
2. スクリプトのリロード
関連リソース » ノードコマンドについて
デバイスがNEQTOサービスに接続している状態で行ってください。
グループのトップメニューから「Nodes」タブを開きます。
- Tutorial Step 1.6 ノード登録で登録したノードを選択します
- 「 スクリプトの再ロード」コマンドをクリックします

3. 新しいスクリプトの実行
関連リソース » スクリプトの再ロードについて (NEQTO Bridge/STM32 Discovery/SPRESENSE)
デバイスはNEQTO Consoleからスクリプトの再ロード指示を受けると、一度スクリプトを終了し、更新されたスクリプトをダウンロードして実行します。
|
Thu Apr 08 2021 02:32:02 GMT+00:00+766ms : Hello World!!! 57 Thu Apr 08 2021 02:32:03 GMT+00:00+766ms : Hello World!!! 58 Thu Apr 08 2021 02:32:04 GMT+00:00+766ms : Hello World!!! 59 finished [system][info]Checking Script... [system][info]Script Updated Thu Apr 08 2021 02:34:04 GMT+00:00+766ms : Hello World!!! 0 # Thu Apr 08 2021 02:34:04 GMT+00:00+766ms : Hello World!!! 1 ## Thu Apr 08 2021 02:34:04 GMT+00:00+766ms : Hello World!!! 2 ### |
おわりに
これで「NEQTO Hello World!」は終了です。
neqto.jsには、モジュールが有するUART、SPI、I2C、GPIOなどのハードウェアインタフェースを直接制御する機能や、クラウド間通信、ストレージ、省電力制御など、IoT製品の開発に役立つ機能が豊富に用意されています。NEQTOを活用して、あなたのIoTソリューションを完成させてください。
「応用編」では、様々な入門サンプルが用意されています。開発の参考にしてください。
応用編
応用編で使用されているコードは、概念実証と一般的なガイダンスのためのものであり、本番環境で直接使用することを意図していません。
1. ダミーデータをNEQTO Consoleへ送信してみましょう
関連リソース
- コンポーネントについて
- NEQTO からConsoleでデータを表示する
- nqMQTTのデータフォーマットについて (
NEQTO Bridge/STM32 Discovery/SPRESENSE)
1. 新しいスクリプトを登録します
Scriptsページから、新しいスクリプトを登録します。
- 「スクリプト登録」をクリックします
- 必要な項目を入力してください
- 保存をクリックします
以下のサンプルコードをエディターに挿入し、保存をクリックします。
//==============================================================
//  Sample scenario
//==============================================================
//  Send dummy data to NEQTO Console
//==============================================================
log.setLevel(0,2); //-1:NONE 0:ERROR 1:WARNING 2:DEBUG 3:TRACE, 0:DISABLE 1:LOG 2:CONSOLE 3:BOTH
log.printLevel(2); //0:DISABLE 1:LOG 2:CONSOLE 3:BOTH

var timerInterval = 1000; //ms
var maxNumOfTimes = 60;

var to = setInterval(function() { publishFlag = 1; }, timerInterval);

//==============================================================
//  Main Loop
//==============================================================
var actFlag = 1;
var publishFlag = 0;
var loopcnt = 0;
while(actFlag) {
    if(publishFlag) {
        if(nqMqtt.canPublish()) {
            var valT = 20.2; /* dummy Temperature */
            valT += Math.pow(2, loopcnt*0.04) - 1;
            var strT = String(valT);
            var tempObj = nqMqtt.get('LwM2MObject', Date.now(), 3303, 0, 5700, 'Float', strT);
            nqMqtt.publish(null,tempObj,function(err) {
                if(err.code == 0) {
                    print('publish successful');
                } else {
                    print('publish failure');
                }
                if(++loopcnt >= maxNumOfTimes) {
                    print('finished');
                    clearInterval(to);
                    actFlag = 0;
                }
            });
        }
        publishFlag = 0;
    }
}
1. 新しいテンプレートを登録します
Templatesページから、新しいスクリプトを登録します。
- 「テンプレート登録」をクリックします
- 必要な項目を入力してください
- スクリプトでは、新たに登録したスクリプトを選択します
- 保存をクリックします
3. コンポーネント登録します
新しく作成したテンプレートを選択し、コンポーネントにスクロールします。
- 「コンポーネント登録」をクリックします
- 名前で、
Temperatureを入力します - オブジェクトで、
温度を選択します - リソースで,
センサ値を選択します - インスタンスで,
0を入力します - 保存をクリックして、コンポーネント作成を完了します
4. ノードを更新
ノードページから、先に作成したノードを選択します。
「 歯車アイコン」をクリックして、ノードの構成を編集します。
- テンプレートを新たに作成したテンプレートに置き換えます
- 保存をクリックします
- 更新されたノードを表示するためにページをリロードする
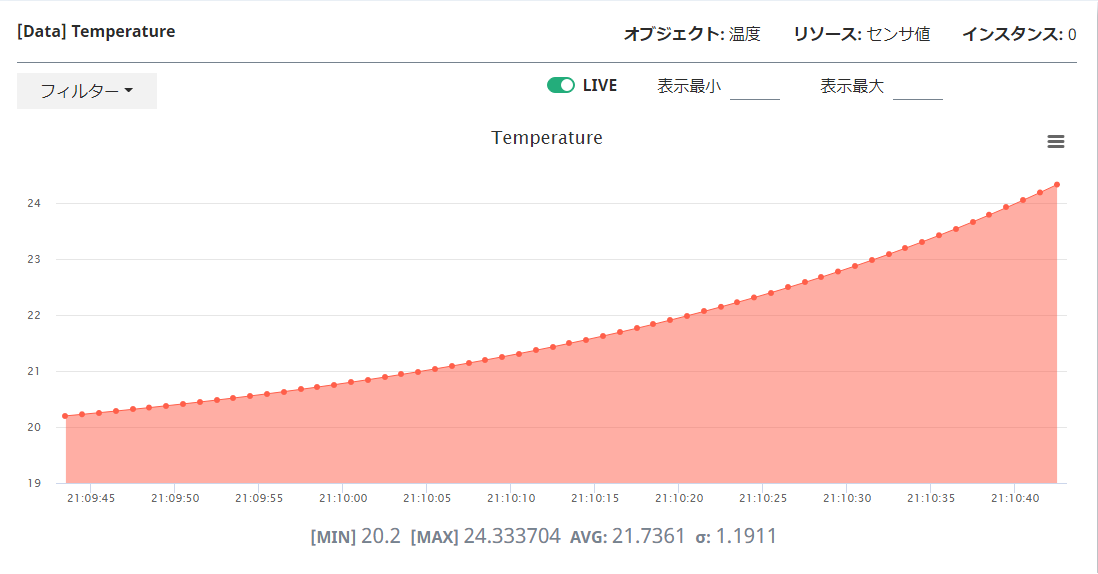
5. グラフ表示
ノードページから、コンポーネントにスクロールします。
Temperatureコンポーネントのチャートボタンをクリックします。- 「詳細チャートを表示」を選択します
チャートビューで、「LIVE」モードを切り替えます。
6. スクリプト実行
「 スクリプトの再ロード」ボタンをクリックすると、コマンドが実行されます。
2. LEDを制御してみましょう
SPRESENSE
関連リソース
- SPRESENSE Pinout
- 関連するneqto.jsオブジェクト (Timers, GPIO, nqMqtt)
結線図
 |
Spresense Wi-Fi | 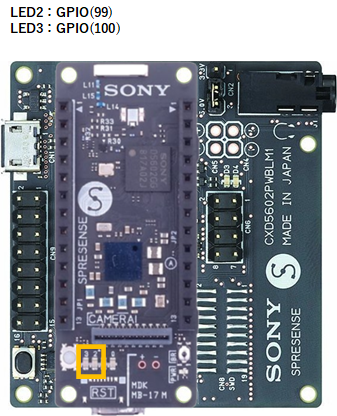 |
Spresense LTE-M |
Example 1
1秒周期でLEDをON/OFFしてみましょう。
//==============================================================
//  Sample scenario
//==============================================================
//  Turn the LED on and off with a timer.
//==============================================================
log.setLevel(0,2); //-1:NONE 0:ERROR 1:WARNING 2:DEBUG 3:TRACE, 0:DISABLE 1:LOG 2:CONSOLE 3:BOTH
log.printLevel(2); //0:DISABLE 1:LOG 2:CONSOLE 3:BOTH

var gpioLED2 = new GPIO(99,5);  //OUT:PUSH-PULL
var gpioLED3 = new GPIO(100,5); //OUT:PUSH-PULL
gpioLED2.setValue(0);
gpioLED3.setValue(0);

var timerInterval = 1000; //ms
var maxNumOfTimes = 30;

var loopcnt = 0;
var to = setInterval(function() {
    var date = new Date();
    if(++loopcnt >= maxNumOfTimes) {
        print(date + '+' +  date.getMilliseconds() + 'ms : finished');
        clearInterval(to);
        gpioLED2.setValue(0);
        gpioLED3.setValue(0);
    } else {
        print(date + '+' +  date.getMilliseconds() + 'ms : ' + (maxNumOfTimes - loopcnt));
        gpioLED2.setValue(loopcnt & 1);
        gpioLED3.setValue((loopcnt + 1) & 1);
    }
}, timerInterval);
Example 2
カスタムメッセージを使用してLEDをON/OFFしてみましょう。
//==============================================================
//  Sample scenario
//==============================================================
//  Turn the LED on and off with a custom message.
//==============================================================
log.setLevel(0,2); //-1:NONE 0:ERROR 1:WARNING 2:DEBUG 3:TRACE, 0:DISABLE 1:LOG 2:CONSOLE 3:BOTH
log.printLevel(2); //0:DISABLE 1:LOG 2:CONSOLE 3:BOTH

var gpioLED2 = new GPIO(99,5);  //OUT:PUSH-PULL
var gpioLED3 = new GPIO(100,5); //OUT:PUSH-PULL
gpioLED2.setValue(0);
gpioLED3.setValue(0);

//neqto MQTT event handler
nqMqtt.on('push', function(message) {
    print(Date() + ': nqmqtt push ' + message);
    if(message == 'exit') {
        actflag = 0;
    } else if(message == "led2 on") {
        gpioLED2.setValue(1);
    } else if(message == "led2 off") {
        gpioLED2.setValue(0);
    } else if(message == "led3 on") {
        gpioLED3.setValue(1);
    } else if(message == "led3 off") {
        gpioLED3.setValue(0);
    }
});
nqMqtt.on('error', function(error) {
    print(Date() + ': nqmqtt error ' + error.code);
});
nqMqtt.on('connect', function(connack) {
    print(Date() + ': nqmqtt connect');
});
nqMqtt.on('close', function() {
    print(Date() + ': nqmqtt close');
});

//==============================================================
//  Main Loop
//==============================================================
var actflag = 1;
print(Date() + ': Ready');
while(actflag) {
}

//Termination processing
gpioLED2.setValue(0);
gpioLED3.setValue(0);
throw '#nqEXIT';
カスタムメッセージから下記コマンドを実行してみましょう。
| カスタムコマンド | 内容 |
|---|---|
led2 on | led2を点灯します |
led2 off | led2を消灯します |
led3 on | led3を点灯します |
led3 off | led3を消灯します |
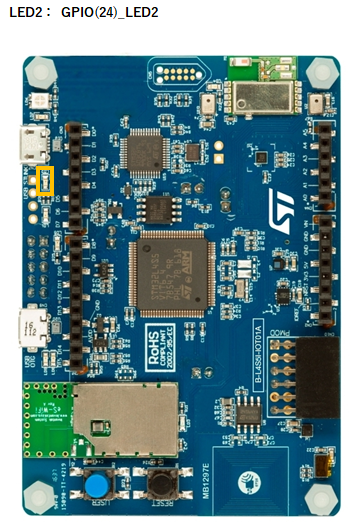
STM32 Discovery
Related resources:
- STM32 Discovery Kit (B-L4S5I-IOT01A) Pinout
- 関連するneqto.jsオブジェクト (Timers, GPIO, nqMqtt)
結線図
STM32 Discovery Kit (B-L4S5I-IOT01A)
Example 1
1秒周期でLEDをON/OFFしてみましょう。
//==============================================================
//  Sample scenario
//==============================================================
//  Turn the LED on and off with a timer.
//==============================================================
log.setLevel(0,2); //-1:NONE 0:ERROR 1:WARNING 2:DEBUG 3:TRACE, 0:DISABLE 1:LOG 2:CONSOLE 3:BOTH
log.printLevel(2); //0:DISABLE 1:LOG 2:CONSOLE 3:BOTH

var gpioLED2 = new GPIO(24,5);  //OUT:PUSH-PULL
gpioLED2.setValue(0);

var timerInterval = 1000; //ms
var maxNumOfTimes = 30;

var loopcnt = 0;
var to = setInterval(function() {
    var date = new Date();
    if(++loopcnt >= maxNumOfTimes) {
        print(date + '+' +  date.getMilliseconds() + 'ms : finished');
        clearInterval(to);
        gpioLED2.setValue(0);
    } else {
        print(date + '+' +  date.getMilliseconds() + 'ms : ' + (maxNumOfTimes - loopcnt));
        gpioLED2.setValue(loopcnt & 1);
    }
}, timerInterval);
Example 2
カスタムメッセージを使用してLEDをON/OFFしてみましょう。
//==============================================================
//  Sample scenario
//==============================================================
//  Turn the LED on and off with a custom message.
//==============================================================
log.setLevel(0,2); //-1:NONE 0:ERROR 1:WARNING 2:DEBUG 3:TRACE, 0:DISABLE 1:LOG 2:CONSOLE 3:BOTH
log.printLevel(2); //0:DISABLE 1:LOG 2:CONSOLE 3:BOTH

var gpioLED2 = new GPIO(24,5);  //OUT:PUSH-PULL
gpioLED2.setValue(0);

//neqto MQTT event handler
nqMqtt.on('push', function(message) {
    print(Date() + ': nqmqtt push ' + message);
    if(message == 'exit') {
        actflag = 0;
    } else if(message == "led2 on") {
        gpioLED2.setValue(1);
    } else if(message == "led2 off") {
        gpioLED2.setValue(0);
    }
});
nqMqtt.on('error', function(error) {
    print(Date() + ': nqmqtt error ' + error.code);
});
nqMqtt.on('connect', function(connack) {
    print(Date() + ': nqmqtt connect');
});
nqMqtt.on('close', function() {
    print(Date() + ': nqmqtt close');
});

//==============================================================
//  Main Loop
//==============================================================
var actflag = 1;
print(Date() + ': Ready');
while(actflag) {
}

//Termination processing
gpioLED2.setValue(0);
gpioLED3.setValue(0);
throw '#nqEXIT';
カスタムメッセージから下記コマンドを実行してみましょう。
| カスタムコマンド | 内容 |
|---|---|
led2 on | led2を点灯します |
led2 off | led2を消灯します |
NEQTO Bridge
関連リソース
- NEQTO Bridge Module Pinout
- 拡張ボードの接続先について (
Connector Board/IO Board/Digital IO Board) - 関連するneqto.jsオブジェクト (Timers, GPIO, nqEx, nqMqtt)
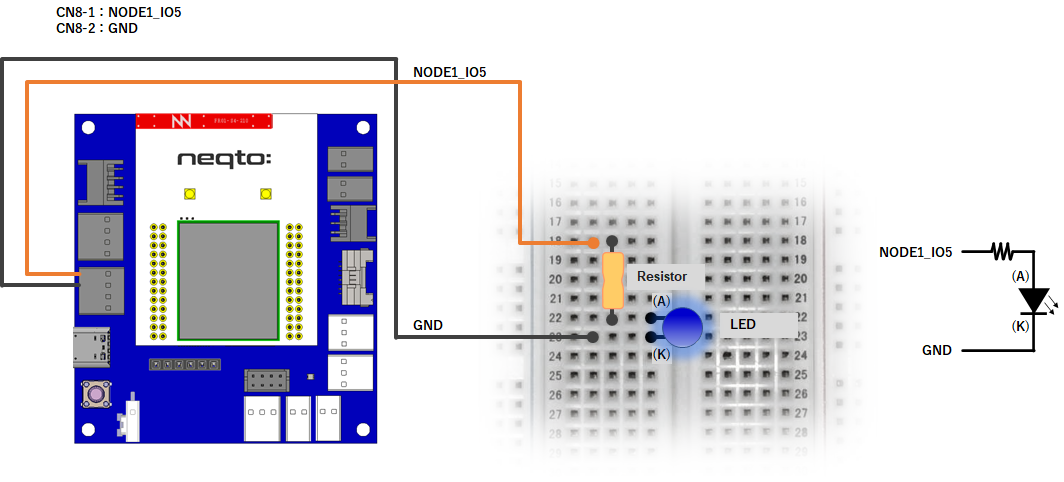
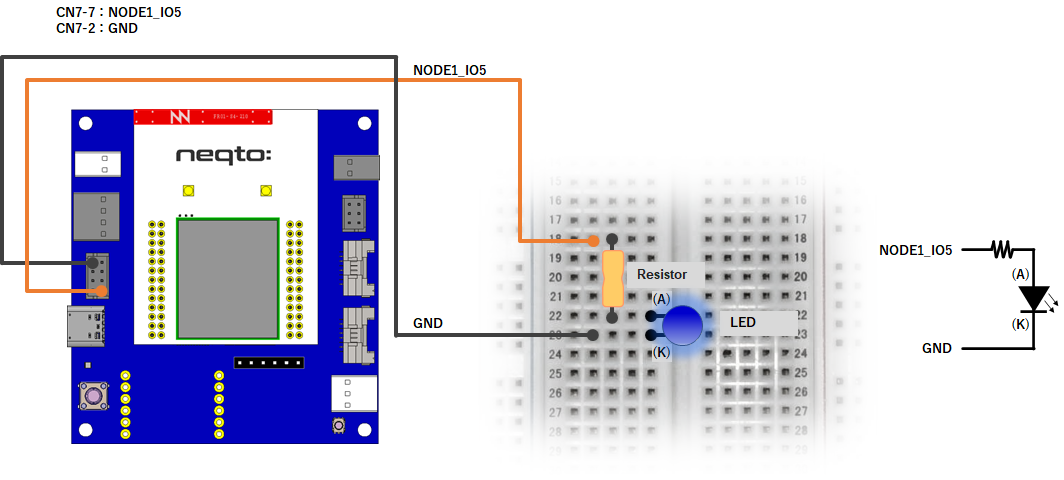
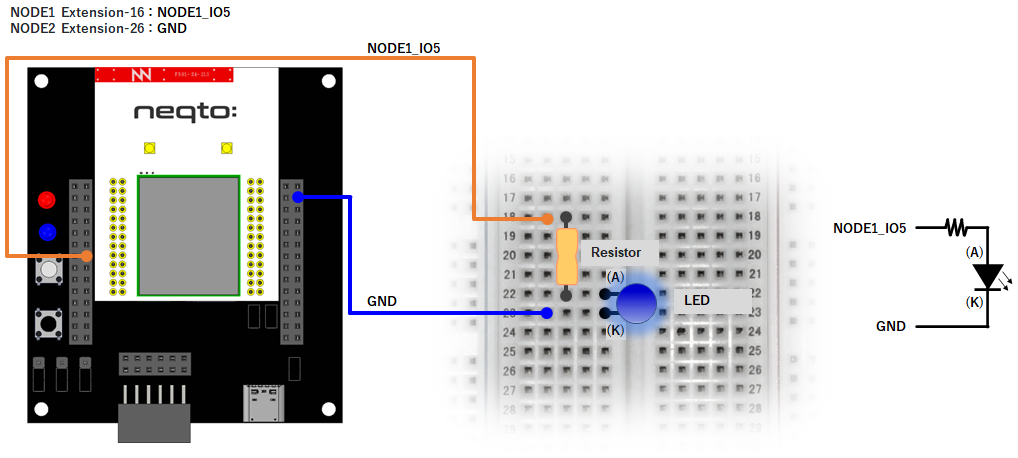
結線図
このチュートリアルでは、NEQTOデバイスの他に別途外部回路が必要になります。
NEQTO Bridge + IO Board
NEQTO Bridge + Digital IO Board
NEQTO Bridge + Connector Board
Example 1
1秒周期でLEDをON/OFFしてみましょう。
//==============================================================
//  Sample scenario
//==============================================================
//  Turn the LED on and off with a timer.
//==============================================================
log.setLevel(0,2); //-1:NONE 0:ERROR 1:WARNING 2:DEBUG 3:TRACE, 0:DISABLE 1:LOG 2:CONSOLE 3:BOTH
log.printLevel(2); //0:DISABLE 1:LOG 2:CONSOLE 3:BOTH

if(nqEx.getBoardType()) { //using IO board or Digital IO board
    nqEx.enGPIO(true);
}

var gpioLED = new GPIO(15,5); //NODE1_IO5(OUT:PUSH-PULL)
gpioLED.setValue(0);

var timerInterval = 1000; //ms
var maxNumOfTimes = 30;

var loopcnt = 0;
var to = setInterval(function() {
    var date = new Date();
    if(++loopcnt >= maxNumOfTimes) {
        print(date + '+' +  date.getMilliseconds() + 'ms : finished');
        clearInterval(to);
        gpioLED.setValue(0);
        nqEx.enGPIO(false);
    } else {
        print(date + '+' +  date.getMilliseconds() + 'ms : ' + (maxNumOfTimes - loopcnt));
        gpioLED.setValue(loopcnt & 1);
    }
}, timerInterval);
Example 2
PWMを使用して100ms周期でLEDをON/OFFしてみましょう。
//==============================================================
//  Sample scenario
//==============================================================
//  Turn the LED on and off with PWM.
//==============================================================
log.setLevel(0,2); //-1:NONE 0:ERROR 1:WARNING 2:DEBUG 3:TRACE, 0:DISABLE 1:LOG 2:CONSOLE 3:BOTH
log.printLevel(2); //0:DISABLE 1:LOG 2:CONSOLE 3:BOTH

if(nqEx.getBoardType()) { //using IO board or Digital IO board
    nqEx.enGPIO(true);
}

var gpioLED = new GPIO(15,9); //NODE1_IO5(OUT:PWM)
gpioLED.setPwm(2000,1000);    //period=200ms, pulse=100ms

var timerInterval = 1000; //ms
var maxNumOfTimes = 10;

var loopcnt = 0;
var to = setInterval(function() {
    var date = new Date();
    if(++loopcnt >= maxNumOfTimes) {
        print(date + '+' +  date.getMilliseconds() + 'ms : finished');
        clearInterval(to);
        gpioLED.releasePwm();
        nqEx.enGPIO(false);
    } else {
        print(date + '+' +  date.getMilliseconds() + 'ms : ' + (maxNumOfTimes - loopcnt));
    }
}, timerInterval);
Example 3
カスタムメッセージを使用してLEDをON/OFFしてみましょう。
//==============================================================
//  Sample scenario
//==============================================================
//  Turn the LED on and off with a custom message.
//==============================================================
log.setLevel(0,2); //-1:NONE 0:ERROR 1:WARNING 2:DEBUG 3:TRACE, 0:DISABLE 1:LOG 2:CONSOLE 3:BOTH
log.printLevel(2); //0:DISABLE 1:LOG 2:CONSOLE 3:BOTH

if(nqEx.getBoardType()) { //using IO board or Digital IO board
    nqEx.enGPIO(true);
}

var gpioLED = new GPIO(15,5); //NODE1_IO5(OUT:PUSH-PULL)
gpioLED.setValue(0);

//neqto MQTT event handler
nqMqtt.on('push', function(message) {
    print(Date() + ': nqmqtt push ' + message);
    if(message == 'exit') {
        actflag = 0;
    } else if(message == "led on") {
        gpioLED.setValue(1);
    } else if(message == "led off") {
        gpioLED.setValue(0);
    }
});
nqMqtt.on('error', function(error) {
    print(Date() + ': nqmqtt error ' + error.code);
});
nqMqtt.on('connect', function(connack) {
    print(Date() + ': nqmqtt connect');
});
nqMqtt.on('close', function() {
    print(Date() + ': nqmqtt close');
});

//==============================================================
//  Main Loop
//==============================================================
var actflag = 1;
print(Date() + ': Ready');
while(actflag) {
}

//Termination processing
gpioLED.setValue(0);
nqEx.enGPIO(false);
throw '#nqEXIT';
カスタムメッセージから下記コマンドを実行してみましょう。
| カスタムコマンド | 内容 |
|---|---|
led on | ledを点灯します |
led off | ledを消灯します |
3. スイッチを制御してみましょう
SPRESENSE
関連リソース
- SPRESENSE Pinout
- 関連するneqto.jsオブジェクト (Timers, GPIO, nqMqtt)
- コンポーネントについて
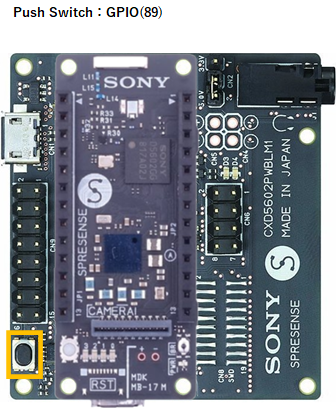
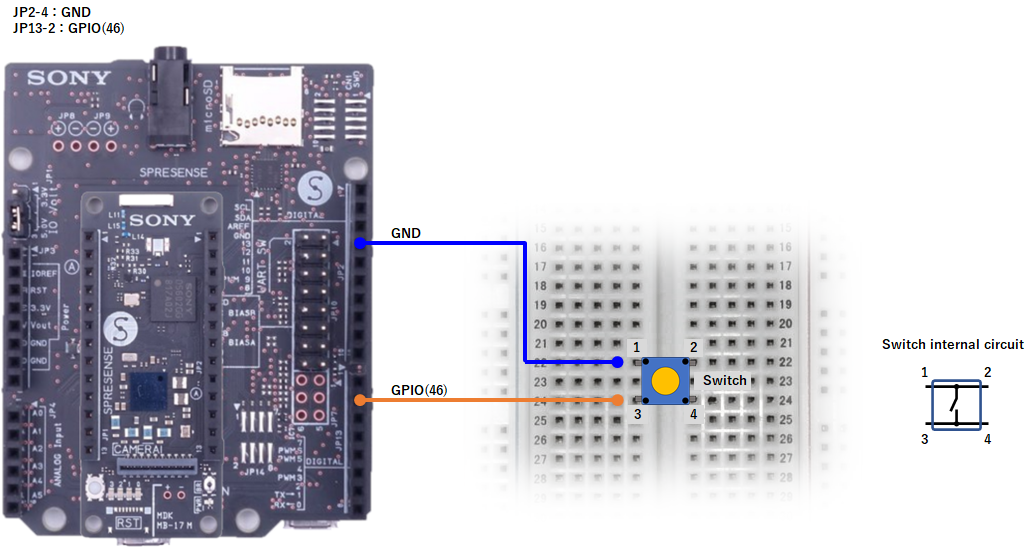
結線図
このチュートリアルでは、NEQTOデバイスの他に別途外部回路が必要になります。
SPRESENSE LTE-M
SPRESENSE Wi-Fi
Example 1
スイッチ状態を監視してみましょう。
//==============================================================
//  Sample scenario
//==============================================================
//  Monitor switch status
//==============================================================
log.setLevel(0,2); //-1:NONE 0:ERROR 1:WARNING 2:DEBUG 3:TRACE, 0:DISABLE 1:LOG 2:CONSOLE 3:BOTH
log.printLevel(2); //0:DISABLE 1:LOG 2:CONSOLE 3:BOTH

var gpioSW;
if(nqSpresense.getModuleType() == 'WiFi') { //using SPRESENSE Wi-Fi
    gpioSW = new GPIO(46,0); //IN:PULL-UP
} else { //using SPRESENSE LTE-M
    gpioSW = new GPIO(89,2); //Push Switch - IN
}

//neqto MQTT event handler
nqMqtt.on('push', function(message) {
    print(Date() + ': nqmqtt push ' + message);
    if(message == 'exit') {
        actflag = 0;
    }
});
nqMqtt.on('error', function(error) {
    print(Date() + ': nqmqtt error ' + error.code);
});
nqMqtt.on('connect', function(connack) {
    print(Date() + ': nqmqtt connect');
});
nqMqtt.on('close', function() {
    print(Date() + ': nqmqtt close');
});

var monitorInterval = 250; //ms

var to = setInterval(function() {
    print('SW state : ' + gpioSW.getValue());
}, monitorInterval);

//==============================================================
//  Main Loop
//==============================================================
var actflag = 1;
print(Date() + ': Ready');
while(actflag) {
}

//Termination processing
clearInterval(to);
throw '#nqEXIT';
Example 2
GPIO割り込みを使用してスイッチ状態を監視してみましょう。
//==============================================================
//  Sample scenario
//==============================================================
//  Monitor switch status using GPIO interrupts.
//==============================================================
log.setLevel(0,2); //-1:NONE 0:ERROR 1:WARNING 2:DEBUG 3:TRACE, 0:DISABLE 1:LOG 2:CONSOLE 3:BOTH
log.printLevel(2); //0:DISABLE 1:LOG 2:CONSOLE 3:BOTH

var gpioSW;
if(nqSpresense.getModuleType() == 'WiFi') { //using SPRESENSE Wi-Fi
    gpioSW = new GPIO(46,0); //IN:PULL-UP
} else { //using SPRESENSE LTE-M
    gpioSW = new GPIO(89,2); //Push Switch - IN
}

gpioSW.setIrq(3, function(status) {
    print('SW state : ' + status);
});

//neqto MQTT event handler
nqMqtt.on('push', function(message) {
    print(Date() + ': nqmqtt push ' + message);
    if(message == 'exit') {
        actflag = 0;
    }
});
nqMqtt.on('error', function(error) {
    print(Date() + ': nqmqtt error ' + error.code);
});
nqMqtt.on('connect', function(connack) {
    print(Date() + ': nqmqtt connect');
});
nqMqtt.on('close', function() {
    print(Date() + ': nqmqtt close');
});

//==============================================================
//  Main Loop
//==============================================================
var actflag = 1;
print(Date() + ': Ready');
while(actflag) {
}

//Termination processing
gpioSW.disableIrq();
throw '#nqEXIT';
Example 3
スイッチ状態の変化をNEQTO Consoleへ送信してみましょう。
//==============================================================
//  Sample scenario
//==============================================================
//  Send switch state changes to NEQTO Console
//==============================================================
log.setLevel(0,2); //-1:NONE 0:ERROR 1:WARNING 2:DEBUG 3:TRACE, 0:DISABLE 1:LOG 2:CONSOLE 3:BOTH
log.printLevel(2); //0:DISABLE 1:LOG 2:CONSOLE 3:BOTH

var gpioSW;
if(nqSpresense.getModuleType() == 'WiFi') { //using SPRESENSE Wi-Fi
    gpioSW = new GPIO(46,0); //IN:PULL-UP
} else { //using SPRESENSE LTE-M
    gpioSW = new GPIO(89,2); //Push Switch - IN
}

gpioSW.setIrq(3, function(status) {
    swEvt = [Date.now(), status];
    print('SW state : ' + status);
});

//neqto MQTT event handler
nqMqtt.on('push', function(message) {
    print(Date() + ': nqmqtt push ' + message);
    if(message == 'exit') {
        actflag = 0;
    }
});
nqMqtt.on('error', function(error) {
    print(Date() + ': nqmqtt error ' + error.code);
});
nqMqtt.on('connect', function(connack) {
    print(Date() + ': nqmqtt connect');
});
nqMqtt.on('close', function() {
    print(Date() + ': nqmqtt close');
});

//Component
var OBJECT_ID = 3342;   //On/Off switch
var RESOURCE_ID = 5500; //Digital Input State
var INSTANCE_ID = 0;

//==============================================================
//  Main Loop
//==============================================================
var actflag = 1;
var swEvt = [-1, -1];
var swEvtPrev = [-1, -1];
var swEvtTmp = new Array(swEvt.length);
print(Date() + ': Ready');
while(actflag) {
    if(swEvtPrev[0] != swEvt[0] || swEvtPrev[1] != swEvt[1]) {
        if(nqMqtt.canPublish()) {
            swEvtTmp[0] = swEvt[0];
            swEvtTmp[1] = swEvt[1];
            var mqttdata = nqMqtt.get('LwM2MObject', swEvtTmp[0], OBJECT_ID, INSTANCE_ID, RESOURCE_ID, 'Integer', swEvtTmp[1].toString());
            nqMqtt.publish(null, mqttdata, function(err) {
                if(err.code == 0) {
                    print('publish successful');
                } else {
                    print('publish failure');
                }
                swEvtPrev[0] = swEvtTmp[0];
                swEvtPrev[1] = swEvtTmp[1];
            });
        }
    }
}

//Termination processing
gpioSW.disableIrq();
throw '#nqEXIT';
データの送信先として、以下のコンポーネント設定を使用します。
| 名前 | オブジェクト | リソース | インスタンス |
|---|---|---|---|
Switch State | On/Offスイッチ | デジタル入力ステート | 0 |
STM32 Discovery
関連リソース
- STM32 Discovery Kit (B-L4S5I-IOT01A) Pinout
- 関連するneqto.jsオブジェクト (Timers, GPIO, nqMqtt)
- コンポーネントについて
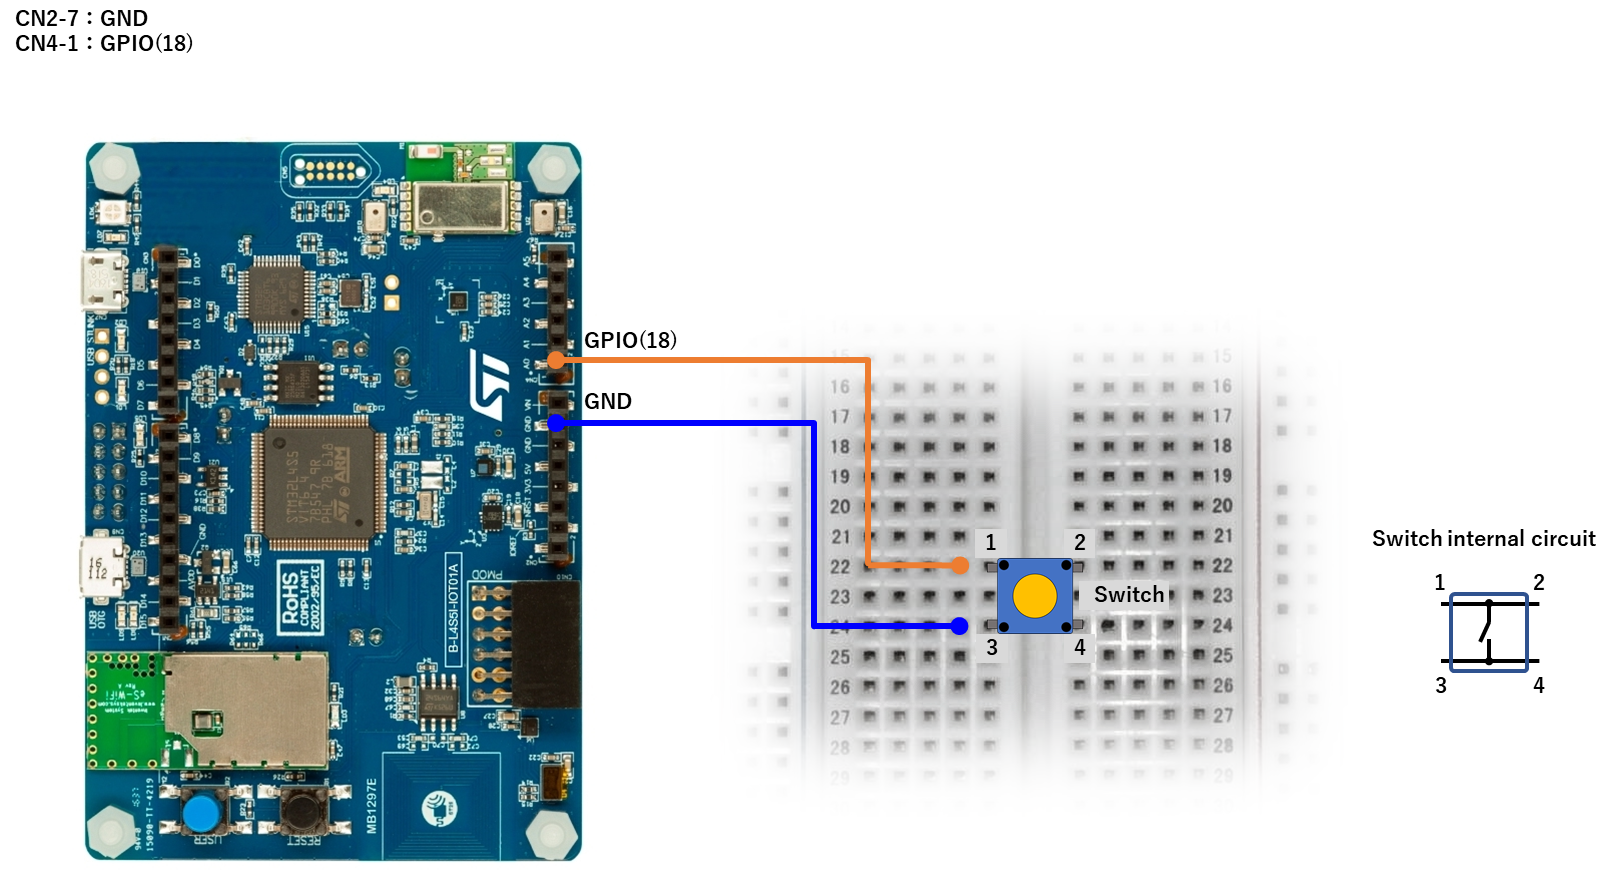
結線図
このチュートリアルでは、NEQTOデバイスの他に別途外部回路が必要になります。
STM32 Discovery Kit (B-L4S5I-IOT01A)
Example 1
スイッチ状態を監視してみましょう。
//==============================================================
//  Sample scenario
//==============================================================
//  Monitor switch status
//==============================================================
log.setLevel(0,2); //-1:NONE 0:ERROR 1:WARNING 2:DEBUG 3:TRACE, 0:DISABLE 1:LOG 2:CONSOLE 3:BOTH
log.printLevel(2); //0:DISABLE 1:LOG 2:CONSOLE 3:BOTH

var gpioSW = new GPIO(18,0); //IN:PULL-UP

//neqto MQTT event handler
nqMqtt.on('push', function(message) {
    print(Date() + ': nqmqtt push ' + message);
    if(message == 'exit') {
        actflag = 0;
    }
});
nqMqtt.on('error', function(error) {
    print(Date() + ': nqmqtt error ' + error.code);
});
nqMqtt.on('connect', function(connack) {
    print(Date() + ': nqmqtt connect');
});
nqMqtt.on('close', function() {
    print(Date() + ': nqmqtt close');
});

var monitorInterval = 250; //ms

var to = setInterval(function() {
    print('SW state : ' + gpioSW.getValue());
}, monitorInterval);

//==============================================================
//  Main Loop
//==============================================================
var actflag = 1;
print(Date() + ': Ready');
while(actflag) {
}

//Termination processing
clearInterval(to);
throw '#nqEXIT';
Example 2
GPIO割り込みを使用してスイッチ状態を監視してみましょう。
//==============================================================
//  Sample scenario
//==============================================================
//  Monitor switch status using GPIO interrupts.
//==============================================================
log.setLevel(0,2); //-1:NONE 0:ERROR 1:WARNING 2:DEBUG 3:TRACE, 0:DISABLE 1:LOG 2:CONSOLE 3:BOTH
log.printLevel(2); //0:DISABLE 1:LOG 2:CONSOLE 3:BOTH

var gpioSW = new GPIO(18,0); //IN:PULL-UP

gpioSW.setIrq(3, function(status) {
    print('SW state : ' + status);
});

//neqto MQTT event handler
nqMqtt.on('push', function(message) {
    print(Date() + ': nqmqtt push ' + message);
    if(message == 'exit') {
        actflag = 0;
    }
});
nqMqtt.on('error', function(error) {
    print(Date() + ': nqmqtt error ' + error.code);
});
nqMqtt.on('connect', function(connack) {
    print(Date() + ': nqmqtt connect');
});
nqMqtt.on('close', function() {
    print(Date() + ': nqmqtt close');
});

//==============================================================
//  Main Loop
//==============================================================
var actflag = 1;
print(Date() + ': Ready');
while(actflag) {
}

//Termination processing
gpioSW.disableIrq();
throw '#nqEXIT';
Example 3
スイッチ状態の変化をNEQTO Consoleへ送信してみましょう。
//==============================================================
//  Sample scenario
//==============================================================
//  Send switch state changes to NEQTO Console
//==============================================================
log.setLevel(0,2); //-1:NONE 0:ERROR 1:WARNING 2:DEBUG 3:TRACE, 0:DISABLE 1:LOG 2:CONSOLE 3:BOTH
log.printLevel(2); //0:DISABLE 1:LOG 2:CONSOLE 3:BOTH

var gpioSW = new GPIO(18,0); //IN:PULL-UP

gpioSW.setIrq(3, function(status) {
    swEvt = [Date.now(), status];
    print('SW state : ' + status);
});

//neqto MQTT event handler
nqMqtt.on('push', function(message) {
    print(Date() + ': nqmqtt push ' + message);
    if(message == 'exit') {
        actflag = 0;
    }
});
nqMqtt.on('error', function(error) {
    print(Date() + ': nqmqtt error ' + error.code);
});
nqMqtt.on('connect', function(connack) {
    print(Date() + ': nqmqtt connect');
});
nqMqtt.on('close', function() {
    print(Date() + ': nqmqtt close');
});

//Component
var OBJECT_ID = 3342;   //On/Off switch
var RESOURCE_ID = 5500; //Digital Input State
var INSTANCE_ID = 0;

//==============================================================
//  Main Loop
//==============================================================
var actflag = 1;
var swEvt = [-1, -1];
var swEvtPrev = [-1, -1];
var swEvtTmp = new Array(swEvt.length);
print(Date() + ': Ready');
while(actflag) {
    if(swEvtPrev[0] != swEvt[0] || swEvtPrev[1] != swEvt[1]) {
        if(nqMqtt.canPublish()) {
            swEvtTmp[0] = swEvt[0];
            swEvtTmp[1] = swEvt[1];
            var mqttdata = nqMqtt.get('LwM2MObject', swEvtTmp[0], OBJECT_ID, INSTANCE_ID, RESOURCE_ID, 'Integer', swEvtTmp[1].toString());
            nqMqtt.publish(null, mqttdata, function(err) {
                if(err.code == 0) {
                    print('publish successful');
                } else {
                    print('publish failure');
                }
                swEvtPrev[0] = swEvtTmp[0];
                swEvtPrev[1] = swEvtTmp[1];
            });
        }
    }
}

//Termination processing
gpioSW.disableIrq();
throw '#nqEXIT';
データの送信先として、以下のコンポーネント設定を使用します。
| 名前 | オブジェクト | リソース | インスタンス |
|---|---|---|---|
Switch State | On/Offスイッチ | デジタル入力ステート | 0 |
NEQTO Bridge
関連リソース
- NEQTO Bridge Module Pinout
- 拡張ボードの接続先について (
Connector Board/IO Board/Digital IO Board) - 関連するneqto.jsオブジェクト (Timers, GPIO, nqEx, nqMqtt)
- コンポーネントについて
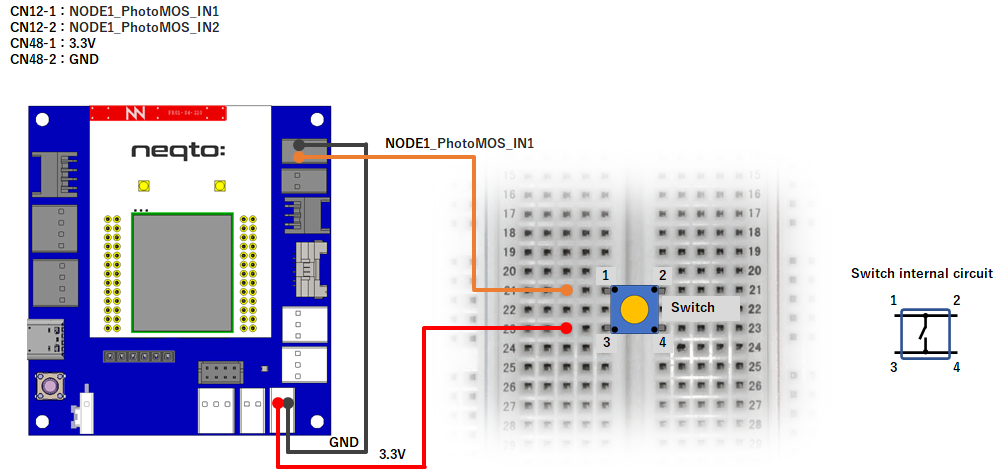
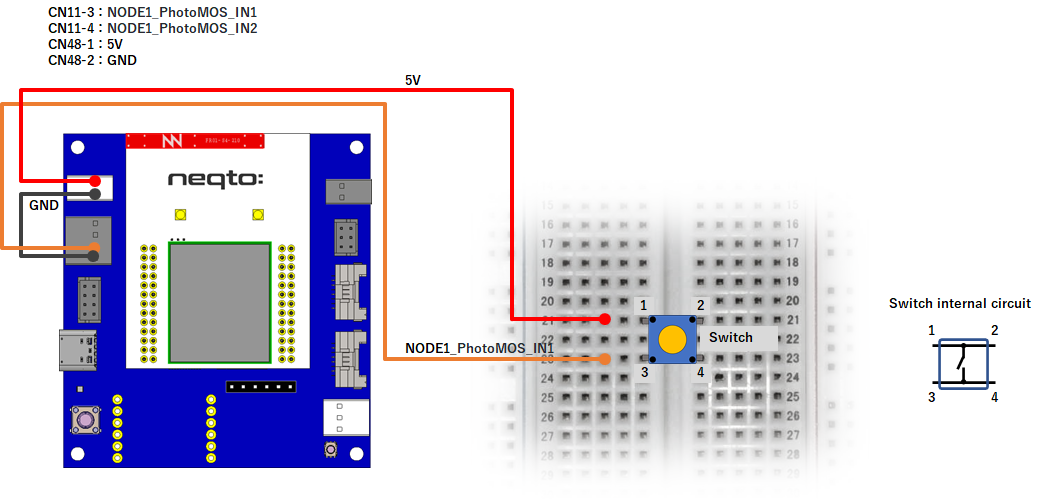
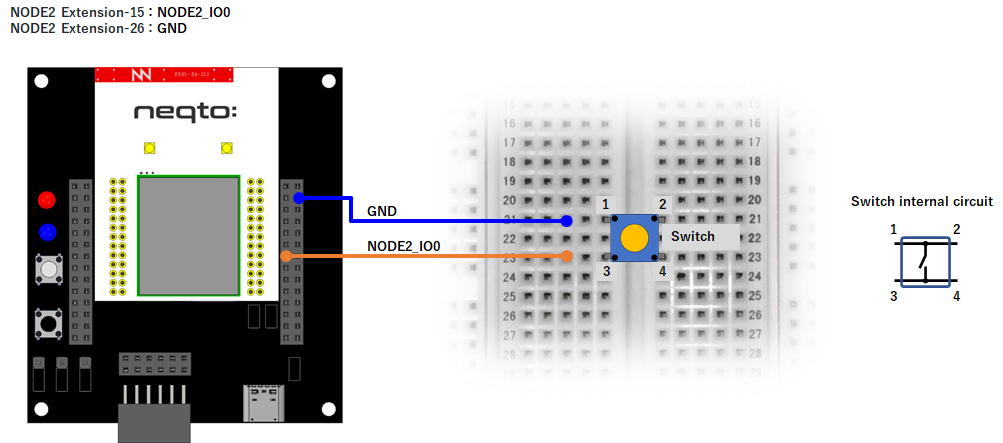
結線図
このチュートリアルでは、NEQTOデバイスの他に別途外部回路が必要になります。
NEQTO Bridge + IO Board
NEQTO Bridge + Digital IO Board
NEQTO Bridge + Connector Board
Example 1
スイッチ状態を監視してみましょう。
//==============================================================
//  Sample scenario
//==============================================================
//  Monitor switch status
//==============================================================
log.setLevel(0,2); //-1:NONE 0:ERROR 1:WARNING 2:DEBUG 3:TRACE, 0:DISABLE 1:LOG 2:CONSOLE 3:BOTH
log.printLevel(2); //0:DISABLE 1:LOG 2:CONSOLE 3:BOTH

var gpioSW;
if(nqEx.getBoardType()) { //using IO board or Digital IO board
    gpioSW = new GPIO(13,2); //Photo Coupler - NODE1_IO3(IN)
} else { //using Connector board
    gpioSW = new GPIO(20,0); //NODE2_IO0(IN:PULL-UP)
}

//neqto MQTT event handler
nqMqtt.on('push', function(message) {
    print(Date() + ': nqmqtt push ' + message);
    if(message == 'exit') {
        actflag = 0;
    }
});
nqMqtt.on('error', function(error) {
    print(Date() + ': nqmqtt error ' + error.code);
});
nqMqtt.on('connect', function(connack) {
    print(Date() + ': nqmqtt connect');
});
nqMqtt.on('close', function() {
    print(Date() + ': nqmqtt close');
});

var monitorInterval = 250; //ms

var to = setInterval(function() {
    print('SW state : ' + gpioSW.getValue());
}, monitorInterval);

//==============================================================
//  Main Loop
//==============================================================
var actflag = 1;
print(Date() + ': Ready');
while(actflag) {
}

//Termination processing
clearInterval(to);
nqEx.enGPIO(false);
throw '#nqEXIT';
Example 2
GPIO割り込みを使用してスイッチ状態を監視してみましょう。
//==============================================================
//  Sample scenario
//==============================================================
//  Monitor switch status using GPIO interrupts.
//==============================================================
log.setLevel(0,2); //-1:NONE 0:ERROR 1:WARNING 2:DEBUG 3:TRACE, 0:DISABLE 1:LOG 2:CONSOLE 3:BOTH
log.printLevel(2); //0:DISABLE 1:LOG 2:CONSOLE 3:BOTH

var gpioSW;
if(nqEx.getBoardType()) { //using IO board or Digital IO board
    gpioSW = new GPIO(13,2); //Photo Coupler - NODE1_IO3(IN)
} else { //using Connector board
    gpioSW = new GPIO(20,0); //NODE2_IO0(IN:PULL-UP)
}

gpioSW.setIrq(3, function(status) {
    print('SW state : ' + status);
});

//neqto MQTT event handler
nqMqtt.on('push', function(message) {
    print(Date() + ': nqmqtt push ' + message);
    if(message == 'exit') {
        actflag = 0;
    }
});
nqMqtt.on('error', function(error) {
    print(Date() + ': nqmqtt error ' + error.code);
});
nqMqtt.on('connect', function(connack) {
    print(Date() + ': nqmqtt connect');
});
nqMqtt.on('close', function() {
    print(Date() + ': nqmqtt close');
});

//==============================================================
//  Main Loop
//==============================================================
var actflag = 1;
print(Date() + ': Ready');
while(actflag) {
}

//Termination processing
gpioSW.disableIrq();
throw '#nqEXIT';
Example 3
スイッチ状態の変化をNEQTO Consoleへ送信してみましょう。
//==============================================================
//  Sample scenario
//==============================================================
//  Send switch state changes to NEQTO Console
//==============================================================
log.setLevel(0,2); //-1:NONE 0:ERROR 1:WARNING 2:DEBUG 3:TRACE, 0:DISABLE 1:LOG 2:CONSOLE 3:BOTH
log.printLevel(2); //0:DISABLE 1:LOG 2:CONSOLE 3:BOTH

var gpioSW;
if(nqEx.getBoardType()) { //using IO board or Digital IO board
    gpioSW = new GPIO(13,2); //Photo Coupler - NODE1_IO3(IN)
} else { //using Connector board
    gpioSW = new GPIO(20,0); //NODE2_IO0(IN:PULL-UP)
}

gpioSW.setIrq(3, function(status) {
    swEvt = [Date.now(), status];
    print('SW state : ' + status);
});

//neqto MQTT event handler
nqMqtt.on('push', function(message) {
    print(Date() + ': nqmqtt push ' + message);
    if(message == 'exit') {
        actflag = 0;
    }
});
nqMqtt.on('error', function(error) {
    print(Date() + ': nqmqtt error ' + error.code);
});
nqMqtt.on('connect', function(connack) {
    print(Date() + ': nqmqtt connect');
});
nqMqtt.on('close', function() {
    print(Date() + ': nqmqtt close');
});

//Component
var OBJECT_ID = 3342;   //On/Off switch
var RESOURCE_ID = 5500; //Digital Input State
var INSTANCE_ID = 0;

//==============================================================
//  Main Loop
//==============================================================
var actflag = 1;
var swEvt = [-1, -1];
var swEvtPrev = [-1, -1];
var swEvtTmp = new Array(swEvt.length);
print(Date() + ': Ready');
while(actflag) {
    if(swEvtPrev[0] != swEvt[0] || swEvtPrev[1] != swEvt[1]) {
        if(nqMqtt.canPublish()) {
            swEvtTmp[0] = swEvt[0];
            swEvtTmp[1] = swEvt[1];
            var mqttdata = nqMqtt.get('LwM2MObject', swEvtTmp[0], OBJECT_ID, INSTANCE_ID, RESOURCE_ID, 'Integer', swEvtTmp[1].toString());
            nqMqtt.publish(null, mqttdata, function(err) {
                if(err.code == 0) {
                    print('publish successful');
                } else {
                    print('publish failure');
                }
                swEvtPrev[0] = swEvtTmp[0];
                swEvtPrev[1] = swEvtTmp[1];
            });
        }
    }
}

//Termination processing
gpioSW.disableIrq();
throw '#nqEXIT';
データの送信先として、以下のコンポーネント設定を使用します。
| 名前 | オブジェクト | リソース | インスタンス |
|---|---|---|---|
Switch State | On/Offスイッチ | デジタル入力ステート | 0 |
4. HTS221温湿度センサを制御してみましょう
SPRESENSE
関連リソース
- SPRESENSE Pinout
- 関連するneqto.jsオブジェクト (Timers, I2C, nqMqtt)
- コンポーネントについて
- neqto.js Libraries HTS221 v2 温湿度センサ
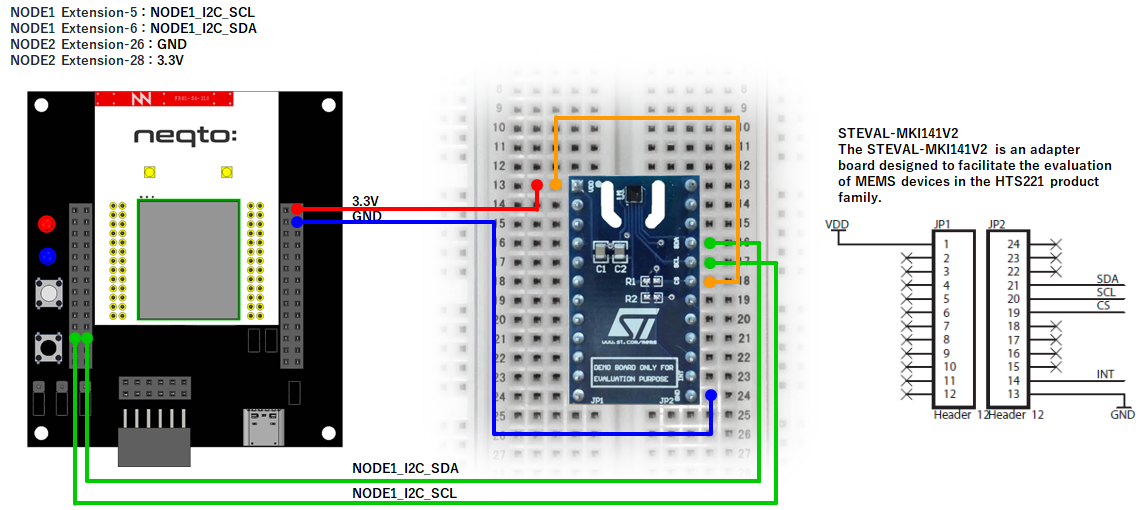
- STMicroelectronics N.V. STEVAL-MKI141V2
結線図
このチュートリアルでは、NEQTOデバイスの他に別途外部回路が必要になります。
SPRESENSE LTE-M
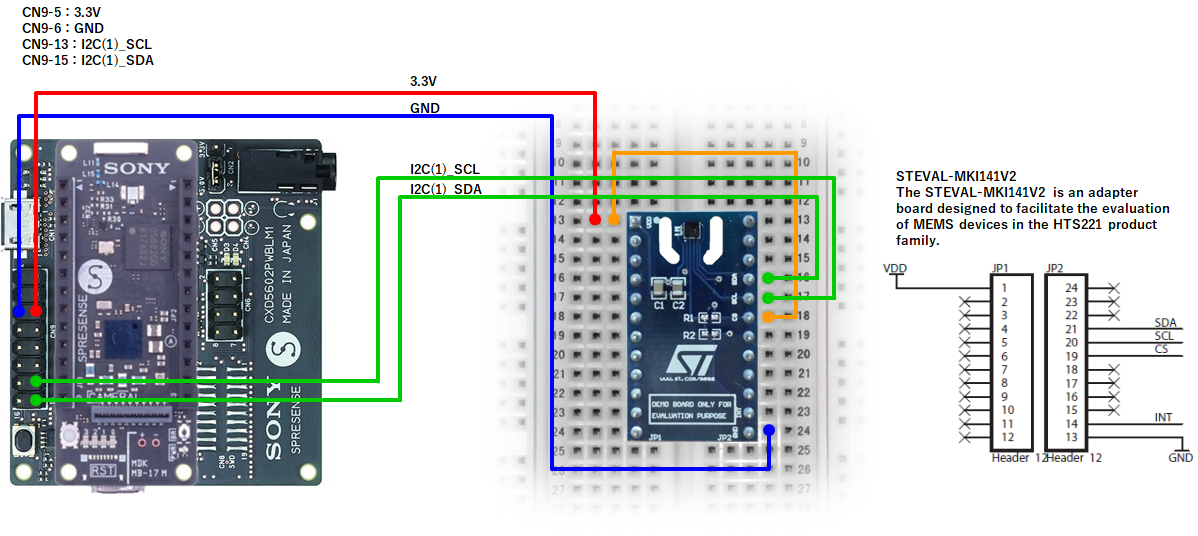
SPRESENSE Wi-Fi

Example 1
NEQTOライブラリを使用して温湿度データを測定してみましょう。
//==============================================================
//  Sample scenario
//==============================================================
//  Measure temperature and humidity data using NEQTO library.
//==============================================================
log.setLevel(0,2); //-1:NONE 0:ERROR 1:WARNING 2:DEBUG 3:TRACE, 0:DISABLE 1:LOG 2:CONSOLE 3:BOTH
log.printLevel(2); //0:DISABLE 1:LOG 2:CONSOLE 3:BOTH

if(!('HTS221' in this)) {
    throw new Error('Please add the HTS221_V2 Library to the Script');
}

var i2c;
if(nqSpresense.getModuleType() == 'WiFi') { //using SPRESENSE Wi-Fi
    i2c = new I2C(0);
} else { //using SPRESENSE LTE-M
    i2c = new I2C(1);
}

i2c.open(400000);
var hts221 = new HTS221(i2c);
var ready = hts221.init();
if(!ready) {
    print('Unable to connect to HTS221');
    i2c.close();
}

//neqto MQTT event handler
nqMqtt.on('push', function(message) {
    print(Date() + ': nqmqtt push ' + message);
    if(message == 'exit') {
        actflag = 0;
    }
});
nqMqtt.on('error', function(error) {
    print(Date() + ': nqmqtt error ' + error.code);
});
nqMqtt.on('connect', function(connack) {
    print(Date() + ': nqmqtt connect');
});
nqMqtt.on('close', function() {
    print(Date() + ': nqmqtt close');
});

var timerInterval = 1000; //ms

var to = setInterval(function() { measureFlag = 1; }, timerInterval);

//==============================================================
//  Main Loop
//==============================================================
var actflag = 1;
var measureFlag = 0;
while(actflag){
    if(ready && measureFlag) {
        var date = new Date();
        hts221.measOn();
        results = hts221.checkStatusAndGetResult();
        hts221.measOff();
        if(!results) {
            print('failed measurement');
        } else {
            print(date + ', Temp: ' + results.temp.toFixed(1) + ', Humi: ' + results.humi.toFixed(1));
        }
        measureFlag = 0;
    }
}

//Termination processing
clearInterval(to);
i2c.close();
throw '#nqEXIT';
Example 2
測定した温湿度データをNEQTO Consoleに送信してみましょう。
//==============================================================
//  Sample scenario
//==============================================================
//  Measure temperature and humidity data using NEQTO library.
//==============================================================
log.setLevel(0,2); //-1:NONE 0:ERROR 1:WARNING 2:DEBUG 3:TRACE, 0:DISABLE 1:LOG 2:CONSOLE 3:BOTH
log.printLevel(2); //0:DISABLE 1:LOG 2:CONSOLE 3:BOTH

if(!('HTS221' in this)) {
    throw new Error('Please add the HTS221_V2 Library to the Script');
}

var i2c;
if(nqSpresense.getModuleType() == 'WiFi') { //using SPRESENSE Wi-Fi
    i2c = new I2C(0);
} else { //using SPRESENSE LTE-M
    i2c = new I2C(1);
}

i2c.open(400000);
var hts221 = new HTS221(i2c);
var ready = hts221.init();
if(!ready) {
    print('Unable to connect to HTS221');
    i2c.close();
}

//neqto MQTT event handler
nqMqtt.on('push', function(message) {
    print(Date() + ': nqmqtt push ' + message);
    if(message == 'exit') {
        actflag = 0;
    }
});
nqMqtt.on('error', function(error) {
    print(Date() + ': nqmqtt error ' + error.code);
});
nqMqtt.on('connect', function(connack) {
    print(Date() + ': nqmqtt connect');
});
nqMqtt.on('close', function() {
    print(Date() + ': nqmqtt close');
});

var timerInterval = 3000; //ms
var numOfTimes = 10;

var to = setInterval(function() { measureFlag = 1; }, timerInterval);

//==============================================================
//  Main Loop
//==============================================================
var actflag = 1;
var measureFlag = 0;
while(actflag){
    if(ready && numOfTimes && measureFlag) {
        var date = new Date();
        hts221.measOn();
        results = hts221.checkStatusAndGetResult();
        hts221.measOff();
        if(!results) {
            print('failed measurement');
        } else {
            print(date + ', Temp: ' + results.temp.toFixed(1) + ', Humi: ' + results.humi.toFixed(1));
            if(nqMqtt.canPublish()) {
                var tempobj = nqMqtt.get('LwM2MObject', date.getTime(), 3303, 0, 5700, 'Float', results.temp.toString());
                var humiobj = nqMqtt.get('LwM2MObject', date.getTime(), 3304, 0, 5700, 'Float', results.humi.toString());
                var mqttdata = [tempobj, humiobj];
                nqMqtt.publish(null, mqttdata, function(err) {
                    if(err.code == 0) {
                        print('publish successful');
                    } else {
                        print('publish failure');
                    }
                    numOfTimes--;
                    if(!numOfTimes) {
                        print('finished');
                    }
                });
            } else {
                print('publish was skipped');
            }
        }
        measureFlag = 0;
    }
}

//Termination processing
clearInterval(to);
i2c.close();
throw '#nqEXIT';
データの送信先として、以下のコンポーネント設定を使用します。
| 名前 | オブジェクト | リソース | インスタンス |
|---|---|---|---|
Temperature Measurements | 温度 | センサ値 | 0 |
Humidity Measurements | 湿度 | センサ値 | 0 |
Example 3
I2Cインタフェースを直接制御して、センサにアクセスしてみましょう。
//==============================================================
//  Sample scenario
//==============================================================
//  Directly control the I2C interface to access the sensor.
//==============================================================
log.setLevel(0,2); //-1:NONE 0:ERROR 1:WARNING 2:DEBUG 3:TRACE, 0:DISABLE 1:LOG 2:CONSOLE 3:BOTH
log.printLevel(2); //0:DISABLE 1:LOG 2:CONSOLE 3:BOTH

var i2c;
if(nqSpresense.getModuleType() == 'WiFi') { //using SPRESENSE Wi-Fi
    i2c = new I2C(0);
} else { //using SPRESENSE LTE-M
    i2c = new I2C(1);
}

i2c.open(400000);

var SLAVE_ADDR = 0x5F;   //HTS221 slave address
var REG_WHO_AM_I = 0x0F; //HTS221 device ID register address

var wrBuf = new ArrayBuffer(1);
var wrAry = new Uint8Array(wrBuf);
wrAry[0] = REG_WHO_AM_I;

print('Send : 0x' + ('0' + wrAry[0].toString(16).toUpperCase()).slice(-2));

if(i2c.write(SLAVE_ADDR, wrBuf)) {
    var rdBuf = i2c.read(SLAVE_ADDR, 1);
    if(rdBuf.byteLength > 0) {
        var rdAry = new Uint8Array(rdBuf);
        print('Device ID : 0x' + ('0' + rdAry[0].toString(16).toUpperCase()).slice(-2));
    }
}

i2c.close();
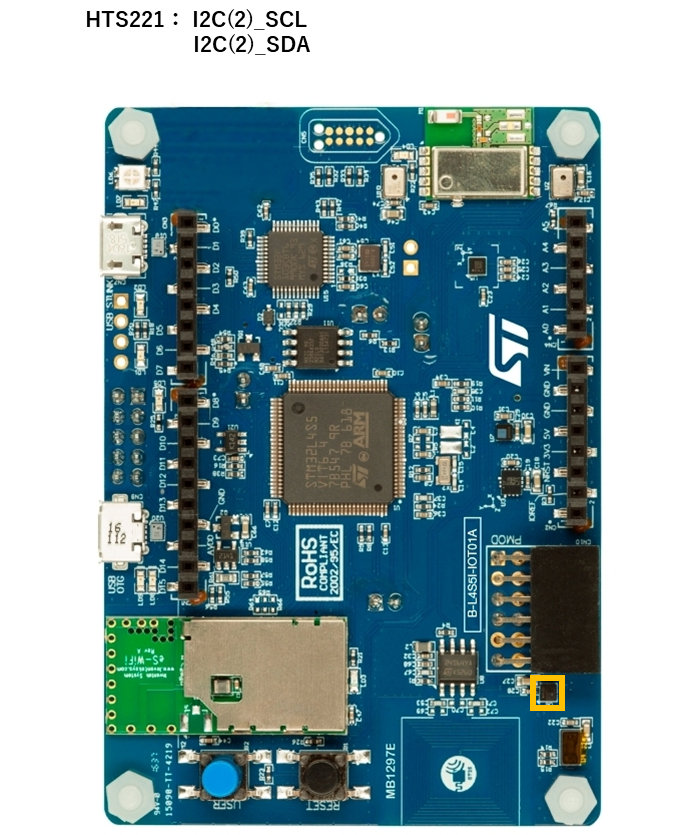
STM32 Discovery
Related resources
- STM32 Discovery Kit (B-L4S5I-IOT01A) Pinout
- 関連するneqto.jsオブジェクト (Timers, I2C, nqMqtt)
- コンポーネントについて
- neqto.js Libraries HTS221 v2 温湿度センサ
- STMicroelectronics N.V. HTS221
結線図
STM32 Discovery Kit (B-L4S5I-IOT01A)
Example 1
NEQTOライブラリを使用して温湿度データを測定してみましょう。
//==============================================================
//  Sample scenario
//==============================================================
//  Measure temperature and humidity data using NEQTO library.
//==============================================================
log.setLevel(0,2); //-1:NONE 0:ERROR 1:WARNING 2:DEBUG 3:TRACE, 0:DISABLE 1:LOG 2:CONSOLE 3:BOTH
log.printLevel(2); //0:DISABLE 1:LOG 2:CONSOLE 3:BOTH

if(!('HTS221' in this)) {
    throw new Error('Please add the HTS221_V2 Library to the Script');
}

var i2c = new I2C(2);

i2c.open(400000);
var hts221 = new HTS221(i2c);
var ready = hts221.init();
if(!ready) {
    print('Unable to connect to HTS221');
    i2c.close();
}

//neqto MQTT event handler
nqMqtt.on('push', function(message) {
    print(Date() + ': nqmqtt push ' + message);
    if(message == 'exit') {
        actflag = 0;
    }
});
nqMqtt.on('error', function(error) {
    print(Date() + ': nqmqtt error ' + error.code);
});
nqMqtt.on('connect', function(connack) {
    print(Date() + ': nqmqtt connect');
});
nqMqtt.on('close', function() {
    print(Date() + ': nqmqtt close');
});

var timerInterval = 1000; //ms

var to = setInterval(function() { measureFlag = 1; }, timerInterval);

//==============================================================
//  Main Loop
//==============================================================
var actflag = 1;
var measureFlag = 0;
while(actflag){
    if(ready && measureFlag) {
        var date = new Date();
        hts221.measOn();
        results = hts221.checkStatusAndGetResult();
        hts221.measOff();
        if(!results) {
            print('failed measurement');
        } else {
            print(date + ', Temp: ' + results.temp.toFixed(1) + ', Humi: ' + results.humi.toFixed(1));
        }
        measureFlag = 0;
    }
}

//Termination processing
clearInterval(to);
i2c.close();
throw '#nqEXIT';
Example 2
測定した温湿度データをNEQTO Consoleに送信してみましょう。
//==============================================================
//  Sample scenario
//==============================================================
//  Measure temperature and humidity data using NEQTO library.
//==============================================================
log.setLevel(0,2); //-1:NONE 0:ERROR 1:WARNING 2:DEBUG 3:TRACE, 0:DISABLE 1:LOG 2:CONSOLE 3:BOTH
log.printLevel(2); //0:DISABLE 1:LOG 2:CONSOLE 3:BOTH

if(!('HTS221' in this)) {
    throw new Error('Please add the HTS221_V2 Library to the Script');
}

var i2c = new I2C(2);

i2c.open(400000);
var hts221 = new HTS221(i2c);
var ready = hts221.init();
if(!ready) {
    print('Unable to connect to HTS221');
    i2c.close();
}

//neqto MQTT event handler
nqMqtt.on('push', function(message) {
    print(Date() + ': nqmqtt push ' + message);
    if(message == 'exit') {
        actflag = 0;
    }
});
nqMqtt.on('error', function(error) {
    print(Date() + ': nqmqtt error ' + error.code);
});
nqMqtt.on('connect', function(connack) {
    print(Date() + ': nqmqtt connect');
});
nqMqtt.on('close', function() {
    print(Date() + ': nqmqtt close');
});

var timerInterval = 3000; //ms
var numOfTimes = 10;

var to = setInterval(function() { measureFlag = 1; }, timerInterval);

//==============================================================
//  Main Loop
//==============================================================
var actflag = 1;
var measureFlag = 0;
while(actflag){
    if(ready && numOfTimes && measureFlag) {
        var date = new Date();
        hts221.measOn();
        results = hts221.checkStatusAndGetResult();
        hts221.measOff();
        if(!results) {
            print('failed measurement');
        } else {
            print(date + ', Temp: ' + results.temp.toFixed(1) + ', Humi: ' + results.humi.toFixed(1));
            if(nqMqtt.canPublish()) {
                var tempobj = nqMqtt.get('LwM2MObject', date.getTime(), 3303, 0, 5700, 'Float', results.temp.toString());
                var humiobj = nqMqtt.get('LwM2MObject', date.getTime(), 3304, 0, 5700, 'Float', results.humi.toString());
                var mqttdata = [tempobj, humiobj];
                nqMqtt.publish(null, mqttdata, function(err) {
                    if(err.code == 0) {
                        print('publish successful');
                    } else {
                        print('publish failure');
                    }
                    numOfTimes--;
                    if(!numOfTimes) {
                        print('finished');
                    }
                });
            } else {
                print('publish was skipped');
            }
        }
        measureFlag = 0;
    }
}

//Termination processing
clearInterval(to);
i2c.close();
throw '#nqEXIT';
データの送信先として、以下のコンポーネント設定を使用します。
| 名前 | オブジェクト | リソース | インスタンス |
|---|---|---|---|
Temperature Measurements | 温度 | センサ値 | 0 |
Humidity Measurements | 湿度 | センサ値 | 0 |
Example 3
I2Cインタフェースを直接制御して、センサにアクセスしてみましょう。
//==============================================================
//  Sample scenario
//==============================================================
//  Directly control the I2C interface to access the sensor.
//==============================================================
log.setLevel(0,2); //-1:NONE 0:ERROR 1:WARNING 2:DEBUG 3:TRACE, 0:DISABLE 1:LOG 2:CONSOLE 3:BOTH
log.printLevel(2); //0:DISABLE 1:LOG 2:CONSOLE 3:BOTH

var i2c = new I2C(2);

i2c.open(400000);

var SLAVE_ADDR = 0x5F;   //HTS221 slave address
var REG_WHO_AM_I = 0x0F; //HTS221 device ID register address

var wrBuf = new ArrayBuffer(1);
var wrAry = new Uint8Array(wrBuf);
wrAry[0] = REG_WHO_AM_I;

print('Send : 0x' + ('0' + wrAry[0].toString(16).toUpperCase()).slice(-2));

if(i2c.write(SLAVE_ADDR, wrBuf)) {
    var rdBuf = i2c.read(SLAVE_ADDR, 1);
    if(rdBuf.byteLength > 0) {
        var rdAry = new Uint8Array(rdBuf);
        print('Device ID : 0x' + ('0' + rdAry[0].toString(16).toUpperCase()).slice(-2));
    }
}

i2c.close();
NEQTO Bridge
関連リソース
- NEQTO Bridge Module Pinout
- 拡張ボードの接続先について (
Connector Board/IO Board/Digital IO Board) - 関連するneqto.jsオブジェクト (Timers, I2C, nqEx, nqMqtt)
- コンポーネントについて
- neqto.js Libraries HTS221 v2 温湿度センサ
- STMicroelectronics N.V. STEVAL-MKI141V2
結線図
このチュートリアルでは、NEQTOデバイスの他に別途外部回路が必要になります。
NEQTO Bridge + IO Board
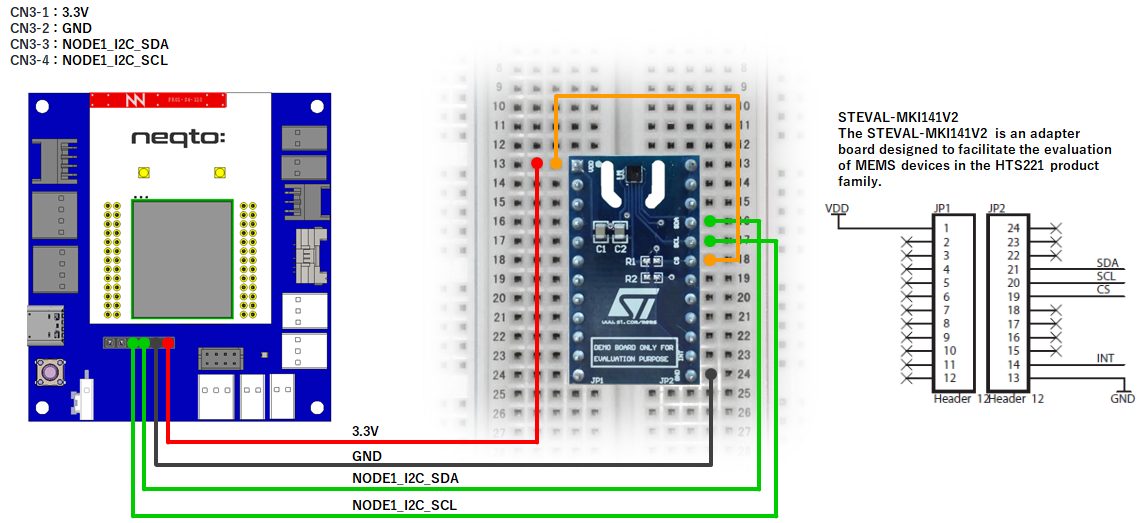
NEQTO Bridge + Digital IO Board
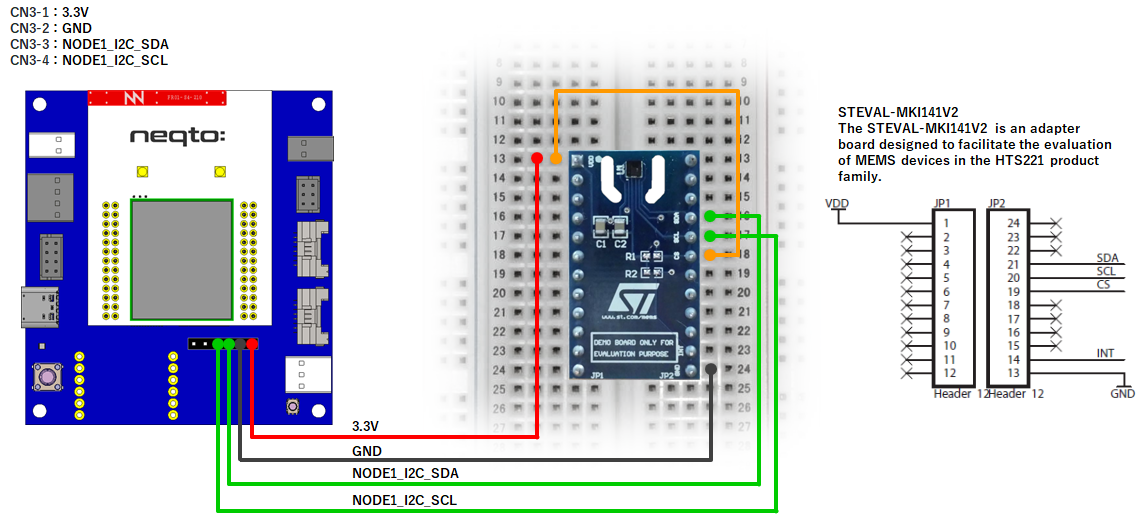
NEQTO Bridge + Connector Board
Example 1
NEQTOライブラリを使用して温湿度データを測定してみましょう。
//==============================================================
//  Sample scenario
//==============================================================
//  Measure temperature and humidity data using NEQTO library.
//==============================================================
log.setLevel(0,2); //-1:NONE 0:ERROR 1:WARNING 2:DEBUG 3:TRACE, 0:DISABLE 1:LOG 2:CONSOLE 3:BOTH
log.printLevel(2); //0:DISABLE 1:LOG 2:CONSOLE 3:BOTH

if(!('HTS221' in this)) {
    throw new Error('Please add the HTS221_V2 Library to the Script');
}

if(nqEx.getBoardType()) { //using IO board or Digital IO board
    nqEx.enI2CS(true); //Required to use the I2C Short port
    nqEx.enI2CL(true); //Required to use the I2C Long port
}

var i2c = new I2C(1);

i2c.open(400000);
var hts221 = new HTS221(i2c);
var ready = hts221.init();
if(!ready) {
    print('Unable to connect to HTS221');
    i2c.close();
}

//neqto MQTT event handler
nqMqtt.on('push', function(message) {
    print(Date() + ': nqmqtt push ' + message);
    if(message == 'exit') {
        actflag = 0;
    }
});
nqMqtt.on('error', function(error) {
    print(Date() + ': nqmqtt error ' + error.code);
});
nqMqtt.on('connect', function(connack) {
    print(Date() + ': nqmqtt connect');
});
nqMqtt.on('close', function() {
    print(Date() + ': nqmqtt close');
});

var timerInterval = 1000; //ms

var to = setInterval(function() { measureFlag = 1; }, timerInterval);

//==============================================================
//  Main Loop
//==============================================================
var actflag = 1;
var measureFlag = 0;
while(actflag){
    if(ready && measureFlag) {
        var date = new Date();
        hts221.measOn();
        results = hts221.checkStatusAndGetResult();
        hts221.measOff();
        if(!results) {
            print('failed measurement');
        } else {
            print(date + ', Temp: ' + results.temp.toFixed(1) + ', Humi: ' + results.humi.toFixed(1));
        }
        measureFlag = 0;
    }
}

//Termination processing
clearInterval(to);
i2c.close();
nqEx.enI2CS(false);
nqEx.enI2CL(false);
throw '#nqEXIT';
Example 2
測定した温湿度データをNEQTO Consoleに送信してみましょう。
//==============================================================
//  Sample scenario
//==============================================================
//  Measure temperature and humidity data using NEQTO library.
//==============================================================
log.setLevel(0,2); //-1:NONE 0:ERROR 1:WARNING 2:DEBUG 3:TRACE, 0:DISABLE 1:LOG 2:CONSOLE 3:BOTH
log.printLevel(2); //0:DISABLE 1:LOG 2:CONSOLE 3:BOTH

if(!('HTS221' in this)) {
    throw new Error('Please add the HTS221_V2 Library to the Script');
}

if(nqEx.getBoardType()) { //using IO board or Digital IO board
    nqEx.enI2CS(true); //Required to use the I2C Short port
    nqEx.enI2CL(true); //Required to use the I2C Long port
}

var i2c = new I2C(1)

i2c.open(400000);
var hts221 = new HTS221(i2c);
var ready = hts221.init();
if(!ready) {
    print('Unable to connect to HTS221');
    i2c.close();
}

//neqto MQTT event handler
nqMqtt.on('push', function(message) {
    print(Date() + ': nqmqtt push ' + message);
    if(message == 'exit') {
        actflag = 0;
    }
});
nqMqtt.on('error', function(error) {
    print(Date() + ': nqmqtt error ' + error.code);
});
nqMqtt.on('connect', function(connack) {
    print(Date() + ': nqmqtt connect');
});
nqMqtt.on('close', function() {
    print(Date() + ': nqmqtt close');
});

var timerInterval = 3000; //ms
var numOfTimes = 10;

var to = setInterval(function() { measureFlag = 1; }, timerInterval);

//==============================================================
//  Main Loop
//==============================================================
var actflag = 1;
var measureFlag = 0;
while(actflag){
    if(ready && numOfTimes && measureFlag) {
        var date = new Date();
        hts221.measOn();
        results = hts221.checkStatusAndGetResult();
        hts221.measOff();
        if(!results) {
            print('failed measurement');
        } else {
            print(date + ', Temp: ' + results.temp.toFixed(1) + ', Humi: ' + results.humi.toFixed(1));
            if(nqMqtt.canPublish()) {
                var tempobj = nqMqtt.get('LwM2MObject', date.getTime(), 3303, 0, 5700, 'Float', results.temp.toString());
                var humiobj = nqMqtt.get('LwM2MObject', date.getTime(), 3304, 0, 5700, 'Float', results.humi.toString());
                var mqttdata = [tempobj, humiobj];
                nqMqtt.publish(null, mqttdata, function(err) {
                    if(err.code == 0) {
                        print('publish successful');
                    } else {
                        print('publish failure');
                    }
                    numOfTimes--;
                    if(!numOfTimes) {
                        print('finished');
                    }
                });
            } else {
                print('publish was skipped');
            }
        }
        measureFlag = 0;
    }
}

//Termination processing
clearInterval(to);
i2c.close();
nqEx.enI2CS(false);
nqEx.enI2CL(false);
throw '#nqEXIT';
データの送信先として、以下のコンポーネント設定を使用します。
| 名前 | オブジェクト | リソース | インスタンス |
|---|---|---|---|
Temperature Measurements | 温度 | センサ値 | 0 |
Humidity Measurements | 湿度 | センサ値 | 0 |
Example 3
I2Cインタフェースを直接制御して、センサにアクセスしてみましょう。
//==============================================================
//  Sample scenario
//==============================================================
//  Directly control the I2C interface to access the sensor.
//==============================================================
log.setLevel(0,2); //-1:NONE 0:ERROR 1:WARNING 2:DEBUG 3:TRACE, 0:DISABLE 1:LOG 2:CONSOLE 3:BOTH
log.printLevel(2); //0:DISABLE 1:LOG 2:CONSOLE 3:BOTH

if(nqEx.getBoardType()) { //using IO board or Digital IO board
    nqEx.enI2CS(true); //Required to use the I2C Short port
    nqEx.enI2CL(true); //Required to use the I2C Long port
}

var i2c = new I2C(1);

i2c.open(400000);

var SLAVE_ADDR = 0x5F;   //HTS221 slave address
var REG_WHO_AM_I = 0x0F; //HTS221 device ID register address

var wrBuf = new ArrayBuffer(1);
var wrAry = new Uint8Array(wrBuf);
wrAry[0] = REG_WHO_AM_I;

print('Send : 0x' + ('0' + wrAry[0].toString(16).toUpperCase()).slice(-2));

if(i2c.write(SLAVE_ADDR, wrBuf)) {
    var rdBuf = i2c.read(SLAVE_ADDR, 1);
    if(rdBuf.byteLength > 0) {
        var rdAry = new Uint8Array(rdBuf);
        print('Device ID : 0x' + ('0' + rdAry[0].toString(16).toUpperCase()).slice(-2));
    }
}

i2c.close();
nqEx.enI2CS(false);
nqEx.enI2CL(false);